You've got your hands on premium genetics from our collection of new releases, which means you're holding pure potential. But that potential is only realized with a perfect start. Germination is that critical first step—the foundation for a healthy, resilient plant and a heavy harvest. This guide is your roadmap. We'll show you exactly how to germinate autoflower seeds the right way, from preparing your space to nurturing your first sprouts. Let's give your investment the strong beginning it deserves.
Key Takeaways
- Mimic Spring Conditions for Success: Your seeds are programmed to sprout when they sense ideal conditions. Replicate this by providing consistent warmth (68-77°F), total darkness, and high humidity until the first taproot appears.
- A Gentle Touch is Non-Negotiable: Seedlings are extremely fragile in their first few weeks. Avoid the common mistakes of overwatering, rough handling during transplants, and providing light that is too intense.
- Quality Genetics are Your Foundation: The potential of your harvest is locked inside the seed from day one. Starting with fresh, viable seeds from a trusted source is the single best way to ensure a successful germination and a healthy plant.
What Makes Autoflower Seeds Special?
If you're looking for a straightforward path to a quick harvest, autoflower seeds are your answer. Unlike traditional cannabis plants, known as photoperiods, which need a specific light schedule to start producing buds, autoflowers do it all on their own. They automatically switch from the vegetative (leafy growth) stage to the flowering stage based on their age, not how much light they get. This makes them incredibly low-maintenance and a fantastic choice for both new growers and seasoned cultivators who want a fast turnaround.
This unique trait means you don't have to worry about changing your light timers or stressing about light leaks that could ruin a photoperiod crop. The plant has its own internal clock that tells it when it's time to flower, typically just a few weeks after sprouting. Because of this, many growers can achieve multiple harvests in a single outdoor season or run a perpetual harvest indoors with ease. If you want a plant that works on your schedule, exploring a collection of autoflower seeds is the perfect place to start. They simplify the growing process without sacrificing the quality of your final product, offering impressive yields and potency in a compact, easy-to-manage package.
How Are Autoflowers Different from Other Seeds?
So, what’s the secret behind this self-starting ability? It all comes down to genetics. Autoflowers get their unique flowering trait from a wild cannabis subspecies called Cannabis ruderalis. Native to the harsh, cold climates of Central Asia and Eastern Europe, ruderalis adapted to survive short growing seasons by flowering quickly based on age. Plant breeders skillfully crossed these hardy ruderalis plants with popular indica and sativa strains. The result is a hybrid that maintains the desirable aromas, flavors, and effects of classic strains while inheriting the automatic flowering gene. This genetic foundation is what makes autoflowers so resilient and fast.
Autoflower Growth by the Numbers
Let's break down the numbers to see what you can expect. The journey from seed to harvest for an autoflower is impressively quick, typically taking just 8 to 15 weeks. It all begins with germination, a process that can take up to 10 days, so a little patience is key. To give your seeds the best start, you'll want to maintain a warm environment, keeping the temperature between 70-79°F (21-26°C). When you're ready to plant, place the seed less than an inch deep—about 1-2 cm is perfect. With the right care, you can realistically expect a yield of about 1 to 4 ounces of dried flower per plant. These figures show just how efficient and rewarding growing autoflower varieties can be.
The Top Reasons to Grow Autoflowers
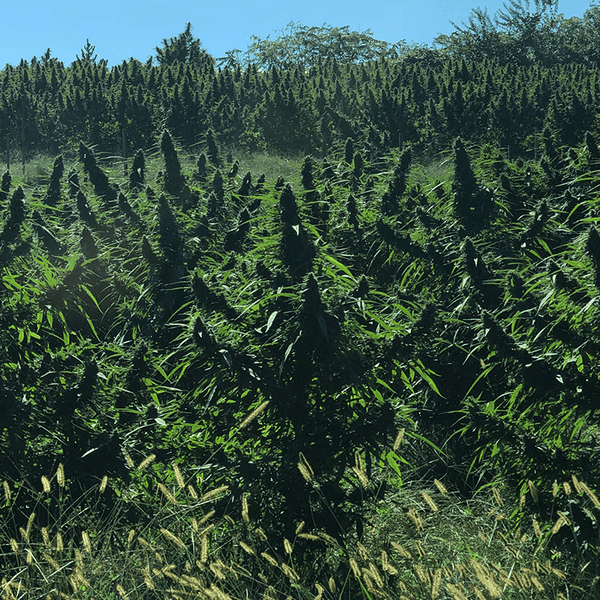
The main reasons growers love autoflowers are speed and simplicity. Their life cycle is significantly shorter, with many strains going from seed to harvest in as little as 8 to 10 weeks. This rapid growth is ideal if you're eager to see results quickly. Their compact size also makes them perfect for growers with limited space, whether you're using a small indoor tent, a balcony, or a discreet corner of your garden. Because they are so resilient and don't depend on light cycles, they are very forgiving for beginners. This combination of speed, size, and ease of care makes them a versatile choice for almost any outdoor marijuana seeds project.
Potential Downsides of Autoflowers
While autoflowers offer incredible benefits, it's good to know their limitations so you can decide if they're the right fit for your goals. Their biggest strength—speed—is also a potential challenge. Because they operate on a fixed schedule, there's very little time to correct mistakes. Any stress during the early weeks, like overwatering or a rough transplant, can permanently impact your final harvest since the plant won't have time to recover. This compact size also means they generally produce a smaller yield than a large photoperiod plant. Additionally, you can't take clones from autoflowers, so you'll need to start from seed for every new plant. For growers who prioritize massive yields or want to preserve specific genetics through cloning, traditional feminized seeds might be a better option.
How to Pick Your Perfect Autoflower Strain
Your harvest will only ever be as good as the seeds you start with, so choosing wisely is key. The best results always come from fresh, high-quality seeds from a trusted source. Older or poorly stored seeds can have lower germination rates, meaning they might not sprout at all. When you get your seeds, look for ones that are dark brown or gray, feel hard to the touch, and don't have any cracks. A healthy seed is your first step toward a healthy plant. To ensure you're getting the best genetics, it's always a good idea to shop all seeds from a reputable seed bank that stands behind their products.
How to Create the Perfect Germination Environment
Before you get a single seed wet, let's talk about setting the stage. Creating the right environment is the most important thing you can do to encourage your seeds to sprout. Think of it as building a cozy nursery. You’re trying to replicate the perfect conditions of a gentle spring day, which signals to the seed that it’s safe to wake up and start its journey. A little attention to detail here goes a long way and can be the difference between a successful start and a frustrating one.
Getting the temperature, moisture, and light conditions just right from the beginning helps your seeds develop a strong taproot—the foundation for a healthy, thriving plant. This isn’t about complicated science; it’s about giving your seeds the simple comforts they need to feel secure enough to grow. Taking the time to prepare this ideal space is a simple step that pays off with strong, vigorous seedlings ready to take on the world.
Finding the Sweet Spot for Temp and Humidity
Your seeds are looking for that sweet spot that feels just like spring. Aim to keep the temperature consistently between 68-77°F (20-25°C). If your room tends to be on the cooler side, a seedling heat mat is an excellent tool for maintaining this ideal warmth. For humidity, you’ll want to keep it high, right around 70%. This moisture in the air is crucial because it prevents the delicate seed from drying out as it cracks open. You can easily create this humid microclimate by placing a plastic dome or even a simple plastic bag over your germination setup.
Light, Darkness, and Airflow
Just like in nature, your seeds need to think they're buried safely underground before they'll sprout. This means complete darkness is a must. Any light can confuse the seed, making it think it has reached the surface and causing it to start growing leaves before its root system is ready. Keep your germination setup in a dark, quiet place like a closet or a cabinet. Once your seedling pops up, it’s ready for some gentle light. You don't need anything intense; a simple, low-wattage LED is perfect for this stage, especially for an indoor cannabis seeds setup. Finally, make sure there’s a bit of fresh air. Don't seal your container completely, as a little airflow prevents mold and gives your new seedling room to breathe.
The Importance of Water pH
Water is what brings your seed to life, but its quality matters more than you might think. The pH level of your water plays a huge role in getting a successful start. For the best results, use clean water with a neutral pH, somewhere between 5.5 and 7.0. If the water is too acidic or alkaline, it can block the brand-new taproot from absorbing the nutrients it needs to grow strong. You can check your water's pH with a simple test kit from any garden supply store. Using filtered or distilled water is an easy way to give your plants a clean, neutral start, which is especially important when you're working with premium genetics like our popular THCA seeds.
Getting the Lighting Just Right
This might seem a bit backward, but your seeds need complete darkness to germinate properly. In nature, they start their life buried underground, far from the sun's rays. Exposing a germinating seed to light can actually stress it out and interfere with the initial growth of its taproot. So, find a warm, dark, and safe spot for your setup, like inside a kitchen cabinet or a drawer. Once your seedling has sprouted and you see its first little leaves (called cotyledons), then it’s time to introduce it to a gentle light source. Until then, darkness is your friend.
What's the Best Medium for Germination?
When your sprout is ready for a home, the right growing medium is essential. You need something light and airy that the delicate new roots can easily push through. A specialized seed-starting mix is a fantastic choice because it’s designed for this exact purpose. You’ll want to avoid heavy, dense garden soil, which can become compacted and waterlogged, potentially suffocating or rotting your seed. A quality medium provides the perfect balance of moisture, air, and support for your new plant, whether you're growing indoor cannabis seeds or preparing for an outdoor garden.
A Beginner-Friendly Coco Coir Mix
For a nearly foolproof option, I highly recommend a mix based on coco coir. It’s incredibly forgiving for beginners because it strikes the perfect balance between holding moisture and providing excellent aeration for the roots. This quality helps you avoid the number one mistake new growers make: overwatering. The light, fluffy texture of coco coir allows the brand-new taproot to grow without resistance, giving your seedling a strong and healthy start. Plus, it has a great ability to hold onto nutrients, making them readily available as your plant begins to grow. Using a coco mix is a simple way to ensure your high-quality feminized seeds have the ideal environment to thrive right from the beginning.
Your Germination Checklist: What You'll Need
Getting all your supplies ready before you start makes the whole process feel calm and controlled. One of the most popular and reliable techniques is the paper towel method, and it requires just a few simple items you probably already have. You’ll need your autoflower seeds, a couple of paper towels, two plates, and some purified or distilled water. That’s it! Having everything within arm’s reach means you can work efficiently without scrambling for supplies mid-process. This simple preparation sets you up for a smooth and successful germination from the very beginning.
4 Proven Methods to Germinate Autoflower Seeds
Once your environment is ready, it’s time to pick a germination method. You’ll find that growers often have strong opinions about which technique is best, but the truth is, several methods work well. The right choice for you depends on your experience, your setup, and your personal preference. Some methods give you a clear view of the process, while others are more hands-off. We’ll walk through the most common and effective options so you can decide which one fits your style.
The most popular techniques include the classic paper towel method, planting directly into soil, soaking seeds in water, and using starter plugs. Each has its own set of pros and cons. For example, planting directly in soil is often recommended for autoflowers because it eliminates the risk of transplant shock. On the other hand, the paper towel method lets you easily monitor for the first sign of a taproot. Don’t be afraid to experiment with a few different autoflower seeds to see what gives you the best results.
Method 1: The Classic Paper Towel Trick
This is one of the most widely used methods for a reason: it’s simple and effective. The paper towel method allows you to see exactly when your seeds have sprouted, taking the guesswork out of the process. All you need are a couple of paper towels, two plates, and your seeds.
To start, moisten a paper towel so it’s damp but not soaking wet. Place your seeds on the towel, leaving about an inch of space between each one. Cover them with another damp paper towel, then place the entire setup between two plates to create a dark, humid dome. Store it in a warm, dark place, like the top of your refrigerator or in a cupboard. Check on them daily, and you should see a taproot emerge in a few days.
Pro Tip: What to Do if You See Mold
Don't panic if you spot a bit of white fuzz on your paper towels. Mold usually shows up when there's too much moisture and not enough fresh air, but it's often fixable if you catch it early. The key is to act quickly. Carefully move your seeds to a clean surface, throw out the moldy towels, and thoroughly wash and dry the plates. Then, simply restart the process with fresh, lightly dampened paper towels. Make sure they’re moist but not dripping wet, as soggy conditions are what invite mold in the first place. This quick reset can get your germination back on track without harming the seeds.
Method 2: Planting Straight into Soil
Many experienced growers argue that planting directly into the final container is the best way to germinate autoflowers. This approach completely avoids the need for transplanting, which can stress the plant and slow its growth. Since autoflowers have a limited vegetative period, minimizing stress is key to getting a great harvest.
To use this method, simply fill your pot with your chosen growing medium and poke a small hole about a half-inch deep. Gently place the seed in the hole and lightly cover it with soil. Be careful not to pack the soil down too tightly. Water the spot gently and keep the soil moist but not waterlogged. This hands-off technique mimics how seeds grow in nature and sets your plant up for an undisturbed life cycle.
Creating a Mini Greenhouse with Plastic Wrap
To give your directly-sown seed the best chance, you can create a simple humidity dome right on top of your pot. This traps moisture and warmth, creating a perfect microclimate that tells the seed it's safe to grow. Simply stretch a piece of plastic wrap over the top of your pot and secure it with a rubber band or the pot's rim. Poke a few small holes in the plastic to allow for some air exchange. This little greenhouse will help maintain the high humidity levels that are so important for germination, preventing the soil and the seed from drying out. Just remember to remove the plastic wrap as soon as you see the seedling break through the soil to give it fresh air.
Method 3: The Simple Water Soak
Soaking your seeds in a glass of water for 12 to 24 hours can help kickstart the germination process. This technique softens the seed’s hard outer shell, making it easier for the taproot to break through. It’s a great first step, especially if you’re working with older seeds that might need a little extra encouragement.
Just fill a glass with room-temperature, dechlorinated water and drop your seeds in. Let them soak in a dark, warm place. Most viable seeds will sink to the bottom after a few hours. After 24 hours at most, you can transfer them to a paper towel or plant them directly in soil. Be careful not to leave them in the water for too long, as this can deprive them of oxygen and drown them.
The "Shot Glass" Soaking Technique
One of the simplest and most effective ways to kickstart germination is the "Shot Glass" soaking technique. Think of this as a gentle wake-up call for your seeds. Soaking them in water for 12 to 24 hours helps soften their tough outer shell, making it much easier for the first tiny taproot to emerge. To get started, just fill a shot glass or another small container with room-temperature, dechlorinated water. Gently drop your seeds in and place the glass in a warm, dark spot, like a kitchen cabinet. You’ll likely notice that most of the viable seeds sink to the bottom after a few hours, which is a great sign that they are absorbing water and preparing to sprout.
The most important part of this method is timing. While the soak is incredibly helpful, you want to be careful not to leave the seeds in the water for too long—aim for no more than 24 hours. After that point, they can run out of oxygen and essentially drown before they even have a chance to sprout. A simple trick is to set a timer on your phone right after you drop them in so you don't forget. This step not only prepares your seeds for the next stage but also gives you an early confidence check; seeing them sink is a great indicator that you're working with healthy, viable genetics, setting you up for a successful growing experience from the very beginning.
Method 4: Using Starter Plugs or Cubes
Starter plugs or cubes offer a fantastic middle ground between the paper towel and direct-to-soil methods. Made from materials like peat, coco coir, or Rockwool, these plugs provide a stable and controlled environment for your seeds to sprout. They hold the perfect amount of moisture and give the new taproot a secure medium to grow into.
Simply soak the plug in water, let any excess drain out, and place your seed inside the pre-made hole. You can then put the plug in a humidity dome to maintain ideal conditions. Once the seedling has developed a few leaves and its roots start to poke through the bottom of the plug, you can transplant the entire thing directly into its final pot. This minimizes transplant shock while still letting you monitor early growth.
Which Germination Method Should You Choose?
So, what’s the final verdict? The truth is, there isn’t one single method that’s guaranteed to be the best. Success often comes down to the grower’s attention to detail and the quality of the seeds themselves. Many cultivators develop a preference over time based on what has consistently worked for them and their specific setup.
If you’re just starting, the paper towel method is a great way to learn because you can see the results clearly. If you want to minimize stress on your autoflowers, planting directly in soil is an excellent choice. The most important thing is to start with premium cannabis genetics, maintain a clean workspace, and keep the environment stable. Feel free to try different methods to discover your personal favorite.
How to Germinate Your Seeds, Step by Step
With your environment ready, it’s time for the main event: waking up your seeds. This part of the process is all about patience and gentle handling. Think of it as the first step in a partnership with your plant. By giving your seeds the right start, you’re setting the stage for a healthy, vigorous grow cycle. Follow these steps carefully, and you’ll see those first signs of life in no time.
Step 1: Prepping Your Seeds for Success
Before you begin, you need to decide which germination method you’ll use. You can pre-soak your seeds in a glass of water for 12-24 hours, use the popular paper towel method, or plant them directly into your growing medium. The paper towel method is a favorite because it’s simple and lets you see exactly when the taproot emerges. No matter which path you choose, starting with high-quality Autoflower Seeds is the most important first step. Maintain a consistent temperature between 68-77°F (20-25°C) and keep the humidity around 70% to encourage your seeds to sprout.
How to Help Older Seeds Sprout
If you have some older seeds you’re hoping to use, don’t count them out just yet. They often need a bit more persuasion to wake up. A simple pre-soak is a great way to start. Let them sit in a glass of room-temperature water for 12 to 24 hours to soften their tough outer shell. For an extra nudge, you can add a few drops of hydrogen peroxide (about 2-3ml per glass) to the water. This helps oxygenate the environment and can assist in breaking down the seed coat. Just be careful not to over-soak them, as they can drown if left for too long. After their bath, move them to a damp paper towel to finish the job. While these techniques can be very effective, remember that starting with fresh, high-quality cannabis seeds is always the most reliable path to successful germination.
Step 2: Your Germination Timeline (Day by Day)
Patience is a virtue, especially when you’re waiting for seeds to pop. Autoflower seeds typically take anywhere from two to seven days to germinate. This window can vary based on a few factors, like the age of the seeds, the specific strain, and how consistent your environmental conditions are. Fresher seeds, like those in our New Releases, often germinate on the quicker side of that range. Don’t panic if you don’t see a taproot after 48 hours. Just keep the environment stable and give them a little more time to work their magic.
Planting Your Sprouted Seed Correctly
Once you see that little white taproot, it’s time to move your seed to its new home. This is a delicate operation, so handle it with care—the taproot is extremely fragile. Using a pair of clean tweezers, gently pick up the sprouted seed and place it into a small hole in your growing medium, about a half-inch deep. Make sure the taproot is pointing downwards. Lightly cover the seed with your soil or coco coir, but don’t pack it down. The new seedling needs to be able to push its way to the surface easily. Give the spot a gentle watering, just enough to moisten the area around the seed without drowning it. This careful approach gives your plant the best possible start, whether you're cultivating outdoor marijuana seeds or setting up an indoor garden.
How Long Until the Seedling Emerges?
After you’ve planted your sprouted seed, the waiting game begins again, but this time it’s much shorter. You can expect to see a tiny seedling break through the surface of the soil within a few days to a week. Just like with germination, this timeline can be influenced by the environment and the specific strain you’re growing. Keep the soil consistently moist—but not waterlogged—and maintain that warm, spring-like temperature. Fresher seeds, like the ones in our New Releases collection, often emerge on the quicker side of that range. If you don’t see any action after a week, don’t give up hope just yet. Some seeds are just a little slower to get going. As long as you provide a stable environment, your new plant should make its appearance soon.
Step 3: Keeping a Close Eye on Your Sprouts
Once you’ve started the germination process, check on your seeds every day. If you’re using the paper towel method, gently lift the corner to see if a taproot has appeared and to make sure the towel is still damp, but not soaking wet. If you planted directly in soil, check that the surface is moist. The goal is to be observant without being disruptive. Over-handling can damage the delicate taproot before it even has a chance to grow, so resist the urge to poke or move the seeds around. A quick daily check-in is all you need.
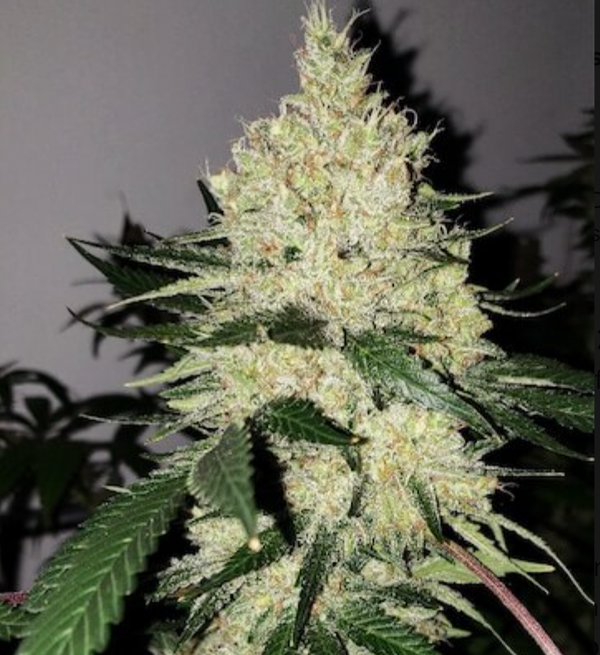
What Does a Healthy Sprout Look Like?
You’ll know germination was a success when you see a tiny, white taproot emerge from the seed. This is the plant’s first root, and it’s your cue to move to the next step. Once this little root is about a quarter-inch long, it’s ready to be planted (if it isn’t in soil already). Carefully place it about a half-inch deep in your growing medium with the taproot pointing down. Soon, you’ll see a sprout push its way up through the surface, sometimes wearing the seed shell like a little helmet. This is a healthy, happy seedling, ready to begin its life.
Understanding Your Seedling's First Parts
Once your sprout breaks the surface, you’ll notice a few key parts. The first thing you saw during germination was the taproot, that single white root that emerged from the seed. This is the plant's anchor and primary source for water and nutrients. Above ground, the first leaves you’ll see are a pair of small, oval-shaped leaves called cotyledons. These aren't "true" cannabis leaves; think of them as baby leaves packed with all the food the seedling needs to get started. They provide the initial energy until the first set of true, serrated leaves appear. This early seedling care is critical, as the plant is building the foundation for all future growth.
Seeds Not Sprouting? How to Troubleshoot
Even with the best intentions, sometimes seeds just don’t want to sprout. Don’t worry—it happens to every grower at some point. Most germination issues come down to a few common culprits that are usually easy to fix. Before you give up on a batch, let’s walk through some simple troubleshooting steps to see if we can get those seeds to pop. Often, a small adjustment is all it takes to get back on track.
Is Your Environment the Problem? Here's How to Fix It
Your seeds are a bit like Goldilocks: they need conditions to be just right. The most common reason for germination failure is an environment that’s too hot, too cold, too wet, or too dry. Aim for a consistent temperature between 68-77°F (20-25°C) and a humidity level around 70%. A warm, dark place like a cupboard or a drawer is perfect. If your space is a little chilly, a simple heat mat placed under your germination tray can make a world of difference. Using a humidity dome can also help maintain that perfect moisture level, creating a cozy little greenhouse for your seeds to start their journey.
What to Do About Low-Quality Seeds
The success of your grow starts with the quality of your genetics. If you’re working with old seeds or seeds from an unknown source, you might face lower germination rates. Fresh, high-quality seeds have much higher viability, meaning they are more likely to be alive and ready to sprout. That’s why it’s so important to buy your seeds from a reputable supplier. When you start with premium genetics, you give yourself a huge head start and avoid the frustration of seeds that fail to perform. Think of it as the foundation for your entire harvest.
How to Spot a High-Quality Seed
You can tell a lot about a seed just by looking at it. A healthy, viable seed will typically be dark brown, gray, or even have tiger-stripe patterns. It should feel firm and hard when you gently squeeze it between your fingers. Avoid seeds that are pale green or white, as these are likely immature and won't sprout. Also, steer clear of any seeds that feel soft or have visible cracks in their shells, as this damage can prevent them from germinating successfully. Ultimately, the most reliable way to get your hands on great genetics is to source them from a trusted seed bank that guarantees freshness and viability. When you start with healthy autoflower seeds, you're setting yourself up for a much smoother and more rewarding growing experience from day one.
Common Mistakes in Seed Storage and Handling
How you store and handle your seeds matters. If they aren’t stored properly in a cool, dark, and dry place, their outer shells can harden, making it difficult for water to get inside and kickstart the germination process. If you suspect you have older seeds with tough shells, you can try a technique called scarification. Gently scuffing one side with a piece of fine-grit sandpaper or carefully nicking the edge with a nail file can help. This small opening allows water to penetrate the seed coat. Just be extremely careful not to damage the delicate embryo inside.
Tips for Long-Term Seed Storage
To keep your seeds viable for as long as possible, you need to create an environment that puts them into a deep sleep. The golden rule is to keep them cool, dark, and dry. Think of your refrigerator—not the freezer—as the perfect spot. Place your seeds in an airtight container, like a small glass jar or a sealed bag, and toss in a desiccant packet (the kind you find in shoe boxes) to absorb any moisture. This setup protects them from humidity, which can cause mold, and the cold temperature slows down their metabolic rate, preserving their energy. Proper storage ensures that when you're ready to plant your next batch of cannabis seeds, they’ll have the same vitality as the day you got them.
A Quick Checklist for Germination Issues
Sometimes the problem is a simple mistake in your process. Overwatering is a classic error; seeds can easily rot if they’re sitting in saturated soil. To avoid this, use a spray bottle to keep your growing medium consistently moist but never soaking wet. Another common issue is planting depth. A seed planted too deep will exhaust its energy reserves before it can reach the surface. A good rule of thumb is to plant your autoflower seeds no more than a half-inch deep. Check your medium daily and make small adjustments to keep your seeds happy.
Your Seedlings Have Sprouted! Now What?
Congratulations, your seeds have sprouted! This is an exciting moment, but the work isn't over. The seedling stage is one of the most delicate phases in a cannabis plant's life. How you care for your tiny plants now will directly impact their health and future yields. Your main job is to provide a stable, gentle environment where they can establish strong roots and healthy first leaves. Think of it as a nursery—your goal is to protect these little ones from stress while giving them everything they need to thrive.
Caring for Your Seedlings in the First Week
Once you see a sprout, the clock starts. The first week is all about observation and maintaining stability. Your seedling will emerge from the growing medium, shed its seed casing, and open its first set of small, rounded leaves. These are called cotyledons, and they act as the plant's initial food source. Soon after, the first set of "true" leaves will appear—these will have the classic serrated cannabis leaf shape. During this time, your seedling is focused on developing its taproot, which will anchor the plant and absorb water and nutrients for the rest of its life.
Watering Your New Seedlings (Without Drowning Them)
One of the most common mistakes new growers make is overwatering. Seedlings have tiny, fragile root systems that can easily drown or develop rot in waterlogged soil. At the same time, you can't let them dry out. The key is to keep the growing medium consistently moist, but never soaking wet. The best tool for the job is a simple spray bottle. Gently mist the surface of the soil around the base of the seedling whenever it starts to feel dry to the touch. Using a humidity dome or a piece of plastic wrap over the container can also help maintain moisture levels without oversaturating the soil.
How Much Light Do Your Seedlings Really Need?
As soon as your seedling breaks the surface, it needs light to begin photosynthesis. But just like their roots, young leaves are very delicate and can be easily burned by intense light. You don't need a high-powered lamp at this stage. A low-wattage fluorescent (CFL) or a small LED grow light will work perfectly. Position the light a safe distance from the top of the seedling—check the manufacturer's recommendation, but 12-24 inches is a common starting point. Most growers provide their autoflower seeds with a light cycle of 18 hours on and 6 hours off to encourage vigorous growth.
When Is It Time to Start Feeding Your Seedlings?
Your seedling doesn't need extra food right away. The cotyledons—those first round leaves—contain all the energy the plant needs to get started. You should wait to introduce any nutrients until you see the first or second set of true, serrated leaves develop. When you do start feeding, begin with a very weak solution, typically at one-quarter of the recommended strength. This prevents "nutrient burn," which can damage or even kill a young plant. The type of growing medium you use also matters; a nutrient-rich soil will feed your plant for longer than an inert medium like coco coir.
An Introduction to Training Your Autoflower
Once your seedling is established and has a few sets of true leaves, you can start thinking about training. Plant training is simply a way to guide your plant’s growth to get the most out of it. Left to its own devices, a cannabis plant typically grows like a Christmas tree, with one large main stalk, or cola, that gets most of the light and energy. Training techniques help break this pattern, encouraging the plant to grow wider and more like a bush. This creates a flat, even canopy where all the branches and potential bud sites get an equal share of light. For autoflowers, which have a very short time to grow, choosing the right training method is essential for maximizing your harvest.
Why Low-Stress Training (LST) is Best
Because autoflowers are on a tight schedule, they don't have much time to recover from stress. This is why Low-Stress Training (LST) is the go-to method for them. Unlike high-stress techniques that involve cutting or breaking the plant, LST is all about gently bending and tying down the main stem and side branches. This simple action tricks the plant into distributing growth hormones more evenly, encouraging the lower branches to grow up and become main colas themselves. This gentle approach is perfect for the fast life cycle of autoflower seeds, as it shapes the plant for bigger yields without causing the stress that could slow it down.
A Guide to Safely Transplanting Your Seedlings
Moving your delicate seedlings to a new home is a critical step that can feel a little nerve-wracking. While many growers plant their autoflower seeds directly into their final containers to avoid this process, sometimes starting in a smaller pot is necessary. The key to a successful transplant is a gentle hand and good timing. Done correctly, your seedlings will barely notice the move and will continue to grow into strong, healthy plants. This process sets the stage for vigorous growth, so taking the time to do it right pays off.
Is It Time to Transplant? Look for These Signs
Timing is everything. Move your seedlings too soon, and their root systems won't be developed enough to handle the stress. Wait too long, and they can become root-bound, stunting their growth. A good visual cue is when your seedling has developed a few sets of true leaves and a robust root system that holds the soil together in a neat plug. To prepare, water your seedlings thoroughly the day before you plan to transplant. This ensures the soil is moist but not soggy, which helps the root ball slide out of its container without falling apart. This simple step reduces stress on the plant and makes the entire process much smoother.
Choosing the Right Pot for Your Seedling
Think of your seedling's pot as its first home—it needs to be just right. The size and type of container you choose play a huge role in developing a healthy root system, which is the foundation for a strong plant. For autoflowers, this decision is especially important. Because they have a short, fixed lifespan, any stress—like being in a pot that’s too small or being transplanted clumsily—can impact their final size and yield. While many growers plant their autoflower seeds directly into their final container to avoid transplant shock altogether, starting in a smaller pot and moving up is also a valid strategy if done with care.
Recommended Pot Sizes for Indoor and Outdoor Grows
For an indoor grow, a 3- to 5-gallon pot is generally the sweet spot for a final container. This size gives the roots plenty of room to expand without holding an excessive amount of water that could lead to root rot. While you can technically grow a plant in a much smaller container, you’ll find yourself watering constantly. For outdoor plants that have the potential to grow much larger, you might start in a 2-gallon pot to manage them easily before transplanting into a much larger final home, like a 10-gallon pot or bigger. For most indoor cannabis seeds, especially autoflowers, planting directly into that 3- or 5-gallon pot is the simplest, safest route to a happy plant.
The Benefits of Using Fabric Pots
If you’ve been looking at growing supplies, you’ve probably seen fabric pots. These soft-sided containers are a fantastic alternative to traditional plastic pots for a few key reasons. Their biggest advantage is promoting a healthier root structure through a process called "air pruning." When a root reaches the breathable fabric wall, it’s exposed to air, which naturally stops its growth in that direction. This encourages the plant to send out a whole new web of fibrous feeder roots, creating a dense, efficient root ball instead of a few long roots circling the bottom of a plastic pot. This superior root system leads to better nutrient and water uptake, and ultimately, a more vigorous plant.
How to Transplant Your Seedlings, Step by Step
When it’s time to make the move, gentleness is your best friend. Start by preparing the new pot with your chosen growing medium, making a small hole in the center for the seedling. To remove the seedling from its current container, never pull it by its fragile stem. Instead, gently squeeze the sides of the pot to loosen the soil. Tip it over into your hand, supporting the root ball. If it’s a bit stuck, you can use a pencil or a small tool to carefully pry it out. Place the seedling into the new hole, ensuring it’s at the same depth it was before. Handle it by its leaves if you need to adjust it, as a plant can always grow a new leaf but can’t replace a broken stem.
Avoiding the Dreaded Transplant Shock
Transplant shock is the period of stress a plant experiences after being moved, often showing up as wilting or slowed growth. The best way to handle it is to prevent it from happening in the first place. If you're moving your seedlings from an indoor setup to the great outdoors, you’ll need to "harden them off." This involves gradually introducing them to the new environment over a week or so. Start with a few hours in a shady, protected spot, slowly increasing their exposure to direct sunlight and wind. Preparing the new soil is also vital. Ensuring your outdoor marijuana seeds are moving into a high-quality, well-draining medium gives their roots the best possible start.
What to Do After Transplanting
Once your seedling is settled in its new home, your job isn’t quite done. Gently firm the soil around the base of the plant to eliminate any air pockets and provide stability. Give it a light watering to help the roots make contact with their new soil, but be careful not to overdo it. For the next few days, keep a close eye on your plant. It might look a little sad or droopy at first, which is normal. Keep the soil consistently moist but not waterlogged, and avoid exposing it to intense light or extreme temperatures right away. With a little attentive care, your seedling will perk up and begin its next phase of vigorous growth.
Expert Tips for a Flawless Germination
You’ve got the basics down, but a few extra steps can make a huge difference. These pro tips are my go-to strategies for ensuring nearly every seed pops and grows into a strong, healthy seedling. Think of this as your checklist for giving your plants the absolute best start in life, helping you turn quality genetics into a thriving garden.
Ready to Go Pro? Try These Techniques
For an extra edge, try pre-soaking your seeds in a glass of room-temperature water for 12 to 24 hours before you begin. This simple step helps soften the hard outer shell, signaling to the seed that it’s time to wake up and start growing. You’ll often see higher germination rates and faster sprouting times. After their soak, you can move them to a damp paper towel or plant them directly into your starter medium. This technique works especially well with high-quality Autoflower Seeds, as it gives them a clear path to push out their first taproot and begin their rapid life cycle.
How to Master Your Grow Environment
Seeds are sensitive, and a stable environment is crucial for success. Aim to keep the temperature consistently between 20-25°C (68-77°F) and maintain a humidity level of around 70%. This combination mimics the ideal conditions of a perfect spring day, encouraging your seeds to germinate without stress. You don’t need fancy equipment to achieve this; a simple seedling dome or even a plastic sandwich bag placed over your starter pot can create a mini-greenhouse effect. Consistency is key, so find a warm, stable spot away from drafts or dramatic temperature swings. This is especially important when growing sensitive Indoor Cannabis Seeds that depend on a controlled climate.
Adjusting Humidity for Different Growth Stages
While high humidity is your best friend during germination and the early seedling stage, it becomes a risk as your plants mature. Think of it this way: you start with a high humidity of 60-70% to protect your delicate sprouts. But once your plants begin to develop dense buds during the flowering stage, that same moisture can become a problem. You'll want to gradually lower the humidity down to around 40-50%. This is a critical step because it helps prevent issues like bud rot and powdery mildew, which can ruin a harvest. Properly managing the environment ensures your feminized seeds have the best chance to develop their full potential, from a tiny sprout to a healthy, resinous flower.
Why a Clean Setup Is Your Best Friend
Your biggest enemies during germination are mold and harmful bacteria, so a clean workspace is non-negotiable. Before you handle your seeds, wash your hands thoroughly. If you’re using tools like tweezers, make sure they are sterilized. Always use fresh paper towels or a sterile growing medium to prevent introducing contaminants that can ruin a seed before it even has a chance to sprout. For extra control, a heat mat placed under your germination tray can provide gentle, consistent warmth from below. This not only helps maintain the right temperature but also encourages the taproot to grow downward, seeking warmth and stability from the start.
The Simple Habit of Tracking Your Grow
Watching your seeds sprout is one of the most exciting parts of growing, so pay close attention during this critical stage. Check on your seeds daily, but resist the urge to poke or move them around too much. A great habit to start is keeping a simple grow journal. Note the date you started germination, when you first see the taproot emerge, and when the seedling breaks through the soil. This record-keeping will not only help you troubleshoot any issues but will also make you a better grower over time. As you experiment with New Releases, your notes will become an invaluable guide to understanding what works best for each unique strain.
One Seed, One Pot: Avoiding Competition
Because autoflowers operate on a fixed timeline from seed to harvest, every day counts. This is why many experienced growers recommend planting your sprouted seed directly into its final container. This "one seed, one pot" method completely eliminates the need for transplanting later on. Why is that so important? Transplanting, even when done carefully, can cause stress to the plant's root system. For a photoperiod plant, a few days of recovery is no big deal. But for an autoflower, that recovery time eats into its short vegetative growth phase, which can result in a smaller plant and a reduced final yield. By giving your autoflower seeds a permanent home from day one, you ensure their roots can grow undisturbed, setting them up for the strongest possible start.
A Note on Local Cultivation Laws
Before you start germinating any seeds, it's absolutely essential to understand the laws in your specific area. Cannabis regulations can vary dramatically from one state, county, or even city to the next. Taking the time to do your research is a critical step for any responsible grower. Look into the specific rules that apply to you, such as how many plants you are legally allowed to cultivate at one time, where you are permitted to grow them (indoors vs. outdoors), and any possession limits you need to be aware of. This isn't just about following the rules; it's about ensuring your entire growing experience is positive and stress-free from start to finish.
A great starting point for this research is to check your state government's official website or look for resources from advocacy groups like NORML, which often provide detailed breakdowns of local laws. Understanding these guidelines helps you plan your garden accordingly and protects you from any potential legal issues down the road. Being an informed grower is just as important as being a skilled one. By respecting the regulations in your community, you can focus on what really matters: nurturing your plants and enjoying the rewards of a successful harvest.
From Harvest to Cure: Finishing Your Grow
You’ve successfully navigated germination and the entire growth cycle, and now your plants are heavy with beautiful, aromatic buds. This is the moment you’ve been waiting for, but don’t rush it! The final steps of harvesting, drying, and curing are just as crucial as the growing process itself. This is where you transform your raw plant material into a top-shelf final product. How you handle this finishing stage will have a massive impact on the potency, flavor, aroma, and overall quality of your buds. It’s a process that requires patience and attention to detail, but the incredible results are more than worth the effort.
Think of this phase as the final polish. Harvesting at the perfect moment locks in the peak potency of your cannabinoids and terpenes. A slow, controlled drying process preserves these delicate compounds, preventing the hay-like smell that comes from drying too quickly. Finally, the curing process is where the magic truly happens, allowing the flavors and aromas to fully mature while creating a smooth, enjoyable experience. Whether you've grown hardy industrial hemp seeds or potent THCA strains, mastering these final steps is what separates an average harvest from an exceptional one.
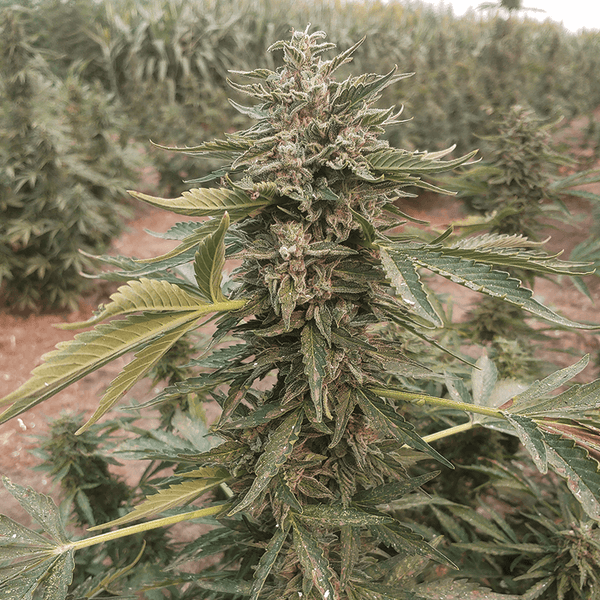
How to Know When It's Time to Harvest
Timing your harvest is more of an art than an exact science, but there are clear signs to look for. The most reliable indicator is the appearance of the trichomes—the tiny, crystal-like glands that cover the buds. To see them clearly, you’ll need a jeweler’s loupe or a small magnifying glass. When the trichomes are mostly cloudy or milky-white, your buds are at their peak THC content, delivering a more energetic effect. If you wait until you see a good number of them turn amber, the effect will generally be more relaxing and sedative. Many growers aim to harvest when the trichomes are about 70% milky and 30% amber, but you can adjust this ratio to achieve your desired effects.
The Drying Process: A Step-by-Step Guide
After you’ve cut down your plants, the next step is to dry them slowly and evenly. The ideal drying environment is a dark room with good air circulation and stable conditions. Aim to keep the temperature around 60-70°F (15-21°C) and the humidity between 45-55%. You can hang entire branches or individual buds on a line or a drying rack. The process typically takes anywhere from 7 to 14 days. You’ll know your buds are ready for the next stage when the smaller stems snap when you bend them, but the larger stems still have a little flexibility. Rushing this step can ruin the flavor, so patience is your best friend here.
Curing Your Buds for Quality and Flavor
Curing is the final and most important step for developing a high-quality product. Once your buds are dry, carefully trim off any excess leaves and place them into airtight glass jars, filling them about three-quarters of the way full. For the first two weeks, you’ll need to "burp" the jars once or twice a day by opening them for 5-10 minutes. This releases moisture and replenishes the oxygen, preventing mold and allowing the flavors to develop. After the first couple of weeks, you can reduce burping to once every few days. A proper cure can take anywhere from two weeks to two months, but this patient process is what creates the smooth, flavorful, and potent buds you’ve been working toward.
Related Articles
- How to Germinate Autoflower Seeds Successfully
- What are Autoflower Seeds?
- Feminized Autoflower Seeds: A Comprehensive Guide
- Autoflower Seeds for Beginners: Grow Fast & Easy
- Autoflower Cannabis Seed 101: Your Complete Guide
Frequently Asked Questions
Which germination method should I choose as a beginner? The paper towel method is a fantastic starting point because it lets you see exactly when the taproot emerges, which removes a lot of the guesswork. Once you see that little white root, you know you're ready for the next step. However, if you want to keep things as simple as possible and avoid any risk of damaging the root during a transfer, planting your seed directly into its final pot is also a great, hands-off option.
My seed sprouted, but the root is pointing up. What should I do? Don't panic, this happens sometimes! The best course of action is to leave it alone. The plant has natural instincts that will cause the root to correct itself and grow downward toward moisture and gravity. Trying to "fix" it yourself with tweezers or your fingers is far more likely to damage the delicate taproot. Just give it a day or two, and you'll likely see it figure things out on its own.
Why is it so important to avoid transplanting autoflowers if possible? Autoflowers operate on a very tight schedule. They have a short, fixed lifespan and will start to flower based on age, not light. Any stress, including the shock from transplanting, can pause their growth for several days. Because their vegetative time is so limited, they don't have time to recover from that pause, which can lead to a smaller plant and a reduced final yield. Planting directly into the final container lets them grow without any interruptions.
How long is too long to wait for a seed to germinate? Most healthy seeds will sprout within two to seven days. If you've passed the one-week mark and still see no signs of life, it's worth double-checking your environment. Make sure the temperature is stable and your medium is moist but not waterlogged. After 10 to 14 days, the chances of a seed sprouting become very low. This is often due to the seed's age or genetics rather than a mistake on your part.
What's the single biggest mistake to avoid when caring for a new seedling? The most common pitfall is overwatering. It’s easy to want to shower your new plant with love, but tiny seedlings have very small, delicate root systems that can easily drown in saturated soil. This can lead to root rot and other issues. Instead of pouring water, use a spray bottle to gently mist the soil around the base of the plant. This keeps the medium perfectly moist without suffocating the roots, giving your seedling the ideal balance it needs to grow strong.