A truly successful cannabis harvest doesn't begin with fancy soil or the most expensive lights—it begins with superior genetics. The potential for incredible potency, flavor, and yield is locked inside the seed itself, making your choice of seeds the single most important decision you'll make as a cultivator. Of course, even the best genetics need the right care to flourish. This guide will show you how to grow weed plant to its absolute full potential, combining premium seeds like our triploid cannabis with the best cultivation practices for an exceptional result you can see, smell, and feel.
As much as we’d love to say that growing cannabis is effortless, that simply wouldn’t be the truth. Instead, understanding the ins and outs of cannabis cultivation can time, as well as some trial and error before it’s done correctly.
Thankfully, there are plenty of ways you can learn how to grow weed easy, and even how to grow weed fast if time’s an issue.
Below, we’ve come up with ten tips and tricks for you to learn how to grow weed easy, fast, and efficiently.
Is It Easy to Grow Weed?
If you know what you’re doing and have had some practice, it can be easy to grow weed. However, for beginners, the plant may pose complexities that growers might not be prepared for.
It isn’t super easy to grow weed, simply because it’s a complex plant. Cannabis cannot grow in every corner of the globe, and it requires specific environments in order for it to thrive.
While it is resilient, cannabis plants demand attention, care, and a deep understanding of its life cycle in order to produce an optimal yield. There are even types of cannabis plants that you may grow that won’t end up being effective at all (like male plants).
Because of these barriers, you do have to take the time to ensure that you have everything you need and more for your setup before you actually start the cultivation process.
But, with the proper guidance, patience, and practice, practically anyone can cultivate a successful cannabis crop — especially when you utilize the tips and tricks we’ve provided below.
Understanding the Legal Landscape of Home Cultivation
Before you even think about picking out your seeds or setting up your grow lights, the very first step is to get familiar with the laws in your area. The legal side of growing cannabis at home can feel a bit tangled, as rules change from one place to another. It’s a patchwork of federal, state, and local regulations that you need to understand to stay on the right side of the law. Taking the time to do this research upfront protects you and your plants, ensuring your cultivation journey is a smooth and stress-free one. Think of it as laying the foundation for a successful harvest; without it, everything else is on shaky ground.
Federal vs. State Laws
One of the most confusing aspects of cannabis law is the difference between federal and state rules. This conflict is at the heart of many legal questions growers have. While many states have created their own laws to legalize cannabis for medical or adult use, the federal government has not. This creates a unique legal situation where an activity might be perfectly legal under your state’s laws but still technically illegal from a federal perspective. For home cultivators, this means you need to be aware of both sets of rules and understand which one applies to your specific situation, especially when it comes to things like federal property or crossing state lines.
The Federal Stance on Cannabis
Let’s be clear: under federal law, cannabis is still classified as an illegal substance. This has some important real-world consequences for everyone, including home growers. Because of its federal status, you cannot possess or use cannabis on any federal lands, which includes national parks, federal courthouses, and other government properties. It also means you can’t carry cannabis across state lines, even if you’re traveling between two states where it’s legal. This is a critical rule to remember, as crossing state borders with cannabis can lead to serious federal charges. Always keep your cultivation and consumption within the boundaries of the state where it’s legally permitted.
Navigating State-Specific Regulations
While the federal government has its stance, your day-to-day ability to grow cannabis at home is governed by your state's laws. This is where things get highly specific. Each state with legal cannabis has its own set of rules for home cultivation. These regulations determine who can grow, how much they can grow, and where they can grow it. But it doesn’t stop at the state level. Many cities and counties add their own local ordinances, which can be even stricter than state law. It is absolutely essential to check the specific regulations for your state, county, and city before you shop for seeds and start planting.
Common Rules for Growing at Home
Once you’ve confirmed that your state and city allow home cultivation, you’ll find there are some common types of rules that pop up almost everywhere. These regulations are designed to keep home growing safe, discreet, and manageable for communities. They typically cover the number of plants you’re allowed to have, where on your property you can grow them, and who has the final say if you’re a renter. Understanding these common rules will give you a good framework for setting up your home grow in a way that is compliant and respectful of your neighbors and community.
Plant Limits and Location Requirements
Most states set a specific limit on the number of plants one person or household can grow. For example, in California, adults 21 and older can grow up to six plants. It’s also common for regulations to specify that plants must be grown in a location that is not visible to the public, like inside your home or in a locked, secure greenhouse. Some local rules may even require you to get a permit for your grow. If your local laws require you to grow inside, you'll want to select strains that thrive in a controlled environment, like our premium indoor cannabis seeds.
Rights of Landlords and Property Owners
This is a big one for renters. Even if you live in a state where home cultivation is legal, your landlord has the right to prohibit it. Property owners can ban the use and cultivation of cannabis on their premises, and this is often written directly into rental agreements. If you’re a tenant, you must check your lease or speak directly with your landlord before you start growing. Violating a no-cannabis clause in your lease could be grounds for eviction. This rule also applies to hotels and vacation rentals, so always be sure you have permission before bringing cannabis onto someone else’s property.
Rules for Transporting Cannabis
Just as there are rules for growing cannabis, there are also rules for transporting it. You can’t just put a plant on your passenger seat and drive around town. States with legal cannabis have put specific regulations in place to ensure that any cannabis being transported in a vehicle is handled safely and responsibly. These laws are similar to open container laws for alcohol and are meant to prevent consumption while driving. Following these simple transportation rules is an easy way to avoid fines or legal trouble while moving your cannabis from one private location to another.
Avoiding Open Container Violations
When you’re driving with cannabis in your car, it’s illegal to have an open container. This means any cannabis product that is in a container that has been opened or has a broken seal must be stored properly. To comply with the law, you should place any cannabis you’re transporting in a sealed package or container. The best practice is to then put that sealed container in the trunk of your car. This ensures it’s out of reach of the driver and passengers, keeping you fully compliant with vehicle transport laws and helping everyone stay safe on the road.
Best Way to Grow Marijuana: Ten Tips and Tricks
So, do you want to know the best way to grow marijuana? The actual methodologies to growing cannabis your ideal way is going to vary based on preferences and circumstances, but we can give you several helpful tips and tricks to help you learn how to grow your own cannabis, as easily and quickly as possible.
Let’s get into these top ten tricks for learning how to grow weed easy.
1: Consider the Right Seeds
Many people take the time to consider what kind of strain they want to produce from their plants; however, not everyone considers what type of seed they want to grow.
If you’re hoping to produce the quickest turnarounds possible, then using autoflowering seeds is going to be the best way to grow marijuana quickly.
Autoflowering cannabis plants automatically transition from the vegetative stage to the flowering stage without the assistance at least eight hours of light exposure. Typical seeds (also known as “photoperiod” cannabis seeds) begin to flower based on the changing of the seasons, making it a lengthy, slightly pain-staking process.
On the flip side, autoflowering seeds may produce a harvest after just 7-10 weeks, allowing you to experience multiple harvests per year.
To boost efficiency even more when growing indoors, you can also opt for feminized weed seeds. Feminized marijuana seeds are seeds that are guaranteed to produce female plants.
Female cannabis plants are the ones that produce the buds people utilize for smoking and other products, while male plants simply don’t. In fact, male plants can actually pollinate female plants, making them less desirable.
Thus, buying feminized marijuana seeds cuts out the middleman of worrying about sex. Instead, you know you’re buying female weed seeds that you can rely on.
2: Pick an Ideal Space
Along with determining your ideal cannabis seeds, it’s best to pick an ideal space for growing cannabis garden before ever getting started.
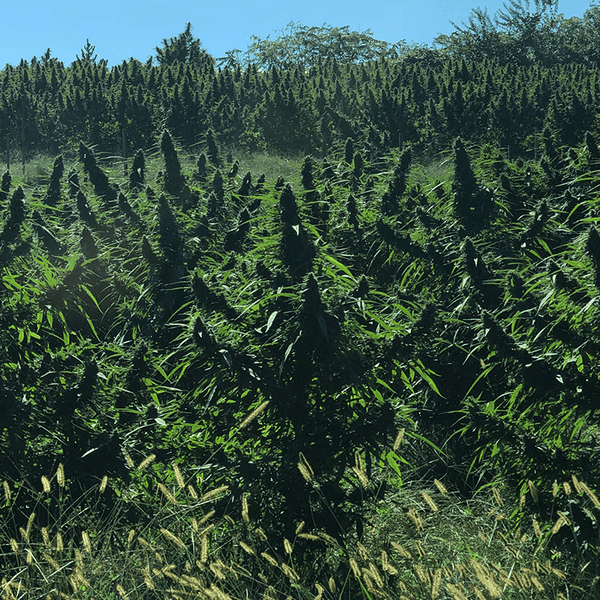
First, you need to determine if you want an indoor or outdoor grow space. If you have plenty of outdoor space, or happen to have a garden or a greenhouse, outdoor setups may be best.
But, if you don’t have a lot of space outdoors, are worried about privacy, or just want a small setup at first, growing your plants inside in places like a closet or spare room will be ideal.
Keep in mind that your marijuana plants are going to need to be in a controlled environment that has plenty of access to light, good air circulation, and security — from both pests and unwanted visitors.
3: Choose the Right Pot Size
The container you choose for your cannabis plant is more than just a bucket of dirt; it’s the foundation for a healthy root system, which directly impacts your plant's overall growth and final yield. When roots don't have enough room, they can become tangled and "root-bound," a condition that chokes the plant and stunts its development. To avoid this, it’s best to start seedlings in small containers and then transplant them to larger pots as they mature. This process gives the roots fresh, nutrient-rich soil and encourages them to spread out. For most mature indoor plants, a final pot size of 3–5 gallons is a solid goal. The ideal size can depend on your specific strain; a compact autoflower may thrive in a 3-gallon pot, while a larger photoperiod plant grown outdoors might need 5 gallons or more to reach its full potential.
3: Rely on Feminized Marijuana Seeds Only
We briefly mentioned this above, but if you’re interested in learning the easiest way to grow marijuana, feminized seeds are key.
Relying on feminized weed seeds means you don’t have to worry about accidentally spending time and money on cultivating male plants.
Instead, you can rest assured that you’re cultivating female plants that produce the quality buds that you and your customers seek the most.
And while they aren’t the standard cannabis seed, feminized marijuana seeds are plenty easy to come by. Trilogene Seeds offers a huge selection of high-quality feminized cannabis seeds you can rely on to promote a better, faster way to grow weed.
A Quick Note on Male Plants
Let's talk about male plants. While they're essential for breeding new strains, they can be a real headache for growers focused on harvesting potent buds. When a male plant releases its pollen, it fertilizes nearby female plants, causing them to shift energy from producing THC-rich flowers to making seeds. This means your harvest will have a lower potency and be full of seeds. This is why starting with feminized seeds is such a smart move. For even more security, especially for outdoor grows where pollen can travel, you can explore innovative options like triploid cannabis. These plants are bred to be virtually sterile, producing seedless flowers even if a rogue male plant is nearby, taking the stress out of preventing pollination.
4. Using High-Quality Soil
Soil quality impacts the healthy growth of your plants significantly. If you take the time to buy quality seeds but don’t give them proper nutrient-rich soil, you’re not going to have much success with your grow.
Instead, you want to make sure you’re utilizing high-quality, nutrient-rich soil that gives your plants the nourishment they need to grow strong and be the healthy plants you deserve.
Good soil will come pre-packed with nutrients your marijuana plant needs; you just have to do some research to better understand which soil mediums are best for these purposes.
Even though it will cost you more money to buy high-quality soil than low-quality, it is going to be more than worth it in the long run when your plants grow up with the nutrients they require.
What is "Living Soil"?
To take your soil quality to the next level, consider using what’s known as “living soil.” Think of it less like plain dirt and more like a bustling underground city. This soil is a complete ecosystem, teeming with beneficial bacteria, fungi, and other microorganisms. These tiny helpers work around the clock, breaking down organic matter into nutrients that your cannabis plants can easily absorb. This symbiotic relationship means the soil essentially feeds the plant, reducing your reliance on bottled chemical nutrients. Creating a living soil environment gives your plants a strong foundation, helping them grow more resilient and produce more flavorful, aromatic buds. It’s a sustainable approach that mimics how plants thrive in nature.
Matching Nutrients to Growth Stages
Cannabis plants have different dietary needs depending on their stage of life, much like people do. During the vegetative stage, when the plant is focused on growing big and leafy, it craves nitrogen. Nitrogen is the key building block for stems and leaves, promoting lush, vigorous growth. Once the plant switches to the flowering stage, its focus shifts to producing buds. At this point, it needs less nitrogen and more phosphorus and potassium. Phosphorus is vital for developing large, dense flowers, while potassium supports overall plant functions and can improve the potency and aroma of your final harvest. Paying attention to this shift and adjusting your feeding schedule accordingly is crucial for getting the best possible yield from your feminized seeds.
Watering Practices and pH Balance
Even with perfect soil and nutrients, your watering habits can make or break your grow. A simple but effective trick is to let your tap water sit out for at least 24 hours before using it. This allows chlorine, which can be harmful to the beneficial microbes in your living soil, to evaporate. Beyond that, you need to pay close attention to the water's pH level. The pH scale determines how acidic or alkaline your water is, and for cannabis in soil, the sweet spot is between 6.0 and 7.0. If the pH is too high or too low, the plant can’t properly absorb the available nutrients—a problem known as “nutrient lockout.” You can easily check and adjust the pH using inexpensive kits found at any garden store, ensuring your plants can drink up all the goodness you provide.
5. Research Proper Lighting
When you're growing weed indoors, giving your plants proper lighting is key to having a successful grow.There are so many different types of lighting you can purchase for your indoor cannabis plants, each one coming with its own set of unique pros and cons.
Make sure to take the time to research all of the main types of cannabis lighting options: high-intensity discharge (HID) lights), light-emitting diode (LED) lights, fluorescent grow lights, ceramic metal halide (CMH), and light-emitting ceramic (LEC) lights.
Once you understand how each type of lighting works, you can better determine which is best for when you're growing weed indoors. Of course, if you’re growing cannabis outdoors, you’re going to rely on the sun, instead.
Light Schedules for Vegetative and Flowering Stages
Once you have your lights, you need to know how to use them. The right light schedule is essential, and it changes depending on your plant's stage of life. During the vegetative stage, your goal is to encourage strong, leafy growth. To do this, you’ll keep the lights on for 18 hours and off for 6 hours each day. This long light cycle gives the plant plenty of energy to develop a robust structure of stems and leaves, which are vital for photosynthesis. Think of this phase as building the foundation for a successful harvest. For optimal growth, maintain a warm environment, ideally around 75-80 degrees Fahrenheit. This combination of extended light and warm temperatures creates the perfect conditions for a healthy, thriving plant.
When your plant has reached a good size and you’re ready to see some buds, it’s time to change the schedule. You’ll switch the lights to an even 12 hours on and 12 hours off. This change mimics the shorter days of autumn, signaling to your photoperiod plants that it’s time to start flowering. It's crucial to keep this schedule consistent, especially the 12 hours of uninterrupted darkness. Any light leaks can confuse your plant and disrupt the process. During this flowering phase, your plants will also prefer slightly cooler temperatures. Following this light and temperature plan is how you guide your indoor cannabis plants from growth to bloom, ensuring you get the results you're working toward.
6. Understand the Plant Growth Cycle
It’s going to be impossible to have a successful yield if you do not have a good understanding of the cannabis plant’s growth cycle.
The cannabis plant’s growth cycle is a unique and complicated one, and it directly affects the way that you take care of your plants.
Knowing the difference between the vegetative stage and the flowering stage, and when your plant is ready for harvest, are all crucial pieces of information when it comes to properly growing weed.
How Long Does It Take to Grow?
Patience is a virtue, especially in cultivation. A typical indoor cannabis grow, from seed to harvest, usually takes about three to four months. This timeline depends heavily on the strain you choose and your specific setup. The vegetative stage can be shortened or lengthened, but the flowering stage is generally a fixed period for photoperiod plants. If you're looking for a quicker turnaround, your best bet is to work with autoflower seeds. These incredible plants don't rely on light cycle changes to start flowering. Instead, they operate on their own internal clock, often ready for harvest in as little as 7 to 10 weeks from germination. This allows for multiple harvests in a single year, making them a fantastic choice for growers who value speed and efficiency.
Setting a Realistic Yield Goal
One of the biggest factors impacting your final yield is plant sex. If you're growing from regular seeds, you'll need to identify and remove male plants as soon as they appear. If a male plant pollinates your females, they will focus their energy on producing seeds instead of the potent, resinous buds you're after. The easiest way to avoid this common pitfall is by starting with high-quality feminized seeds, which guarantee every plant is a female. For even more security, especially in outdoor grows, you could explore innovative options like triploid cannabis, which produces a virtually seedless crop even if pollination occurs. Beyond genetics, your yield will depend on providing the right environment—quality soil, proper lighting, and consistent care—throughout the plant's life.
7. Keep an Eye Out for Pests
Any sort of pest or disease can drastically impact your cannabis yield, and that’s not good for anyone.
To avoid this, it’s important to regularly inspect your marijuana plants for any signs of trouble. This includes yellowing leaves or the presence of bugs.
Yellowing leaves can indicate a few different issues for your plant, including being infected by a fungal disease or by spider mites and aphids.
If you do notice any unwanted pests on your weed plants, it’s important to first identify what kind of pest it is; this way, you can take the proper steps to address it.
Make sure to isolate all of your affected plants and use the appropriate treatments. All is not lost!
Managing Common Pests Like Fungus Gnats
Let's talk about one of the most common uninvited guests in an indoor grow: fungus gnats. If you've noticed tiny, black flies buzzing around your plants, you've likely met them. They're drawn to moist environments, so they often show up when soil stays damp for too long. While the adult gnats are mostly just a nuisance, their larvae, which live in the top layer of soil, can damage your plant's roots. To get them under control, you need a multi-step approach. Start by placing yellow sticky traps around your plants to catch the adults. This helps reduce the population and lets you monitor how bad the infestation is. Also, try not to overwater. Letting the top inch or two of soil dry out between waterings makes the environment much less inviting for them.
Increasing air circulation is another simple but effective trick. A small fan gently blowing over the surface of your soil helps it dry out faster and also makes it difficult for the adult gnats to land and lay their eggs. Remember, a healthy plant is better equipped to handle stress, including pests. Starting with strong, healthy genetics gives your crop a solid foundation from the very beginning. If you spot an issue like fungus gnats, act quickly to isolate the affected plants and apply the right treatment. Staying vigilant and maintaining a clean, well-managed grow space is your best defense against these and other common pests.
8. Maintain Optimal Temperature and Humidity Levels
If you're growing weed indoors, the best way to grow weed fast and efficiently is by maintaining optimal temperatures and humidity levels.
Your cannabis plant needs to be kept in an area that stays at about 70-80°F when you grow weed indoors. However, the specific temperature will depend on what phase your plant is currently in.
This is also the same with humidity: as your plant is beginning to grow, it should be kept at high humidity levels around 70%.
As it ages, though, you will decrease these levels. Do ample research about the strains you have to see if they need any specific humidity percentages.
9. Implement Smart Plant Training
Once your plants are established, you can guide their growth to maximize your final yield. This process is called plant training, and it involves strategically stressing the plant to encourage it to grow wider and produce more bud sites. Think of it as directing your plant’s energy exactly where you want it to go. Training techniques are especially useful for indoor grows where space and light are limited. By manipulating the plant's shape, you can create an even canopy that makes the most of your light source, ensuring all parts of the plant receive the energy they need to produce dense, high-quality buds. It’s a proactive step that can make a huge difference in your harvest’s size and quality.
Techniques like Lollipopping and Defoliation
Two popular and effective training techniques are lollipopping and defoliation. Lollipopping is the process of removing the lower branches and growth on your plant that don’t receive much light. By trimming this less productive foliage, you redirect the plant's energy to the top colas, which are the main flower clusters that get the most light. This results in larger, denser buds where it counts most. Defoliation involves selectively removing some of the large fan leaves to improve light penetration and airflow to the lower parts of the plant. A good guideline is to remove about 30% of the leaves that are blocking light from reaching the bud sites below, but be careful not to overdo it.
10. Plan for Odor Control
One aspect of growing that often catches beginners by surprise is the smell. Cannabis plants produce powerful and distinct aromas from their terpenes, especially during the flowering stage. While you might enjoy the scent, it can travel surprisingly far and may not be appreciated by neighbors. Planning for odor control from the start is not just about being considerate; it’s also a matter of security and, in many cases, legality. A good odor control system keeps your grow discreet and ensures you stay on the right side of any local regulations, protecting your investment and your peace of mind. It's a crucial part of any responsible cultivation setup.
Why Odor is a Concern
The strong smells from a cannabis grow, often described as skunky or floral, come from the plant's natural oils, or terpenes. These odors are at their most potent when the plants are budding and can be detected from a significant distance. This can attract unwanted attention to your grow space. Furthermore, many municipalities have strict rules about cannabis cultivation, sometimes requiring that no odor is detectable outside the property. Failing to control the smell can lead to serious consequences, including fines, loss of your cultivation license, or even having your entire operation shut down. Understanding and respecting these rules is essential for a successful and stress-free grow.
Safe vs. Unsafe Odor Control Methods
When it comes to managing odor, not all methods are created equal. A carbon filter is the most common and recommended solution. It works by pulling air from your grow tent through activated carbon, which absorbs the odor molecules before venting the air out. While effective, remember that filters have a limited lifespan and need to be replaced. However, there are a few methods you should absolutely avoid. Do not use air fresheners or scented sprays. The chemicals in these products can stick to your plants and permanently alter the taste and smell of your final buds. Also, do not use ozone generators. They create ozone gas, which is harmful to breathe and can damage or even kill your cannabis plants.
9. Be Patient!
When it comes to the best way to grow marijuana, patience is key. You cannot rush the cultivation process, and your marijuana plant needs ample time to grow to its fullest.
While there are things you can do to speed up the overall process, like buying autoflowering seeds, the entire process of growing weed -- from start to finish -- will still take a few months. So, you have to be prepared to be patient and let your cannabis plants do their thing.
10. Buy Seeds From Trilogene Seeds
If you really want to know the best way to grow marijuana, it’s to buy your seeds from Trilogene Seeds. Our seed bank contains hundreds of high-quality cannabis strains; whether you’re looking for indicas, sativas, even autoflowering or feminized options, Trilogene Seeds has the perfect products for you.
We pride ourselves on having top-shelf options while still offering affordable seeds that cultivators new and old can enjoy.
No matter what kind of seed or strain, or if you want to grow weed indoors or outdoors, Trilogene Seed is sure to have all the seeds you could want and so much more.
What is the Best Way to Grow Marijuana: Indoors or Outdoors?
A lot of people want to whether growing marijuana indoors or outdoors is better. However, the best way to grow marijuana is going to depend on your personal preferences, as well as your individual circumstances.
Both indoor and outdooring have pros and cons that people should consider before committing to one or another. However, both are just as successful as the other when it comes to an easy way to grow weed.
When you grow weed indoors, you have the advantages of using a controlled environment, having year-round growing, and even enforcing added privacy and security.
However, it is going to cost more overall due to the equipment you need, and it will require a dedicated indoor growing space too. The maintenance of an indoor grow space is also quite extensive in order to keep your weed plants happy.
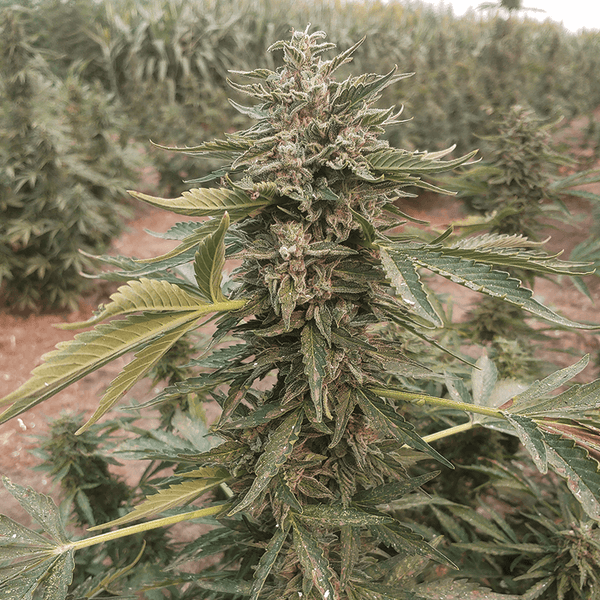
If you grow marijuana outdoors, this is going to cost a lot less, and you have the chance of much bigger yields and growing larger plants if you’d prefer. Natural growing conditions also help to create more flavorful, pure plants.
But, outdoor growing depends heavily on the climate, and this can be detrimental for some. You also have very little privacy typically, putting yourself at risk to law enforcement or nosy neighbors.
It’s also worth noting that growing your weed plants outside means you’re putting them at a higher risk of pests and diseases.
Thus, you have to win the benefits and disadvantages of both of these growing situations before deciding whether you want to grow weed indoors or grow outdoors.
Achieving Your Perfect Harvest With Trilogene Seeds
If you want to learn how to grow weed fast, the best place to start is with Trilogene Seeds. Trilogene’s seed bank has all of the marijuana seeds you need to get your indoor or outdoor grow started.
If you want to grow your own weed at home easy or you want to start a huge outdoor setup, Trilogene seeds has the resources to help you get started.
When you’re ready to experience the best way to grow your own marijuana, turn to Trilogene seeds and pick out all of the autoflowering, feminized, or photoperiod cannabis seeds you could want.
The Final Steps: Harvesting, Drying, and Curing
You’ve nurtured your plants from tiny seeds to full-grown beauties, and now the finish line is in sight. But don’t rush these final steps! Harvesting, drying, and curing are just as critical as the growing phase itself. This is where you lock in the flavor, aroma, and potency of your buds. Getting this part right transforms a good harvest into a great one, ensuring all your hard work pays off with a top-quality final product. Let’s walk through how to properly finish your grow so you can enjoy the fruits of your labor to the fullest.
Step 1: Knowing When to Harvest
Timing your harvest is everything. Harvest too early, and your buds won’t reach their full potential; harvest too late, and their potency can begin to degrade. Instead of guessing, you’ll want to become a bit of a plant detective and look for specific visual cues that tell you the time is right. This requires getting up close and personal with your plants to observe the changes that signal peak maturity. It’s a simple but crucial skill for any grower to develop, and it's what separates decent results from exceptional ones.
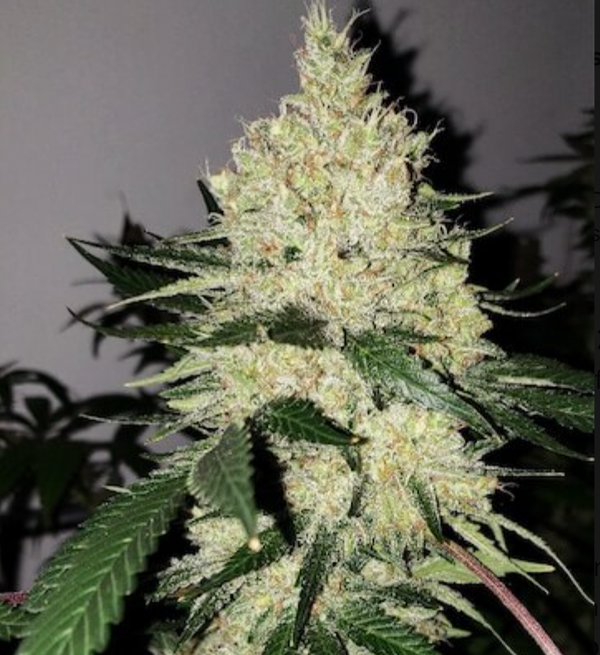
Inspecting Trichomes for Peak Ripeness
The most reliable way to know when to harvest is by inspecting the trichomes—the tiny, sticky crystals covering the buds. You’ll need a jeweler's loupe or a small magnifying glass to see them clearly. Early on, trichomes are clear like glass. As the plant matures, they will turn a cloudy or milky white. This is the point of peak THC production. You’ll also notice the pistils, or the small hairs on the buds, will darken from white to orange or brown. For a balanced effect, aim to harvest when most trichomes are cloudy, with a few just starting to turn amber.
Step 2: Pre-Harvest Preparations
Before you grab your trimming shears, there are a couple of steps you can take in the final weeks to improve the overall quality of your cannabis. These preparations are designed to clean the plant of excess nutrients and can even give your buds a final push in resin production. While one of these steps is optional, many experienced growers swear by them as the secret to a smoother, more flavorful smoke. Taking this extra time can make a noticeable difference in your final stash, so it's well worth the effort.
Flushing and Optional Dark Periods
About one to two weeks before your planned harvest date, you should begin flushing your plants. This simply means you stop giving them nutrients and water them only with plain, pH-balanced water. Flushing helps the plant use up any remaining nutrients stored in its tissues, which results in a cleaner, smoother taste. Another popular, though optional, technique is to give your plants a 48-hour period of complete darkness right before you harvest. Some growers find this stresses the plant just enough to produce a final burst of trichomes, enhancing its aroma and potency.
Step 3: The Art of Drying Your Buds
Once you’ve harvested your plants, the next step is to dry them slowly and evenly. The goal is to reduce the moisture content without drying the buds out too quickly, which can lead to a harsh smoke and loss of terpenes. The best method is to trim off the large fan leaves and hang the branches upside down in a dark, cool room with good air circulation. Aim for a temperature between 60-70°F and a humidity level around 60%. This process typically takes 10 to 15 days. You’ll know your buds are ready for the next step when the smaller stems snap instead of bend.
Step 4: Curing for Maximum Flavor and Potency
Curing is the final and perhaps most important step for developing the complex flavors and aromas of your cannabis. This slow process allows the compounds within the buds to continue to mature, breaking down chlorophyll and starches while preserving the terpenes and cannabinoids. Patience during the curing phase is rewarded with a product that is not only more potent but also significantly smoother and more enjoyable to consume. It’s the true mark of a craft cannabis harvest and a step you definitely don't want to skip.
The Importance of "Burping" Your Jars
After your buds are dry to the touch, trim them from the branches and place them into airtight glass jars, filling them about three-quarters full. Store the jars in a cool, dark place. For the first week or two, you’ll need to "burp" the jars daily by opening them for a few minutes to release moisture and let in fresh air. This prevents mold from forming. Use a small hygrometer in one of the jars to monitor the humidity, aiming for a stable level of around 60%. For the best results, cure your buds for at least 30 days, though many connoisseurs prefer a 60-day cure for optimal quality.
Helpful Resources for New Growers
Learning how to grow cannabis is a continuous journey, and even the most experienced cultivators are always picking up new tricks. As a beginner, having reliable sources of information can make all the difference between a frustrating first attempt and a successful harvest you can be proud of. The internet is full of advice, but not all of it is accurate. We’ve gathered a few trusted resources and a final piece of advice to help you get started on the right foot and build a solid foundation of knowledge for all your future grows.
Top Websites for Cultivation Advice
When you’re just starting, it’s great to have a go-to source for troubleshooting and learning. For a comprehensive guide that covers nearly every topic a beginner could ask about, Grow Weed Easy is an excellent starting point. The site is well-organized and presents information in a way that’s easy to understand. Another fantastic resource, especially if you’re interested in growing with coco coir, is Coco for Cannabis. Both sites offer scientifically-backed advice that can help you avoid common mistakes and get the most out of your plants.
A Final Tip for Your First Grow
If there’s one piece of advice to take with you, it’s this: keep it simple. It’s easy to get excited and want to try advanced techniques, but for your first grow, focus on the fundamentals. Your main goal should be to understand the plant's life cycle and learn how it responds to your specific environment. Start with high-quality genetics, like reliable feminized seeds that remove the guesswork of identifying plant sex, and concentrate on providing the right light, water, and nutrients. Enjoy the process, learn from your plants, and celebrate your first successful harvest. The more complex techniques can wait until you have a solid grow or two under your belt.
Frequently Asked Questions
What's the single most important decision I'll make when starting to grow? Without a doubt, your most important decision is choosing your seeds. While things like lights, soil, and nutrients are all key parts of the process, the genetic potential of your plant is determined from day one. You can have the most expensive setup in the world, but it can't make a plant perform beyond its genetic capabilities. Starting with high-quality seeds from a reputable source sets the foundation for everything else and gives you the best possible chance at a successful harvest.
I want a fast and easy harvest. What's the best way to set myself up for that? If speed and simplicity are your main goals, your best bet is to start with autoflowering feminized seeds. Autoflowers grow on their own internal clock and don't require you to change the light schedule to trigger the flowering stage, which simplifies the process significantly and often leads to a harvest in just a few months. Using feminized seeds ensures that every plant you grow will be a bud-producing female, so you won't waste time and resources tending to male plants that you'll eventually have to remove.
What are triploid seeds, and why would I choose them? Think of triploid cannabis as the "seedless watermelon" of the weed world. These plants have an extra set of chromosomes, which makes them virtually sterile. This is a huge advantage because it means they will produce seed-free flowers (sinsemilla) even if they get pollinated by a stray male plant. For outdoor growers, or anyone who wants an extra layer of security against accidental pollination, triploids are an incredible choice that guarantees your plant's energy goes into producing potent buds, not seeds.
My buds are harvested and dried. Is the curing step really necessary? Yes, absolutely. Skipping the curing process is like pulling a beautiful cake out of the oven and not letting it cool and set. Curing is what truly develops the final character of your buds. This slow process breaks down chlorophyll for a smoother smoke and allows the terpenes to mature, which creates a much richer flavor and aroma. It's the final step that transforms a decent harvest into a top-shelf product you can be proud of.
Besides choosing the wrong seeds, what's a common mistake new growers make? One of the most frequent missteps for beginners is improper watering. It's easy to show your plants too much love by watering them too often, which can suffocate the roots and create a welcoming environment for pests like fungus gnats. A simple rule is to wait until the top inch or two of soil is completely dry before watering again. Also, failing to check the pH of your water can lead to "nutrient lockout," where the plant can't absorb the food you're giving it, no matter how good your soil is.
Key Takeaways
- Know the Rules Before You Grow: Before buying anything, your first step is to confirm your local and state laws on home cultivation. Understanding the regulations on plant counts, grow locations, and your rights as a renter is essential for a secure and stress-free experience.
- Set Your Plants Up for Success: The quality of your harvest is determined early on. Start with superior genetics like feminized or autoflower seeds, use nutrient-rich soil, and provide the correct lighting schedule to build a strong foundation for healthy, high-yielding plants.
- Finish Strong with Proper Curing: The work isn't over at harvest. Patiently drying and curing your buds is a critical final step that develops their full potency, flavor, and aroma. Rushing this process can undermine all the effort you've put in.