Thinking about growing your own cannabis? It's one of the most rewarding projects you can take on. When you grow cannabis at home, you get complete control over the final product—from the soil to the harvest. You can ensure your flower is free from unwanted pesticides and chemicals. While becoming a master grower takes time, getting started is surprisingly simple. This guide will walk you through everything you need to know, so you can cultivate your own premium cannabis with confidence. You've got this.
After reading our guide, you’ll understand the basics and have a solid foundation to build upon year after year.
Your Guide to Homegrown Cannabis
Growing cannabis in closets, garages, attics, balconies, and backyards is an age-old tradition within the community. However, there’s never been a better time in history to home grow. Not only is it now legal in 23 states to grow recreational marijuana, but the resources and access to seeds, grow equipment, and nutrients have never been more accessible.
You’re living in a cannabis cultivation revolution, so start taking advantage!
Why Grow Cannabis at Home?
The perks of growing at home aren’t just limited to having your own weed; you’ll also save, know what’s going into the soil, and you will never have to buy weed illegally or from a dispensary again.
Before You Start: Legal, Financial, and Safety Tips
Before you rush to buy your first pack of seeds and a grow light, let's cover a few essential ground rules. Taking a moment to understand the legal, financial, and safety aspects of home cultivation will save you a lot of headaches down the road. Think of it as preparing the soil before you plant. A little bit of planning ensures your growing journey is smooth, successful, and stress-free from the very beginning. These tips will help you set up a responsible and sustainable home grow that you can enjoy for years to come.
Understanding Local Cannabis Laws
First things first: make sure you’re allowed to grow where you live. Cannabis laws can be a patchwork, varying wildly from one state or even one city to the next. Before you do anything else, you need to research your local regulations on home cultivation. For example, in Minnesota, adults can grow up to eight plants at home, but only four of them can be mature and flowering at any given time. Knowing these specific details—like plant counts and whether you need to keep your grow out of public view—is critical. Ignoring these rules isn't worth the risk, as it can lead to hefty fines or serious legal trouble.
Estimating Your Startup Costs
Growing your own cannabis is a fantastic way to save money over time, but it does require an initial investment. The good news is you don’t need to break the bank to get started. A basic setup can cost as little as $150 to $300, which typically covers essentials like a small grow tent, a light, and soil. Your main ongoing expense will be electricity, which can range from $20 to over $100 per month, averaging around $50 for a small hobby grow. Of course, you'll also need to purchase your genetics. To get premium results without a premium price tag, you can find high-quality, non-GMO seeds on sale to start your garden with proven, reliable strains.
A Key Rule for Privacy: No Tell, No Smell, No Sell
Even in places where home growing is completely legal, discretion is your best friend. A simple and effective mantra to follow is: "No tell, no smell, no sell." Let's break that down. "No tell" means keeping your hobby private. The fewer people who know about your garden, the lower your risk of theft or unwanted attention. "No smell" is about odor control. Cannabis plants produce a powerful aroma, so investing in a good carbon filter for your ventilation system is a must for any indoor grow. Finally, and most importantly, "no sell." Home cultivation laws are for personal use only. Selling your harvest can quickly turn a legal hobby into an illegal distribution charge, so enjoy the fruits of your labor yourself.
What You'll Need for Your Home Grow
Growing cannabis can be surprisingly forgiving if you are prepared. Follow our guide below for the best approach for the beginning home cultivator.
Choosing the Right Cannabis Seeds
Start with premium seeds with robust genetics from a trusted seed bank. Most beginners fail before their plants sprout because they use low-quality, cheap seeds.
Choose a strain that’s suitable for your growing environment (indoor or outdoor), and that’s forgiving. Some varieties are harder to grow than others because they are more susceptible to common problems. You can avoid mistakes by choosing a hardy strain. There’s plenty of time to try a more challenging strain after you have a few harvests under your belt.
Setting Up Your Grow Space
Your grow area is essential in cannabis cultivation, but we know home grows can be less than perfect. When growing inside, we recommend a tent setup. This way, your plants are confined to a tight space, get plenty of dark time, and can be secured.
Seeds vs. Clones: Which Is Right for You?
One of the first decisions you'll make is whether to start from a seed or a clone. A clone is a cutting from a mature "mother plant," making it a genetic duplicate. The main advantage is speed; clones can be ready for harvest two to four weeks sooner than plants grown from seed. They are also guaranteed to be female, which is essential for producing buds. However, clones can inherit any problems from the mother plant, like pests or diseases. Starting with seeds gives your plant a fresh, clean slate. Seeds often result in stronger, more resilient plants with a robust root system. While they take longer to mature, the genetic purity is a significant advantage for ensuring a healthy grow from the very beginning. Your choice depends on your priorities: speed and certainty with clones, or genetic strength and a clean start with seeds.
Autoflower vs. Photoperiod Seeds
When you browse for seeds, you'll see two main types: autoflower and photoperiod. The difference comes down to how they begin to flower. Photoperiod plants require a change in their light cycle to start producing buds, typically switching to 12 hours of light and 12 hours of darkness. This gives you more control over the plant's vegetative growth phase, often resulting in larger plants and bigger harvests. However, they require more hands-on management. Autoflower seeds, on the other hand, are perfect for beginners. They automatically switch from vegetative growth to the flowering stage based on their age, not the light cycle. This makes them easier and faster to grow, though they tend to be smaller. If you want a simpler, quicker process for your first grow, autoflowers are an excellent choice.
Indica vs. Sativa: Understanding Strain Differences
You've likely heard the terms Indica and Sativa, which refer to the two primary types of cannabis. Each offers different effects and has unique growth characteristics. Sativa strains are known for providing an uplifting, energetic, and creative feeling, making them great for daytime use. Indica strains typically deliver a more relaxing, full-body effect, ideal for unwinding in the evening or aiding with sleep. Hybrids offer a mix of both. From a grower's perspective, these differences matter, too. Indica plants tend to be shorter and bushier, which often makes them a better fit for smaller, indoor grow spaces. Sativas grow taller and lankier, thriving in outdoor environments where they have more room to stretch.
Why Female Plants Are Essential
Here’s a critical piece of information for any new grower: only female cannabis plants produce the dense, cannabinoid-rich buds that you want to harvest. Male plants, on the other hand, produce pollen sacs. If a male plant pollinates a female plant, the female will shift its energy from producing potent buds to creating seeds. This results in a significantly smaller, less potent harvest, a disappointing outcome known as a "seeded" crop. To ensure your time and effort result in a successful yield of high-quality buds, your primary goal is to cultivate an all-female garden. This is why understanding your seed type is so important for maximizing your final harvest.
The Role of Feminized and Triploid Seeds
To avoid the problem of male plants, growers rely on specialized seeds. Feminized seeds are genetically engineered to produce female plants more than 99% of the time, taking the guesswork out of identifying and removing males. For an even greater level of security, you can use triploid cannabis seeds. This cutting-edge technology creates plants with three sets of chromosomes, making them naturally sterile and highly resistant to pollination. This means you can get a guaranteed sinsemilla (seedless) harvest of potent buds, even if a stray male plant is nearby. Starting with high-quality feminized or triploid seeds is the surest way to guarantee your garden is full of bud-producing females.
Creating the Perfect Growing Environment
Once you have your seeds, the next big decision is creating the right environment for them to flourish. The "perfect" setup is less about having a flawless, high-tech lab and more about matching your space and resources to your plant's needs. The most fundamental choice you'll make here is whether to grow indoors or outdoors. Each path has its own set of benefits and challenges, and your decision will shape your entire cultivation experience, from daily tasks to the final harvest. Let's break down the pros and cons to help you figure out which is the best fit for you.
Indoor vs. Outdoor Growing: Pros and Cons
Growing indoors gives you ultimate control. You become the sun, the wind, and the rain, managing everything from light cycles to temperature. This allows for year-round cultivation and provides a private, secure space away from pests and prying eyes. It’s the ideal way to grow specific strains that might not survive your local climate, letting you experiment with a wide variety of indoor cannabis seeds. The trade-off is the startup cost for equipment like grow lights and fans, plus the ongoing expense of electricity. It requires a hands-on approach to maintain that perfect ecosystem.
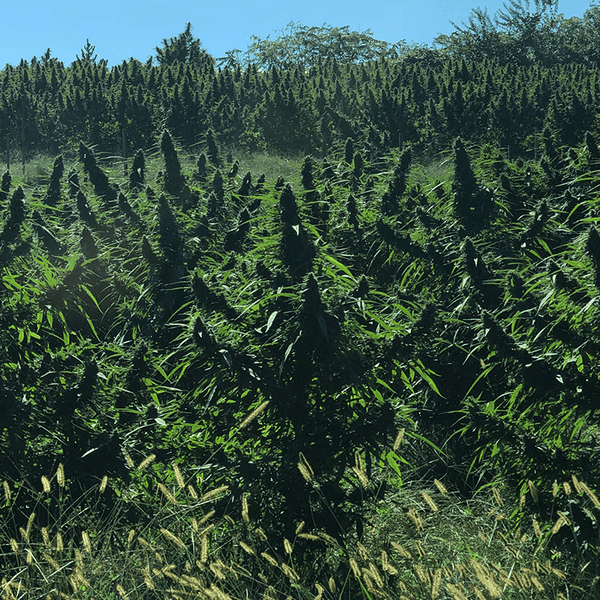
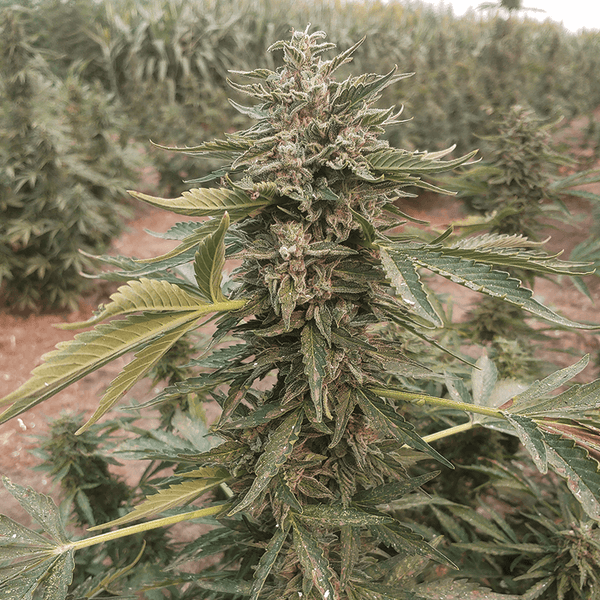
Outdoor growing harnesses the power of the sun, which is free and can produce massive plants. It’s often a more cost-effective and sustainable method, connecting you with the plant's natural cycle and perfect for robust outdoor marijuana seeds. However, you are subject to the whims of nature. As experts at Royal Queen Seeds point out, unexpected weather, pests, and diseases are constant risks. Ultimately, the best choice depends on your budget, space, and how much control you want over the final product.
Finding the Perfect Light Source
If you grow outdoors, you’ll need to ensure your grow area receives direct light. For indoor grows, you’ll need a light system. We recommend high-efficiency LED lights using the 12 hours on, 12 hours off schedule. Once plants get into the vegetative stage, shift to 18 hours of light and 6 hours of dark to encourage flowering.
Understanding Light Spectrums for Each Growth Stage
Think of light as food for your plants. Just like people need different nutrients at different ages, your cannabis plants crave different types of light as they grow. During the early vegetative stage, when your plant is focused on building strong leaves and stems, it loves blue light. This cooler part of the spectrum mimics the long days of spring and early summer, encouraging robust, leafy growth. When it's time to switch to the flowering stage, you'll want to introduce more red light. This warmer spectrum signals to the plant that fall is coming, triggering it to produce dense, resinous buds. You don't need a degree in botany to get this right; many modern full-spectrum LED lights are designed to provide the right mix for every stage, making the process much simpler than it sounds.
Selecting Your Grow Medium
Using high-quality soil is also essential if you want a successful harvest. To ensure your plants will thrive, monitor PH regularly. The optimal PH range for cannabis is between 6.5 and 7.5.
Choosing the Right Pot Size
Selecting the right container size is a bigger deal than you might think, as it's crucial for healthy root development and the overall success of your plant. Starting your seeds in a massive pot is a common mistake that can lead to overwatering and root rot. Instead, it's best to start small. A simple plastic cup with drainage holes is perfect for a seedling. As your plant grows, you'll need to transplant it into progressively larger containers. This process, known as "potting up," allows the root system to expand fully without becoming waterlogged. For a mature plant, a 3- to 5-gallon pot is usually a great size for an indoor home grow, giving the roots plenty of space to thrive.
Understanding Plant Nutrients
Maximizing your plant’s full potential requires feeding it with nitrogen, phosphorus, and potassium (NPK). During the vegetative stage, use 1:3:2, and once in flowering, switch to 0:3:3.
Tips for a Successful Harvest
Home growing presents unique challenges, especially if you live in an apartment. Keep in mind the smell and security. You don’t want everyone on your floor when you are about to harvest a fresh crop of premium marijuana.
Storage is also essential. Keep your dried buds in a safe, secure, dry place away from direct sunlight.
Managing Temperature, Humidity, and pH
Think of your grow space like a nursery. A good rule of thumb is if it’s too hot or cold for you, it’s probably too hot or cold for your plants. Cannabis thrives in mild temperatures and stable humidity, so avoid extreme swings. Keeping your environment consistent helps prevent stress on your plants, allowing them to focus their energy on healthy growth. You don’t need a fancy setup to start, but a simple thermometer and hygrometer (to measure humidity) can give you valuable information and help you make adjustments as needed. Consistency is your best friend here.
Just as important as temperature is the pH of your water and soil. This might sound technical, but it’s straightforward. The pH level determines how well your plants can absorb nutrients. For cannabis, the sweet spot is a pH range between 6.5 and 7.5. You can get an inexpensive pH testing kit online or at a garden store. Check it regularly to ensure your plants are getting everything they need from the soil. A small adjustment here can make a huge difference in your plant’s health and the final quality of your buds.
Ensuring Proper Airflow and Odor Control
Plants need to breathe, too. Good air circulation is vital for strong, healthy cannabis plants. A gentle breeze from a small oscillating fan strengthens stems and helps prevent issues like mold or pests from taking hold. It mimics the natural outdoor environment and encourages robust growth. You don’t need a wind tunnel; just enough movement to see the leaves gently rustling. This simple step helps distribute CO2 evenly and keeps the air fresh, which is exactly what your plants need to thrive throughout their lifecycle.
Let’s be real: flowering cannabis has a very distinct and powerful smell. If you’re growing indoors, especially in an apartment or a shared space, managing the odor is a must. A reliable ventilation system with a charcoal air filter is the industry standard for a reason—it works. The system pulls the fragrant air out of your grow tent or room, runs it through the carbon filter to neutralize the smell, and then exhausts clean air. This not only keeps your hobby private but also contributes to better airflow for your plants, making it a win-win investment.
The Cannabis Growth Cycle: A Step-by-Step Guide
From the moment you plant a seed to the day you harvest your buds, the entire process typically takes about 10 to 14 weeks. It’s a journey of patience and observation, but seeing it through is incredibly rewarding. The life of a cannabis plant is broken down into a few key stages, each with its own specific needs for light, water, and nutrients. Understanding these phases will help you anticipate what your plant requires and when, setting you up for a successful harvest. It all starts with a great seed, so choosing quality genetics when you shop all seeds is the first step to a healthy growth cycle.
Whether you choose hardy autoflower seeds that flower on their own schedule or photoperiod seeds that rely on light changes, the fundamental stages are the same. You’ll watch your plant transform from a tiny sprout into a lush, green, vegetative plant, and finally into a beautiful, bud-producing wonder. Each stage is a milestone. By providing the right care at the right time, you guide your plant toward its maximum potential. Let’s walk through what you can expect during each phase of this amazing process.
The Main Stages of Growth
The cannabis plant journey is divided into three primary stages: germination and seedling, the vegetative stage, and the flowering stage. Each phase has a distinct purpose in the plant's life. First, the seed comes to life and establishes its roots. Then, it focuses on growing big and strong, developing the leaves and branches needed to support future buds. Finally, it switches its energy to producing the resinous flowers that every grower is waiting for. Knowing what to look for in each stage will make you a more confident and effective cultivator.
Stage 1: Germination & Seedling
This is where it all begins. Germination is the process of waking your seed up. It can take anywhere from 3 to 15 days for the seed to sprout a tiny taproot. Once planted, it will emerge from the soil as a fragile seedling. For the next two weeks, your plant is in its most vulnerable state. It needs gentle light, minimal water, and a stable environment to develop its first set of true leaves and a solid root system. Treat it with care, and you’ll give it the strong start it needs for the journey ahead.
Stage 2: Vegetative Stage
Once your seedling has a few sets of leaves, it enters the vegetative stage. This phase is all about growth. Indoors, this stage typically lasts 3 to 8 weeks, and your job is to give the plant everything it needs to build a strong frame. This means plenty of light—about 18 hours on and 6 hours off—and nitrogen-rich nutrients. You’ll see your plant get taller and bushier as it develops more leaves and branches. This is the foundation for a big harvest, so a healthy vegetative stage is crucial for supporting the heavy buds to come.
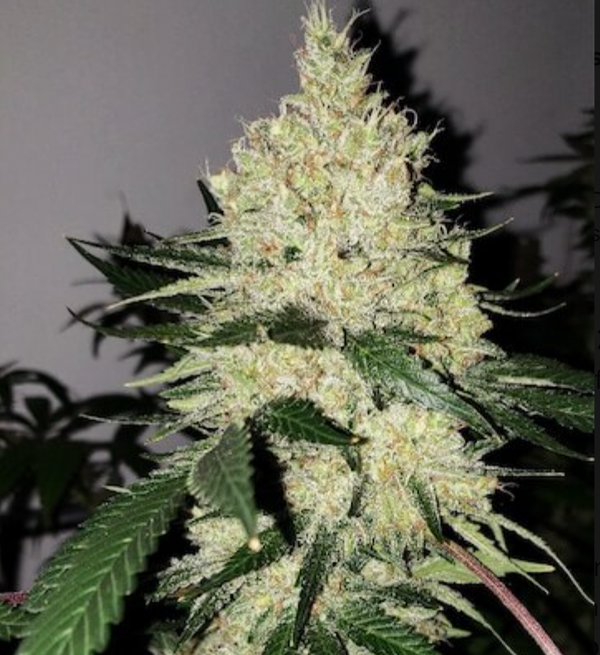
Stage 3: Flowering Stage
This is the most exciting part. To trigger the flowering stage in photoperiod plants, you’ll change the light cycle to 12 hours of light and 12 hours of darkness. This change signals to the plant that it’s time to reproduce, and it will start developing buds. Over the next several weeks, you’ll watch as small white pistils form and swell into dense, sticky flowers covered in trichomes. This is when you’ll switch to phosphorus-heavy nutrients to support bud production and really see the fruits of your labor develop.
Getting the Light Cycle Right
For most cannabis strains, light is the trigger that tells the plant when to grow and when to flower. During the vegetative stage, a long light period of 18 hours on and 6 hours off encourages the plant to focus on growing leaves and stems. When you’re ready for buds, you switch to an even 12/12 cycle. This mimics the changing seasons outdoors and signals to your female plants that it’s time to produce flowers. Sticking to this schedule is critical for photoperiod varieties, like most feminized seeds. Light leaks during the dark period can confuse your plants and cause stress, so make sure your grow space is completely dark when the lights are off.
Plant Training Techniques to Maximize Your Harvest
If you want to get more out of each plant, you can use simple training techniques to shape its growth. Methods like "topping," where you snip the main top of the plant, encourage it to grow more side branches, creating more bud sites. "Low Stress Training" (LST) involves gently bending and tying down branches to create a flat, even canopy where all the buds get equal light. These techniques might seem advanced, but they are easy to learn and can significantly increase your final yield by making sure no light goes to waste.
Harvesting, Drying, and Curing for Premium Buds
You’ve nurtured your plant from a tiny seed to a full-grown beauty, but the work isn’t over yet. The final steps—harvesting, drying, and curing—are what transform your fresh flowers into the high-quality, flavorful, and potent buds you’ve been waiting for. Rushing this final phase is a common mistake that can undo months of hard work. Patience is the key to unlocking the full potential of your harvest. A proper dry and cure will preserve the terpenes that give your cannabis its unique aroma and flavor, while also ensuring a smooth, enjoyable experience.
Pre-Harvest Flushing for a Cleaner Taste
About a week or two before you plan to harvest, it’s a good idea to "flush" your plant. This simply means you stop giving it nutrients and water it with only plain, pH-balanced water. The goal is to encourage the plant to use up any remaining nutrients stored in its tissues. Many growers believe this process results in a much smoother, cleaner-tasting final product by removing any residual mineral or salt buildup. It’s a simple step that can make a noticeable difference in the quality of your buds.
How to Know When It’s Time to Harvest
Timing your harvest is arguably one of the most critical skills to learn. Harvest too early, and your buds won’t be as potent; harvest too late, and the effects can become more sedative. The most reliable way to know when your plants are ready is to look at the trichomes—the tiny, crystal-like glands on the buds—with a magnifying glass or jeweler’s loupe. You’re looking for the moment when most of the clear trichomes have turned a milky or cloudy white. This indicates peak THC levels and optimal ripeness for harvesting.
The Drying Process
Once you’ve cut down your branches, the next step is to dry them slowly and evenly. The ideal environment for drying is a dark, cool space with a temperature around 60°F (15°C) and humidity around 60%. You can hang the branches or place trimmed buds on a drying rack. Good air circulation is important to prevent mold, but don’t point a fan directly at the buds, as this can dry them out too quickly. The drying process usually takes 7 to 14 days. You’ll know they’re ready when the smaller stems snap instead of bend.
Curing: The Final Step for Flavor and Potency
Curing is the final, magical step that develops the flavor and aroma of your buds. After drying, place the buds into airtight glass jars, filling them about three-quarters full. For the first week, open the jars for a few minutes each day to release moisture and let in fresh air—a process known as "burping." After that, you can burp them every few days. Curing should last at least two weeks, but many connoisseurs cure their buds for four weeks or more. This patient process breaks down chlorophyll for a smoother smoke and allows the full terpene profile to emerge.
Why Quality Genetics Matter
Using reliable genetics is crucial for getting your grow off to a good start. If you are starting your home grow journey, we recommend talking with our cultivation experts and choosing one of our robust, forgiving varieties. Contact Trilogene today for more information, or shop our extensive selection of cannabis seeds online.Frequently Asked Questions
How long does the entire process take, from seed to smoke? You should plan for about three to four months from the day you plant your seed to the day you can enjoy your finished product. The growth cycle itself, from seedling to harvest, typically takes 10 to 14 weeks. After that, you'll need another two to four weeks for the crucial drying and curing process. While it requires patience, especially at the end, properly curing your harvest is what develops its rich flavor and smooth quality, so it's well worth the wait.
I live in a small apartment. Is it realistic for me to grow indoors? Absolutely. Growing in a small space is very manageable if you plan for it. A small grow tent, often just 2x2 feet, can fit easily in a closet or corner. The key challenges will be odor and discretion. Investing in a quality carbon filter for your ventilation system is non-negotiable to manage the smell. Also, choosing a shorter, bushier Indica strain or an autoflower variety will help you make the most of your limited vertical space.
With so many strains, how do I pick the right one for my first grow? For your first time, prioritize a strain known for being resilient and forgiving. Look for descriptions that mention resistance to mold or pests and an easy growing process. Autoflower seeds are an excellent starting point because they flower automatically, removing the need to manage light cycles perfectly. Think about the effects you enjoy—do you prefer something relaxing or energizing? Start there, and then find a hardy strain that matches that profile. You can always try more challenging varieties after you have a successful harvest under your belt.
What's the most common mistake new growers make? The most frequent misstep I see is over-caring for the plant, especially with watering. It comes from a good place, but giving your plant too much water is a fast way to cause root rot and other problems. Let the top inch or two of your soil dry out completely before watering again. Another common error is impatience during the final stages. Rushing the drying and curing process will seriously compromise the quality of your buds, undoing months of hard work. Slow and steady wins the race.
Are advanced seeds like Triploids a good idea for a beginner? Yes, they can be a fantastic choice. While the technology is advanced, the benefit for a grower is pure simplicity. Triploid seeds are designed to be highly resistant to pollination, which means they are almost guaranteed to produce seedless, potent buds (sinsemilla). For a beginner, this provides a huge safety net. You don't have to worry about accidentally ending up with a seeded crop if a male plant somehow appears, which removes a major source of stress and lets you focus on learning the fundamentals.
Key Takeaways
- Set the Stage for a Smooth Grow: Before you start, get familiar with your local cultivation laws and plan your budget. Adopting a "no tell, no smell, no sell" policy from day one is the smartest way to protect your hobby and ensure a stress-free experience.
- Choose Genetics That Work for You: The seeds you select determine the path of your grow. For a straightforward first harvest, start with autoflower seeds for speed and simplicity, or use feminized and triploid seeds to guarantee a garden of bud-producing female plants without any guesswork.
- Patience in the Final Stage is Everything: Growing a healthy plant is only half the battle; the final quality comes from the finish. A slow, controlled dry and a patient cure are non-negotiable steps that develop the flavor, aroma, and potency of your buds, turning a good harvest into a great one.