If you wrote off autoflowers years ago, it’s time to look again. The old reputation for low potency is long gone. Thanks to some incredible genetic work, today's autoflowers deliver serious flavor and potency that easily rival photoperiod plants. You still get their signature speed and resilience, making them a strategic addition to any garden. This guide moves past the myths and focuses on what works. We'll walk you through exactly how to grow autoflowering seeds for the kind of top-shelf results they're now famous for, from seed selection to a perfect harvest.
Key Takeaways
- Set a Simple Light Schedule: Autoflowers don't need light cycle changes to start flowering. Provide a consistent 18 to 20 hours of light daily from seedling to harvest to support their fast, uninterrupted growth.
- Prioritize Low-Stress Care: With a short lifespan, autoflowers have little time to recover from mistakes. Avoid transplanting by planting in a final container, start with a light nutrient schedule, and use only gentle training methods to prevent stunting growth.
- Don't Rush the Final Steps: The quality of your harvest is determined after you cut the plant down. A slow, controlled dry followed by a patient cure in glass jars is essential for developing the rich flavor and potency of your buds.
What Are Autoflowering Cannabis Seeds?
If you're looking for a straightforward path to a successful harvest, autoflowering cannabis seeds are a fantastic starting point. Think of them as the low-maintenance cousins in the cannabis family. Unlike traditional photoperiod plants that require specific light schedules to start producing buds, autoflowers operate on their own internal clock. This unique trait makes them incredibly versatile and forgiving, which is great news for both new growers and seasoned cultivators seeking a quick turnaround.
These plants are known for their speed, often going from seed to harvest in just a few months. Their compact size also makes them ideal for smaller indoor setups or discreet outdoor gardens. Because they aren't dependent on changing seasons or light cycles, you can achieve multiple harvests in a single year. Whether you have limited space, a shorter growing season, or simply want a simpler cultivation experience, autoflower seeds offer a reliable and efficient way to grow your own cannabis.
What Makes Autoflowers Different?
The magic of autoflowering seeds lies in their genetics, which include a bit of Cannabis ruderalis, a hardy subspecies that evolved in the harsh climates of Central Asia and Eastern Europe. This lineage gives them their signature trait: they automatically switch from the vegetative stage to the flowering stage based on age, usually around three to four weeks after germination. You don't need to worry about changing your light timer from 18 hours a day to 12. The plant just knows when it's time to start flowering. This entire lifecycle is impressively fast, with most autoflowering strains ready for harvest in just 8 to 10 weeks from the day you plant the seed.
Are Autoflowers Right for Your Grow?
Like any plant, autoflowers come with their own set of advantages and disadvantages. On the plus side, their speed is a huge benefit, allowing for multiple harvests in one season. Their compact, bushy stature makes them perfect for growers with limited space. They are also quite resilient and can handle temperature fluctuations better than many photoperiod strains. The main drawback is that their yields are typically smaller than those of their larger, slower-growing counterparts. However, don't fall for the old myth that autoflowers are less potent. Thanks to incredible advancements in breeding, many modern autoflowers now produce THC levels that are just as high as photoperiod strains.
Typical Autoflower Characteristics
Yield, Height, and Flowering Time
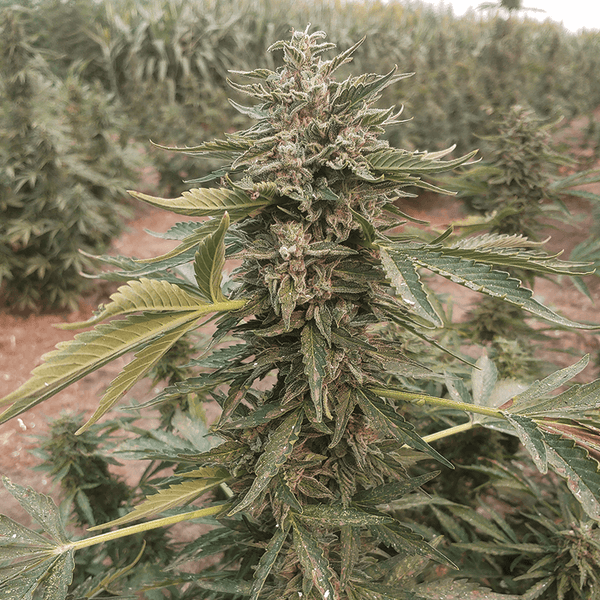
Autoflowers are all about speed. Their most defining feature is a rapid lifecycle that gets you from seed to harvest in record time. Most autoflowering strains are ready to harvest in about 8 to 10 weeks from germination. This quick turnaround is a game-changer, especially for outdoor growers in regions with short summers, as it allows for multiple harvests in a single season. For indoor cultivators, it means you can run more cycles per year. You don't have to wait long to see the results of your hard work, which is incredibly rewarding whether you're on your first grow or your fiftieth.
When it comes to yield, autoflowers typically produce between 50 and 100 grams per plant. While that might be less than a massive photoperiod plant, modern genetics have closed the gap significantly. The final weight depends heavily on the strain's genetics and your growing environment, but a well-cared-for plant can deliver a very respectable harvest of high-quality, potent buds. The days of trading quality for speed are long gone. Today's autoflowers offer impressive cannabinoid profiles and rich terpenes, proving that good things can come in fast-growing packages.
Height is another area where autoflowers really shine, especially for growers working with limited space. These plants usually stay short and bushy, reaching a final height of about 2 to 4 feet (60cm to 120cm). This compact size makes them perfect for small grow tents, balconies, or discreet corners of a garden. Their manageable stature means you won't have to worry about them outgrowing your setup, which is a common challenge with some larger strains. This versatility makes them a reliable choice for almost any cultivation setup, from a simple space bucket to a more advanced indoor garden.
How to Choose the Best Autoflower Seeds
Selecting the right seeds is the first step toward a great harvest. If you're just starting out, look for strains that are known for their resilience and resistance to common pests and diseases. This will give you a bit more room for error as you learn. Also, consider what you want from your final product. Are you looking for an energetic, uplifting feeling or something more relaxing and calm? Read the strain descriptions to understand the expected effects. Finally, check the estimated yield and finishing time to find a plant that fits your goals and timeline. Exploring a variety of quality seeds will help you find the perfect match for your garden.
How to Set Up Your Autoflower Grow Space
Before you even think about planting your seeds, taking the time to prepare your grow space is one of the most important things you can do. Think of it as setting the stage for a great performance. A well-prepared environment gives your plants everything they need to thrive from day one, which is especially important for autoflowers because of their rapid life cycle. There’s not much time to correct mistakes, so getting it right from the start makes all the difference.
Creating the perfect home for your plants involves dialing in a few key elements: lighting, climate, your growing medium, and a nutrient plan. Each piece plays a critical role in the health and final yield of your plants. Getting these factors balanced will help you avoid common problems and set you on the path to a successful harvest. Let’s walk through how to get each one just right.
What's the Best Lighting for Autoflowers?
Autoflowers are unique because they don’t rely on changes in the light cycle to start flowering. This gives you a lot of flexibility. For the best results, provide a consistent light schedule of either 18 hours of light followed by 6 hours of dark (18/6) or 20 hours of light and 4 of dark (20/4). You can maintain this schedule from the moment your seedling sprouts until the day you harvest. This constant, high-energy light fuels their fast growth, helping you get the most out of your indoor cannabis seeds. There’s no need to switch things up, making it a simple and effective setup.
Light Schedules and Spectrum
While the daily schedule is straightforward, the type of light you provide also matters. Full-spectrum LED lights are an excellent choice for autoflowers because they deliver the complete range of light plants need to thrive through every life stage. They provide the blue-spectrum light that encourages strong root and leaf development in seedlings, as well as the red-spectrum light that fuels dense bud production during flowering. Using a full-spectrum light means you won’t have to swap out bulbs or fixtures as your plant matures. Just set your timer for a consistent 18/6 or 20/4 cycle, and your light will provide everything your autoflower seeds need to grow from sprout to harvest.
Light Power Progression
Although your light schedule will stay the same, the intensity of your light should change as your plant grows. Seedlings are delicate and can be overwhelmed by intense light, so start with your light dimmed to around 50% power or positioned farther from the plant. As your autoflower enters its vegetative stage and starts growing more vigorously, you can gradually increase the intensity to 75%. Once you see the first signs of flowering, it’s time to give your plants all the energy they can handle. Increase the light to 100% power to support robust bud development. Always monitor your plants for signs of light stress, like bleached or curling leaves, and adjust the light’s height as needed to keep your indoor cannabis happy.
Creating the Perfect Climate for Your Plants
Your plants are happiest in a stable environment, so keeping temperature and humidity in check is essential. Aim to keep your grow space between 68–77°F (20–25°C). Try to avoid big temperature swings between when the lights are on and off. For humidity, a range of 40–60% is a good target for the entire grow. However, you can fine-tune it for better results. Seedlings enjoy higher humidity, around 60–70%, while it’s best to lower it to 40–50% during the flowering stage. This simple adjustment helps prevent mold from developing on your beautiful buds.
Week-by-Week Environmental Targets
While keeping your climate within a general range works well, you can optimize growth by adjusting your environment as your plants mature. During the first couple of weeks, your seedlings love high humidity, around 65–70%, to help them establish strong roots in a gentle environment. As they enter the vegetative stage around weeks three and four, you can gradually lower the humidity to about 55–60%. Once you see the first signs of flowers, it's time to drop the humidity further to 40–50%. This is a crucial step to prevent mold from forming in your developing buds. Maintaining these specific targets throughout the lifecycle of your autoflower plants gives them the ideal conditions to thrive at every stage, leading to a healthier and more rewarding harvest.
Picking the Right Soil and Pots
The foundation of a healthy plant is its root system, which starts with the right soil and container. When you’re growing autoflower seeds, it’s best to use a light, airy soil mix that isn’t packed with nutrients from the start. This gives you more control over what your plant is eating. A great pro-tip is to mix about 30% perlite into your soil. This improves drainage and aeration, preventing the soil from becoming compacted and allowing the roots to breathe and grow freely. Happy roots lead to a happy, healthy plant.
Creating Your Own Soil Mix
You don't need a complicated recipe to create the perfect soil for your autoflowers. The goal is to make a medium that is light and airy, which allows the roots to expand quickly and easily. A fantastic starting point is a base of high-quality potting soil or coco coir, mixed with amendments that improve drainage. I like to use a simple ratio: about 70% soil or coco and 30% perlite. The perlite creates little air pockets throughout the medium, preventing it from becoming compacted and waterlogged. This simple blend gives you a great foundation and allows you to control the nutrient intake from the beginning, which is perfect for sensitive autoflower seeds that can be easily burned by nutrient-rich "hot" soils.
Preparing Your Pots
Because autoflowers have a limited time to grow, it's best to avoid the stress of transplanting. Plant your seed directly into its final container. For most autoflower strains, a 3- to 5-gallon pot is the perfect size. I highly recommend using fabric pots, as they allow the roots to breathe and naturally "air prune" themselves, preventing them from becoming root-bound. When you're ready, fill your pots with your soil mix, but don't press it down too firmly. You want to keep it light and aerated. Before planting, give the soil a good watering and let it sit for a day. This ensures the medium is evenly moist but not soaked, creating the ideal environment for your feminized seeds to germinate.
What Nutrients Do Autoflowers Need?
Because autoflowers grow so quickly, their nutrient requirements are different from traditional cannabis plants. They are generally lighter feeders. Overfeeding is a common mistake that can lead to nutrient burn and stunted growth. A good rule of thumb is to start with a mild, balanced nutrient mix. When you see the first signs of flowering—those tiny white hairs called pre-flowers—you can begin introducing nutrients. Start with just 1/4 of the manufacturer's recommended dose and see how your plant responds. This gentle approach ensures you’re giving your plants what they need without overwhelming them.
Your Week-by-Week Autoflower Grow Guide
Watching your autoflowers grow is an exciting process, but it happens fast. Unlike photoperiod plants, autoflowers race from seedling to harvest in as little as eight weeks, so every day counts. This timeline will guide you through each stage, helping you give your plants exactly what they need, right when they need it. Keep in mind that every strain is a little different, so treat this as a flexible roadmap rather than a strict schedule. Let’s get growing.
Weeks 1-2: From Seed to Sprout
Your journey begins with germination. The goal here is to create a warm, moist environment that encourages your seeds to sprout. Once your seed has a small taproot, it’s ready for its permanent home. Because autoflower seeds have a short vegetative period, it’s best to plant them directly into their final container. Transplanting can cause stress that slows down growth, and with autoflowers, there’s no time to recover.
During these first two weeks, your seedling is very delicate. Keep the humidity high (around 70-80%) and use a spray bottle to water gently. This prevents you from dislodging the tiny plant or over-saturating the soil. Your seedling has all the nutrients it needs for now, so just focus on providing light and the right amount of moisture.
Choosing a Germination Method
There are a few popular ways to get your seeds started, and there’s no single "right" answer—it’s all about what you’re comfortable with. The paper towel method is a classic for a reason: you just place your seeds between two damp paper towels and tuck them between two plates to create a dark, humid space. Another great option, and my personal favorite for autoflowers, is planting directly into the soil. This approach completely avoids the risk of damaging the delicate taproot during a transfer. Simply make a small hole about a half-inch deep, drop the seed in, and cover it lightly. No matter which method you choose, success always begins with high-quality autoflower seeds. Keep them warm and moist, and you should see signs of life in just a few days.
Weeks 3-4: Supporting Healthy Growth
Welcome to the vegetative stage. Your plant will now focus its energy on growing bigger and stronger, developing leaves and a solid root system. You’ll want to keep your lights on for 18 to 20 hours a day to support this rapid growth. After the initial watering, let the soil dry out a bit before watering again. The soil likely has enough nutrients to carry your plant through this stage, so hold off on adding any fertilizer just yet.
Toward the end of week four, you might start to see the first signs of flowering. Look for tiny white hairs, called pistils, forming where the branches meet the main stem. This is your plant’s way of telling you it’s maturing and getting ready to produce buds. It’s a key milestone for any grower.
Weeks 5-7: What to Do When Buds Appear
Now the real show begins. As your plant enters the flowering stage, its needs will change. This is when you’ll switch from vegetative growth nutrients to a bloom formula, which is higher in phosphorus and potassium. Start with a very light feeding—about a quarter of the recommended dose—to avoid nutrient burn. You can gradually increase the amount as the buds develop.
During this phase, your plant will stretch, and the buds will start to fill out. Pay close attention to humidity levels, as dense buds can be susceptible to mold if the air is too damp. Good air circulation is your best friend here. This is the most critical time for bud development, so giving your plants the right support will directly impact the quality of your final harvest.
Weeks 8-10: The Final Countdown to Harvest
You’re in the home stretch! The final weeks are all about ripening and getting ready for harvest. Your plant has stopped growing taller and is putting all its energy into fattening up its buds. The best way to know when it’s time to harvest is by observing two key indicators: the pistils and the trichomes. Most of the white pistils will have darkened to a reddish-brown color.
For a more precise look, use a magnifying glass to inspect the trichomes—the tiny, crystal-like glands on the buds. You’re looking for a mostly cloudy or milky appearance, with a few amber ones mixed in. This indicates peak potency. Many growers also stop watering a few days before harvest to help concentrate the plant’s resin production, making your THCA seeds live up to their full potential.
Mastering Your Autoflower Care Routine
Once your autoflowers are growing, a consistent care routine is your best friend. While these plants are known for being resilient, they still need the right balance of water, nutrients, and support to produce a great harvest. Think of it less like a strict set of rules and more like a rhythm you develop with your plants. Paying attention to their daily needs will help you spot issues early and keep them on track. From watering just right to giving them a gentle guiding hand, these simple practices will make a huge difference in the health and yield of your crop.
How Often Should You Water Autoflowers?
Overwatering is one of the most common mistakes new growers make. The best way to check if your plants are thirsty is to stick your finger about an inch into the soil. If it feels dry, it’s time to water. When you do, pour the water slowly and evenly around the base of the plant until you see a small amount of runoff from the bottom of the pot. This ensures the entire root system gets a drink. The goal is to keep the soil moist but never soggy, as waterlogged roots can lead to rot. Getting this balance right is key to growing healthy autoflower seeds.
Watering Best Practices
Watering is more of an art than a science, and the key is to listen to your plants. Instead of sticking to a rigid schedule, let the soil tell you when it's time. A great habit to get into is the "finger test." Simply stick your index finger about an inch into the soil. If it comes out dry and clean, your plant is thirsty. If it feels damp, hold off for another day or two. When you do water, do it slowly and thoroughly, making sure the entire pot is saturated until you see a small amount of water escape the drainage holes. This encourages deep root growth and prevents dry pockets from forming in the soil, a crucial practice whether you're growing indoors or tending to outdoor plants.
Why pH Matters (And How to Manage It)
You might remember pH from science class, and it’s just as important for your plants. The pH level of your water determines which nutrients your plant can absorb. If the pH is off, your plants can’t eat, even if the nutrients are in the soil. For soil grows, aim for a pH of around 6.5. You can easily check this with a simple pH pen. Before you water or feed your plants, test your water and adjust it as needed. This simple step ensures your plants can access all the food they need to thrive and is a universal best practice for all cannabis seeds.
Maintaining the Ideal pH Range
Keeping your pH in that sweet spot is a straightforward process once you get the hang of it. You’ll need a digital pH pen and some pH adjustment solutions, typically sold as "pH Up" and "pH Down." The routine is simple: first, mix your water and any nutrients you’re using. Nutrients can alter the pH, so it’s important to test after they’ve been added. Dip your calibrated pH pen into the solution for a reading. If it’s too high or low, add a very small amount—just a few drops—of the appropriate adjustment solution, stir well, and test again. Repeat this until you land in the 6.0-7.0 range for soil. This small but crucial step in your watering routine is vital for the rapid growth cycle of autoflower seeds, ensuring they never miss a meal.
Should You Train Your Autoflower Plants?
Training helps you create a more even plant canopy, allowing light to reach all the bud sites, not just the ones at the top. For autoflowers, it’s best to stick with low-stress training (LST). This involves gently bending and tying down the main stem and side branches to encourage them to grow outwards instead of straight up. You can also carefully remove a few large fan leaves that are blocking light from the lower branches. Just be careful not to overdo it, as autoflowers have a short lifespan and less time to recover from stress. These techniques work great on our feminized seeds, too.
When and How to Defoliate
Defoliation is simply the process of removing some of your plant's leaves. The main goal is to open up the canopy so that more light can reach the lower bud sites, which often get shaded out by large fan leaves. Good airflow is another big benefit, as it helps prevent mold from taking hold, especially as the buds get denser. The best time to do a light defoliation is during the late vegetative stage or right as flowering begins. Be very selective—only remove a few of the largest fan leaves that are casting significant shadows. A good rule to follow is the "less is more" approach. Since autoflowers are on such a tight schedule, they don't have much time to recover from stress. Removing too many leaves at once can shock the plant and slow down its growth, which is the last thing you want. A gentle touch here will help your premium THCA seeds reach their full potential without unnecessary setbacks.
A Simple Feeding Schedule for Autoflowers
Autoflowers don’t need a heavy nutrient schedule, especially since they start in nutrient-rich soil. For the first couple of weeks, they’ll have everything they need. Once you see the first signs of flowering—tiny white hairs called pre-flowers—you can introduce a mild, balanced nutrient mix. A good rule of thumb is to start with about a quarter of the recommended dose on the bottle to avoid burning your plants. You can gradually increase the amount as the plant grows, but always watch for signs of stress. Less is often more when it comes to feeding autoflowers.
Using Supplements like Molasses
During the mid-to-late flowering stage, you can give your plants an extra hand with a simple supplement like unsulphured blackstrap molasses. Think of it not as a primary nutrient, but as a boost for the soil’s ecosystem. The natural sugars in molasses feed the beneficial microbes in your growing medium, which helps your plant’s roots absorb nutrients more effectively. This support during the most critical phase of bud development can contribute to denser, more resinous flowers. It’s an easy and inexpensive way to help maximize the potential of your THCA seeds and get the most out of your harvest.
The Importance of Flushing Before Harvest
The final step before you chop your plants down is one of the most important for ensuring a high-quality final product. Flushing is the process of giving your plants only plain, pH-balanced water for the last one to two weeks before harvest. This simple action removes the buildup of mineral salts and excess nutrients from the soil and the plant itself. By forcing the plant to use up its stored reserves, you get a much smoother, cleaner taste in your finished buds. Skipping this step can result in a harsh, chemical flavor, so taking the time to flush is essential for anyone growing their own autoflower seeds.
Should You Grow Autoflowers Indoors or Outdoors?
Autoflowers are incredibly versatile, thriving in a variety of settings. Whether you have a dedicated grow tent or a sunny spot in your backyard, you can achieve a successful harvest. The choice between growing indoors or outdoors really comes down to your personal situation—your space, your climate, and how much control you want over the final product. An indoor grow gives you complete command over every environmental variable, while an outdoor grow lets you work with the power of the sun. Both paths can lead to amazing results, so let's walk through how to make the most of whichever you choose.
Your Guide to a Perfect Indoor Setup
Growing indoors is all about creating a perfectly controlled world for your plants. You get to play Mother Nature, dialing in the light, temperature, and humidity for optimal growth. Start with a quality growing medium and cannabis-specific nutrients to give your plants a strong foundation from the get-go. Once you’ve germinated your seeds, you can guide them through their vegetative and flowering stages without worrying about unpredictable weather. This level of control makes it easier to produce consistent, top-shelf buds. If you're looking for strains that perform exceptionally well in a controlled environment, check out our collection of indoor cannabis seeds.
How to Find the Best Spot for an Outdoor Grow
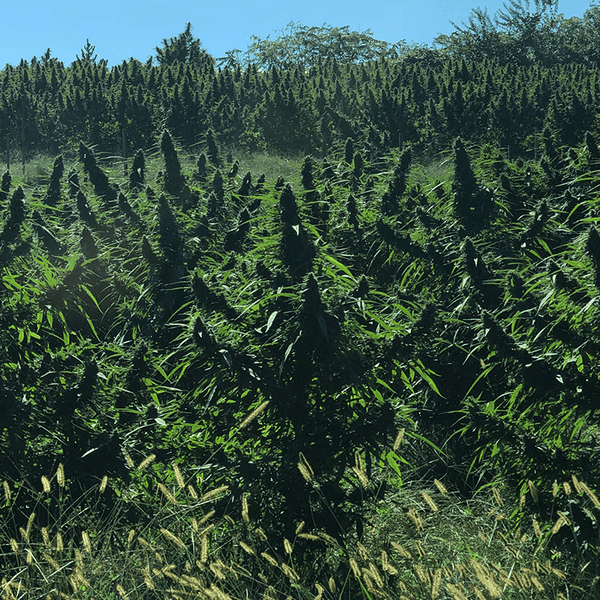
If you're taking your grow outside, location is everything. Autoflowers are a fantastic choice for outdoor cultivation because their quick lifecycle—often just 8 to 10 weeks from seed to harvest—means you can potentially get multiple harvests in a single season. Since they flower based on age rather than light cycles, you don't have to worry about the changing seasons triggering their bloom. Find a spot that gets at least 6-8 hours of direct sunlight each day. Good airflow is also key to keeping your plants healthy and mold-free. With the right genetics and a sunny patch of earth, you can grow incredible plants. Explore our outdoor marijuana seeds to find the perfect fit for your climate.
How to Protect Your Plants from the Elements
Whether you’re indoors or out, managing your plant's environment is crucial. Autoflowers are hardy, but they do best within specific ranges. Aim to keep the temperature steady between 68-77°F (20-25°C), as big swings can stress your plants. Humidity is another key factor. Seedlings and young plants prefer higher humidity, around 60-70%, to get established. As they enter the flowering stage, you’ll want to lower it to 40-50% to help prevent mold and mildew from forming on your developing buds. Keeping these conditions stable will help your autoflower seeds reach their full genetic potential, rewarding you with a healthy and bountiful harvest.
Troubleshooting Common Autoflower Issues
A healthy plant is a happy plant, and a happy plant produces the best results. The secret to a successful harvest isn’t just reacting to problems as they pop up—it’s creating an environment where they’re less likely to occur in the first place. Think of yourself as a proactive caretaker, not just a firefighter. By focusing on a few key areas like environmental stability, pest prevention, and disease management, you can help your autoflowers thrive from seedling to harvest. A little attention to detail goes a long way in keeping your plants resilient and productive.
This means checking in on your plants daily, observing changes, and understanding what they need before they show signs of distress. A strong foundation of care will make the entire growing process smoother and more rewarding. When your plants aren't fighting off pests or struggling with nutrient imbalances, they can put all their energy into developing dense, resinous buds. Proactive care also saves you time and stress in the long run. It’s much easier to prevent an issue than it is to cure a full-blown infestation or deficiency. In the following sections, we’ll cover the simple, consistent habits you can build to keep your garden in top shape.
How to Spot and Solve Common Problems
Your autoflowers are sensitive to their surroundings. Big swings in temperature, humidity, or light can cause stress, which slows down growth and can reduce your final yield. The goal is to create a stable, consistent environment. For example, if you're growing inside, aim to keep the temperature and humidity levels steady throughout the day and night. Inconsistent light schedules can also confuse your plants, so use a timer to ensure they get a reliable amount of light each day. By managing these environmental factors, you’re solving most common growing problems before they even start. This is especially important when growing sensitive indoor cannabis seeds that depend on a controlled climate.
Dealing with Damping Off and Nutrient Lockout
Two common hurdles for new growers are damping off and nutrient lockout, and both often stem from watering issues. Damping off is a fungal disease that can quickly take out young seedlings, causing them to wilt at the base. It thrives in overly wet conditions, which is why gentle watering is so important in the first couple of weeks. Instead of drenching the soil, use a spray bottle to keep it moist. Nutrient lockout is another frustrating problem where your plant can’t absorb the food it needs, even if it’s present in the soil. The most common cause is an incorrect pH level in your water. If the pH is too high or too low, it literally locks the nutrients away from the roots. For soil grows, always aim for a pH of around 6.5. A quick check with a pH pen before you water can save you a lot of headaches down the road.
Identifying and Removing Hermaphrodites
A hermaphrodite is a female plant that develops male pollen sacs, usually due to stress. This is a problem because the pollen can fertilize your other female plants, resulting in buds full of seeds instead of potent flowers. To prevent this, inspect your plants daily during the flowering stage. Look for small, yellow, banana-shaped growths tucked in with the female pistils. If you spot one or two, you can carefully pluck them off with sterile tweezers. If the plant is covered in them, it’s often best to remove it from your garden to protect the rest of your crop. The best defense is starting with strong genetics. High-quality feminized seeds are bred for stability, but for ultimate peace of mind, our innovative triploid cannabis seeds are virtually guaranteed to remain seedless, even when stressed.
How to Prevent Common Cannabis Pests
The best way to deal with pests is to never let them get a foothold. Prevention starts with a clean grow space. Make sure your room or tent is free of dirt, debris, and old plant matter where pests can hide and breed. Regularly inspect your plants, checking the undersides of leaves for any unwelcome visitors like spider mites or aphids. If you spot an issue, remove any affected leaves immediately. For an extra layer of defense, you can use physical barriers like screens on your air intakes to stop insects from getting in. Starting with high-quality, vigorous autoflower seeds also gives your plants the strong start they need to naturally resist pests.
Identifying and Treating Common Plant Diseases
Just like with pests, sanitation is your best friend when it comes to preventing common plant diseases like powdery mildew or root rot. Always use clean, sterile tools, especially when you’re pruning or training your plants. A clean cut from sharp shears will heal quickly, leaving less opportunity for infection to set in. Be sure to remove any fallen leaves or plant residue from the soil surface promptly. Good air circulation is also critical, as stagnant, humid air is a breeding ground for mold and mildew. A small oscillating fan can make a huge difference. Giving your plants the best start with superior genetics from our full seed collection is a foundational step in disease management.
What Causes Plant Stress (And How to Avoid It)
Even with the best care, your plants will sometimes face stress. Your job is to help them build the resilience to handle it. This comes down to consistent, proper care. A correct watering and feeding schedule is the foundation of a strong plant. Overwatering or giving too many nutrients can stress the root system, making the plant vulnerable to other problems. Think of it as providing a balanced diet and a stable home. For growers looking for an edge, our innovative triploid cannabis varieties are bred for vigor and stability, offering an extra layer of resilience right from the start. These small, consistent actions build a robust plant that can power through minor issues with ease.
How to Harvest, Dry, and Cure Your Autoflowers
You’ve made it to the most exciting part of the journey: the harvest. All your hard work and careful attention are about to pay off. This final stage is where you transform your beautiful plants into high-quality buds with amazing flavor and potency. It requires a bit of patience, but trust me, it’s worth every second. Properly drying and curing your harvest is what separates decent buds from a truly top-shelf experience. Let’s walk through how to nail these final steps and preserve the quality of the incredible genetics you’ve grown.
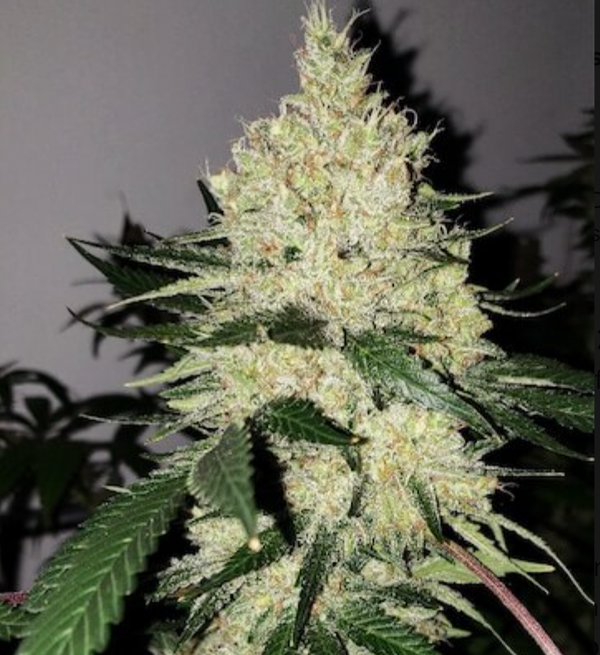
Is It Time to Harvest? Here’s How to Tell
Timing is everything when it comes to harvesting. Harvesting too early or too late can impact the potency and effects of your final product. Instead of guessing, let your plants tell you when they’re ready. You’ll want to get a jeweler's loupe or a small magnifying glass to get a close look at the trichomes—the tiny, crystal-like glands on the buds. For peak THC, most trichomes should be a milky white color, with a few starting to turn amber. Another great visual cue is the pistils, or the small hairs on the buds. When about 70-90% of them have darkened from white to a reddish-brown, your plants are in the perfect harvest window.
Timing Your Harvest with Trichomes
To really nail your harvest time, you need to look closer—literally. Get yourself a jeweler's loupe or a small magnifying glass so you can inspect the trichomes, which are the tiny, sparkling, mushroom-shaped glands covering the buds. These little crystals are where the magic happens, and their color is the most accurate indicator of peak potency. You’re looking for the moment when most of the trichomes have turned from clear to a cloudy, milky white. This is when THC content is at its highest. If you wait until you see a good number of amber trichomes, the effect will be more relaxing and sedative. It’s a small detail that makes a huge difference in the final quality of your THCA seeds.
Using a Progressive Harvest Technique
Not all buds on a plant mature at the same rate. The top colas, which get the most light, are usually ready first, while the lower buds might need a little more time. Instead of cutting the whole plant down at once, consider a progressive harvest. You can carefully cut the ripe, mature buds from the top of the plant and leave the lower ones to continue developing for another week or so. This allows them to fatten up and reach their full potential, maximizing your overall yield. Many growers also stop watering a few days before harvest to help concentrate the plant’s resin production. This simple trick can help your autoflower seeds deliver an even more potent and flavorful final product.
Wet Trim vs. Dry Trim: Which Is Right for You?
Once you’ve cut down your plants, it’s time for a manicure. Trimming removes the excess sugar leaves from your buds, which improves their appearance and makes for a smoother smoke. Grab a pair of clean, sharp scissors and get comfortable. You can trim your buds while the plant is still wet (wet trimming) or after it has dried (dry trimming). Many growers find wet trimming easier because the leaves are still sticking out. Carefully snip away the leaves that don't have many trichomes, leaving behind the dense, beautiful buds. Your goal is to create a clean, well-shaped product that’s ready for the next step.
The Right Way to Dry Your Cannabis Buds
Proper drying is crucial for preserving the terpenes and cannabinoids you’ve worked so hard to cultivate. After trimming, hang the individual branches upside down in a dark, well-ventilated space. You need to control the environment here: aim for a temperature between 60-70°F and a relative humidity of 55-60%. A small fan can help circulate air, but don’t point it directly at the buds. This slow-drying process, which usually takes 7-14 days, prevents mold and preserves the flavor. You’ll know your buds are ready when the smaller stems snap instead of bending. This is the perfect time to start thinking about your next crop of autoflower seeds.
Why Curing Is Key (And How to Do It Right)
Curing is the final touch that develops the flavor and aroma of your cannabis. Once your buds are dry, place them into airtight glass jars, filling them about three-quarters full to leave some room for air. Store the jars in a cool, dark place. For the first two weeks, open the jars once or twice a day for a few minutes to release moisture and let in fresh air—a process called "burping." After that, you can burp them every few days. While your buds will be ready after two to four weeks of curing, letting them cure for six to eight weeks or longer will produce an exceptionally smooth and flavorful result. When you're ready to grow again, you can shop all seeds to find your next favorite strain.
Advanced Tips for a Better Harvest
Once you’ve successfully completed a few grows and have a solid handle on the basics, you might start wondering what’s next. This is where the real fun begins. Taking your grow to the next level isn’t about complicated, expensive equipment; it’s about refining your technique and paying closer attention to the subtle needs of your plants. Small, intentional adjustments to your setup and routine can make a massive difference in the health of your plants and the size and quality of your final harvest. Think of it as moving from following a recipe to becoming a chef—you start to understand the why behind each step. These next steps are all about the details that separate a good grow from a great one. By focusing on optimizing your containers for better root health, fine-tuning your climate for maximum stability, and implementing a few simple strategies to increase your harvest, you can help your plants reach their full genetic potential. It’s time to put your experience to work and see just how impressive your autoflowers can be when you give them that extra bit of care and attention.
Choosing the Perfect Pot Size and Type
The right home for your plant’s roots is foundational to its success. Since autoflowers have a short lifespan, you want to give their root system the best possible start. Soilless potting mixes are a popular option because they retain moisture well while providing excellent aeration, and they often contain enough nutrients to support early vegetative growth. Consider using fabric pots or air pots, which prevent roots from circling and becoming root-bound by encouraging them to air-prune. This process creates a more fibrous, efficient root mass that can absorb more water and nutrients. Choosing the right container from the start helps your autoflower seeds develop into strong, resilient plants.
Advanced Climate Control for Better Buds
Your plants thrive in a stable environment, and consistency is key. Environmental stress from things like extreme temperatures or wild humidity swings can seriously slow down growth and reduce your yield. Aim to keep your grow space within the ideal temperature and humidity ranges for each stage of your plant’s life. During the vegetative stage, they prefer warmer, more humid conditions, while the flowering stage requires slightly cooler and drier air. Using fans for circulation, a hygrometer to monitor conditions, and a dehumidifier or humidifier as needed will give you precise control. A stable climate allows your indoor cannabis seeds to focus all their energy on growing strong and producing dense buds.
How to Maximize Your Autoflower Yield
Getting a larger harvest often comes down to proactive plant care and a few smart techniques. Implementing advanced growing methods can help you maximize your plant’s potential. For autoflowers, Low-Stress Training (LST) is a great way to gently bend and tie down branches to create a more even canopy, exposing more bud sites to light. You should also monitor your plants daily for any signs of trouble. Catching issues early is crucial. Regularly inspect for pests and remove any dead or yellowing leaves. You can even use nets or screens to keep insects out of your garden. Healthy, stress-free plants will always reward you with a more abundant harvest, especially when you start with high-quality THCA seeds.
Related Articles
- Autoflower Seeds for Beginners: Grow Fast & Easy
- Autoflower Cannabis Seed 101: Your Complete Guide
- The Complete Guide to Autoflower Weed Seeds
- Autoflower Cannabis Seeds: A Simple Grow Guide
- Auto Cannabis Seeds: The Ultimate Beginner's Guide
Frequently Asked Questions
Are autoflowers really less potent than other cannabis plants? That’s a common myth that comes from the early days of autoflower breeding. While it might have been true years ago, modern genetics have completely changed the game. Today’s high-quality autoflowers are bred to produce THC and CBD levels that are just as impressive as their photoperiod counterparts. The key is to start with strong, stable genetics from a reputable source.
Can I transplant my autoflower seedling into a bigger pot later? It’s best to plant your germinated seed directly into its final container. Autoflowers have a very short vegetative stage, which means they don't have much time to recover from stress. The shock of being transplanted can slow down their growth for a few days, and with their rapid lifecycle, those few days are critical. Starting them in their permanent home ensures they can grow without interruption.
How do I know when to start giving my plants nutrients? Most quality potting soils have enough nutrients to get your plant through its first few weeks. A great rule of thumb is to wait until you see the first signs of flowering, which are the tiny white hairs (pistils) that form where the branches meet the stem. Once you see these, you can introduce a bloom nutrient formula, but always start with a very light dose—about one-quarter of what the manufacturer recommends—to avoid burning your plant.
What's the biggest mistake people make when growing autoflowers? The most frequent mistake is trying to do too much. Because autoflowers grow so quickly, they are more sensitive to overwatering and overfeeding. New growers often want to give their plants a lot of love, but with autoflowers, less is usually more. Let the soil dry out a bit between waterings and be very conservative with nutrients. Their short life doesn't give them much time to bounce back from mistakes.
How much can I expect to harvest from a single autoflower plant? Yield can vary quite a bit depending on the specific strain, your lighting, and your overall growing conditions. While they typically produce a bit less than a large, long-growing photoperiod plant, the trade-off is their incredible speed. Their quick seed-to-harvest time means you can fit multiple harvests into a single season, which can easily make up for the difference in size.