Let's talk speed. How does seed-to-harvest in as little as seven weeks sound? That's the incredible turnaround you get with modern autoflower seeds. You can fit multiple harvests into a single season instead of waiting months for your plants to mature. This is possible because their Ruderalis genetics trigger flowering based on age, not changing light cycles. This makes them a game-changer for growers who value efficiency. Whether you're a commercial cultivator trying to increase your output or a home grower who just can't wait for the next harvest, this guide will walk you through getting amazing results from these plants.
Key Takeaways
- Embrace the Autoflower Advantage: Their internal clock means they flower automatically based on age, not light. This gives you a straightforward, low-maintenance grow cycle that’s typically finished in just 7-10 weeks.
- A Stable Environment is Non-Negotiable: Because autoflowers have a short, fixed timeline, they can't recover from stress. Avoid common mistakes like transplanting and overfeeding by planting in a final container and starting with a light nutrient schedule.
- Smart Techniques Improve Your Final Product: Use low-stress training (LST) to expose more bud sites to light for a bigger yield. Harvest when trichomes are milky white for maximum potency, and properly cure your buds to develop the best possible flavor and aroma.
What Are Autoflower Seeds?
If you’ve ever wanted to grow cannabis without the hassle of managing complicated light schedules, autoflower seeds are your answer. Think of them as the low-maintenance, high-reward option in the cultivation world. Unlike traditional cannabis plants that depend on changes in light to start producing buds, autoflowers operate on their own internal clock, automatically switching from vegetative growth to the flowering stage once they reach a certain age.
This unique trait comes from a special type of cannabis called Cannabis Ruderalis. Early breeders cleverly crossbred this hardy, fast-flowering plant with popular Indica and Sativa strains. The result? Plants that combine the desirable aromas, flavors, and effects of classic cannabis with the simple, speedy life cycle of Ruderalis. This makes Trilogene’s collection of autoflower seeds a fantastic choice for everyone from first-time growers to seasoned cultivators looking for a quick and efficient harvest.
What Makes an Autoflower... Auto?
The magic of autoflowers lies in their genetics, which remove light dependency from the growing equation. Traditional cannabis plants, known as photoperiod strains, require a specific light cycle to begin flowering—typically 12 hours of light and 12 hours of uninterrupted darkness. This mimics the changing seasons outdoors.
Autoflowering strains, on the other hand, flower based on age alone. They have a predetermined lifespan, usually beginning to flower just 3-4 weeks after sprouting. This means you can keep them under a consistent light schedule (like 18 hours on, 6 hours off) from seedling to harvest. This simplifies your setup and eliminates the risk of accidentally interrupting a dark cycle, which can stress a photoperiod plant.
The Secret Ingredient: Cannabis Ruderalis
The autoflowering trait is a direct gift from Cannabis Ruderalis, a subspecies of cannabis that adapted to survive in the harsh, northern climates of Central Asia and Russia. These regions have short summers and long daylight hours, so Ruderalis evolved to flower quickly based on its age, ensuring it could reproduce before the first frost hit.
While pure Cannabis Ruderalis is naturally low in THC, breeders saw the potential in its automatic flowering gene. By crossing it with high-potency Sativa and Indica varieties, they created autoflowering hybrids that deliver impressive cannabinoid profiles without sacrificing the Ruderalis resilience and speed. It’s the perfect blend of wild toughness and cultivated quality.
What Makes Autoflower Plants Unique?
Autoflowers offer a unique set of advantages that make them appealing to a wide range of growers. Their most celebrated traits include speed, size, and simplicity. Because their entire life cycle is often completed in just 7 to 10 weeks, you can achieve multiple harvests in a single outdoor season or run several cycles indoors per year.
Their compact size is another major benefit. Most autoflowers stay relatively small and bushy, making them ideal for growers with limited space, such as a small tent, balcony, or discreet corner of a garden. This smaller stature also makes them easier to manage. Combined with their natural resilience, autoflowers are incredibly forgiving, making them a perfect starting point for beginners looking to build their confidence and skills.
Ideal for Discreet Growing
If you're looking to keep your garden on the down-low, autoflowers are your best friend. Their naturally compact and bushy structure means they won't tower over your fence or draw unwanted attention. You can easily tuck them away on a balcony, in a small grow tent, or even in a discreet corner of your backyard, making them perfect for urban or private settings. This small size also makes them incredibly easy to manage without a lot of fuss. The quick turnaround is another huge advantage for discreet growing; with a life cycle that wraps up in as little as seven weeks, your plants are present for a much shorter period. This significantly reduces the time you have to worry about discovery, allowing you to get your harvest quickly and quietly. For anyone prioritizing privacy, these autoflower seeds are a smart and practical choice.
How to Choose the Right Autoflower Seeds
Picking the perfect autoflower seed is your first real step toward a successful harvest. With so many options available, it helps to know what you’re looking for before you start shopping. Think about your goals for the grow, the kind of experience you want, and the space you have to work with. By focusing on a few key details—from the quality of the genetics to the final cannabinoid profile—you can confidently select a strain that’s the right fit for you. Let's walk through exactly what to consider.
What Do Good Autoflower Seeds Look Like?
Your final harvest is only as good as the genetics you start with, so always prioritize quality. The quality of autoflowers has improved dramatically over the years, and today’s best seeds produce fast, resilient, and potent plants. Look for seed banks that provide detailed strain information, transparent breeding practices, and solid customer reviews. High-quality autoflower seeds will have high germination rates and grow into vigorous, healthy plants. Because they are so forgiving and deliver quick results, they’re a fantastic choice for new growers, but that doesn’t mean you should ever have to settle for mediocre genetics.
Choosing the Right Strain for You
What do you want from your final product? Answering this question will help you narrow down the perfect strain. Autoflowers come in a wide variety of Indica, Sativa, and Hybrid types, each offering a unique experience. Generally, Indica-dominant strains are known for their relaxing and sedative effects, while Sativa-dominant strains tend to be more uplifting and energizing. Hybrids offer a blend of both. Read the strain descriptions carefully to understand their specific effects, flavors, and aromas. Thinking about your desired outcome will help you find the perfect match in our full collection of seeds.
Examples of Popular Autoflower Strains
The variety of autoflower strains available is incredible, with something for every preference. To give you an idea of what’s out there, let's look at a few standouts. For instance, the Autoflower World Cup recently highlighted strains like Tropicana Cookies Auto for its relaxing Indica effects and Sweet Gelato Auto for its uplifting Sativa buzz. Other strains gain popularity for being exceptionally easy to grow, making them perfect for beginners. You'll also find strains celebrated for their unique flavor profiles, from the gassy notes of Lazer Fuel to the sweet fruitiness of Bahama Berry. Exploring these popular options can help you discover the specific aromas, flavors, and effects you enjoy most as you browse our full autoflower collection.
Decode THC and CBD Levels
Forget the old myth that autoflowers are less potent. Modern autoflowering genetics can produce cannabinoid levels that are just as high as traditional photoperiod strains. When choosing a seed, consider the THC and CBD content. If you’re looking for strong psychoactive effects, choose high-THCA seeds. If you want the therapeutic benefits of cannabis without the intense high, a strain rich in CBD might be a better fit. You can also find strains with a balanced 1:1 ratio of THC to CBD, offering a more moderate, well-rounded experience. Many growers even keep a variety of CBD seeds on hand to suit different needs.
Typical Potency and Terpene Profiles
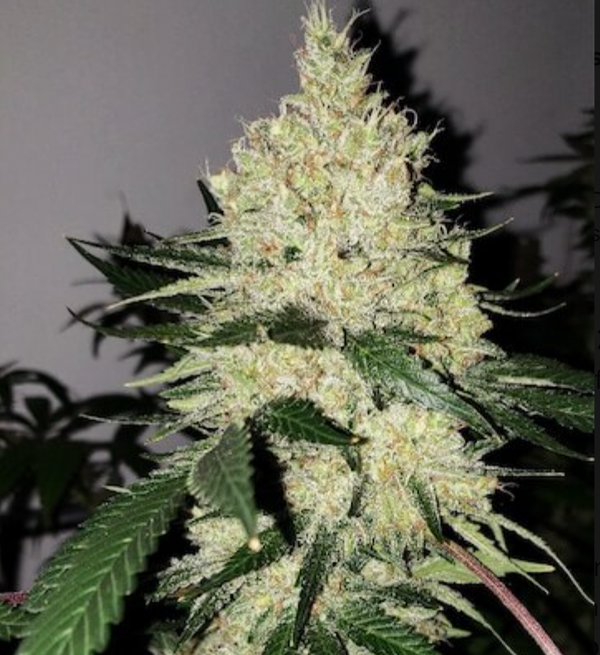
Let's talk about what really defines a great autoflower: its potency and flavor. The best modern autoflowers are powerhouses, with THC levels often reaching and even exceeding 25%, putting them on par with top-tier photoperiod strains. But potency is only half the story. The real magic comes from the terpenes—the aromatic compounds that give each strain its unique scent and taste, from citrusy and piney to sweet and earthy. These terpenes do more than just delight your senses; they also play a crucial role in shaping the strain's effects. Understanding a strain's terpene profile helps you anticipate its experience, whether you're seeking relaxation, focus, or a burst of creativity. A rich and complex profile is a sign of high-quality genetics and is what makes a harvest truly special.
Matching Plant Size and Yield to Your Space
One of the biggest advantages of autoflowers is their compact size. They typically stay small and manageable, which makes them perfect for growers with limited space, such as a small tent or a balcony. Their discreet stature is also a major plus for anyone who wants to keep their garden low-profile. This smaller size and rapid growth cycle often result in a lower yield per plant compared to a large photoperiod plant. However, their speed allows you to fit multiple harvests into a single season, whether you're growing with indoor cannabis seeds or outdoors. This quick turnaround can easily make up for the smaller individual plant yield.
Understanding Plant Height and Yield Expectations
When you're planning your grow, it's helpful to have a clear picture of what to expect from your plants. Autoflowers are known for their compact and bushy structure, which is a huge plus if you're working with a small tent, a balcony, or just want to keep your garden discreet. Because they stay smaller and finish their cycle so quickly, the yield from a single plant will naturally be less than what you'd get from a giant photoperiod plant that has months to grow. But here's the trade-off that makes it all worthwhile: their incredible speed. Since you can complete a full cycle in as little as 7-10 weeks, you can easily fit multiple harvests into one season. This means your total yield over the course of a year can be just as impressive, making autoflower seeds an incredibly efficient choice for consistent production.
Look for Quality Indicators
When your seeds arrive, you can spot quality with a quick visual inspection. Healthy, mature seeds are typically dark brown or gray, often with mottled "tiger stripe" patterns, and should feel hard and firm when you gently squeeze them. Avoid seeds that are pale, greenish, or feel soft and crush easily, as these are likely immature and will have poor germination rates. Beyond looks, a reputable seed bank will provide transparent information about their breeding practices and detailed strain descriptions. This data is just as crucial as the seed's appearance, as it gives you a clear picture of the plant's genetic potential and what to expect during your grow, helping you find the perfect match in our autoflower seed collection.
Why Award-Winning Genetics Matter
Choosing seeds from a line of award-winning genetics is like getting an insurance policy for your harvest. These strains have been rigorously tested and proven to deliver consistent, high-quality results. This means you can count on predictable growth patterns, stable characteristics, and a final product that lives up to its description in terms of flavor, aroma, and effect. Plants from a strong genetic background are also often more vigorous and resilient, better equipped to handle minor stressors. Investing in proven, innovative genetics ensures you’re starting with the best possible foundation, giving you a significant head start on the path to a successful and satisfying harvest.
Setting Up Your Autoflower Grow Environment
Your autoflowers are resilient, but giving them the right environment is the secret to a truly impressive harvest. Unlike photoperiod plants that rely on light cycle changes to start flowering, autoflowers operate on their own internal clock. This makes them a bit more forgiving, but they still have preferences. Dialing in the light, temperature, soil, and watering from the start will help your plants reach their full genetic potential. Think of it as setting the stage for a great performance—get the basics right, and your plants will handle the rest.
Germinating Your Seeds: The First Step
Getting your seeds to sprout is the very first, and arguably most exciting, part of the growing process. This is where your journey from a tiny seed to a thriving plant begins. While there are a few ways to approach germination, some methods are more reliable than others. The goal is simple: provide your seeds with the perfect combination of moisture, warmth, and darkness they need to wake up from dormancy. This signals the seed to crack open and send out its first root, known as a taproot. Successfully germinating your seeds sets a strong foundation for the rest of your plant's life, ensuring it gets the healthy, vigorous start it deserves.
The Paper Towel Method
One of the most trusted and straightforward ways to germinate seeds is the paper towel method. It’s a favorite among growers because it’s easy to do and allows you to watch the progress closely. To start, simply moisten two paper towels—they should be damp, not dripping wet. Place your seeds on one of the towels, leaving some space between them, and then cover them with the second moist towel. Put this paper towel "sandwich" inside a plastic bag or between two plates to lock in the moisture. Store it in a warm, dark place, like on top of your refrigerator or in a cupboard. You can monitor the seeds every day, and within a few days, you should see a tiny white taproot emerge.
How Deep to Plant Your Sprouted Seed
Once your seed has successfully sprouted and you see a small taproot, it’s time to move it to its new home. Planting depth is critical at this stage. If you plant it too deep, the seedling will struggle to reach the surface and may run out of energy before it sees the light. If it's too shallow, the roots might not establish a proper anchor. A good rule of thumb is to plant the sprouted seed about 1/4 to 1/2 inch deep in your soil or growing medium. Gently place the seed taproot-down into the small hole and lightly cover it with soil. This gives your new seedling the perfect depth to establish its roots while still being able to push through to the surface with ease.
Getting the Light and Temperature Just Right
Since autoflower seeds don't depend on light cycles to flower, you can keep them on a consistent schedule. Most growers find success with 18 hours of light and 6 hours of darkness (18/6) or a 20/4 cycle. While it might be tempting to give them 24 hours of light, a short dark period gives your plants a chance to rest and can prevent stress. For temperature, aim for a comfortable 70°F (21°C). Humidity is also key: keep it between 50–60% during the vegetative stage and drop it to around 40% once your plants start flowering to help prevent mold.
Ideal Light Cycles (And What to Avoid)
One of the best things about growing autoflowers is that you can forget about complicated light-flipping schedules. Since they flower based on age, not light cues, you can set your timer once and let it run. The most common and effective schedule is 18 hours of light followed by 6 hours of darkness (18/6). This gives your plants plenty of light to fuel their rapid growth while also providing a necessary rest period to process nutrients and build strong roots. While some growers use a 20/4 cycle, the 18/6 schedule is a proven sweet spot that delivers fantastic results for our entire collection of autoflower seeds without stressing the plants.
Positioning Your Grow Lights
Finding the right distance for your grow lights is key to developing a healthy plant structure. If your lights are too close, you risk burning the top leaves, and if they're too far, your plants will stretch to reach the light, leading to weak stems and airy buds. The perfect distance varies depending on your light's power and type, so your first step should always be to check the manufacturer's recommendation. As a general guideline, keep LED lights about 18 to 24 inches away from the plant canopy. Pay close attention to your plants—they’ll tell you what they need. If you see any signs of stress, adjust the height until they look happy. This simple step is crucial when growing indoor cannabis seeds.
Temperature and Humidity by Growth Stage
Autoflowers thrive in a stable environment, so dialing in your temperature and humidity will make a huge difference. During the seedling and vegetative stages, your plants love a warm and humid climate. Aim for a temperature between 70–78°F (21–25°C) and keep the relative humidity around 50–60%. This encourages vigorous growth. Once you see the first signs of flowers, it’s time to make a change. To help your buds get dense and prevent mold, drop the humidity to around 40%. Keeping a small fan running for gentle air circulation is also a great way to manage your climate and keep your plants healthy from start to finish.
Picking the Best Soil and Pots
Autoflowers thrive in light, airy soil that allows their roots to breathe and grow without resistance. A soil mix that drains well is essential to prevent waterlogging and root rot. You can buy a pre-made mix or create your own using a blend of peat moss, compost, perlite, and vermiculite. A great starting recipe is 3 parts peat moss, 3 parts compost, 2 parts perlite, and 1 part vermiculite. This combination provides a perfect balance of moisture retention, drainage, and aeration. When choosing containers, make sure they have plenty of drainage holes at the bottom.
Plan Your Nutrient Schedule
One of the most common mistakes with autoflowers is overfeeding them. They are generally less hungry than their photoperiod cousins and do best with a lighter nutrient schedule. When you do start feeding, begin with half the recommended dose listed on your nutrient bottle and see how your plants respond. You can always add more later if needed. Avoid giving any nutrients during the first couple of weeks when your plant is just a seedling, as the soil should have enough to get it started. Focus on providing the essential macronutrients—nitrogen, phosphorus, and potassium—in the right balance for each growth stage.
Consider Slow-Release Organic Nutrients
To make feeding even simpler and safer, think about using slow-release organic nutrients. This approach is a great way to avoid the common pitfall of overfeeding your autoflowers. Instead of giving your plants a big dose of liquid nutrients all at once, you amend your soil with organic matter that breaks down over time. This creates a living soil that feeds your plants gradually, giving them exactly what they need, when they need it. It’s a set-it-and-forget-it method that reduces the risk of nutrient burn, which is especially important for autoflower seeds since they don't have time to recover from stress. It’s a more forgiving technique that works with the plant’s natural rhythm.
How to Water Your Autoflowers Correctly
Overwatering is a fast way to cause problems for your autoflowers. These plants prefer their soil to dry out a bit between waterings. A simple way to check if it’s time to water is to stick your finger about an inch into the soil. If it feels dry, it’s time for a drink. Another easy method is the "lift test"—get a feel for how heavy the pot is when it's fully watered versus when it's dry. By letting the soil dry out, you encourage the roots to grow deeper in search of water, which builds a stronger, healthier root system and a more resilient plant.
Should You Grow Indoors or Outdoors?
Deciding where to grow your autoflowers is one of the first big choices you'll make. There’s no single right answer—it all comes down to your space, budget, and goals. Growing indoors gives you complete authority over every aspect of the environment, from light to humidity. This control can lead to consistent, high-quality results year-round, but it also means a higher initial investment in equipment and a bigger electricity bill. You can dial in the perfect conditions, protecting your plants from unexpected weather and pests, which is a huge plus for anyone aiming for top-shelf quality.
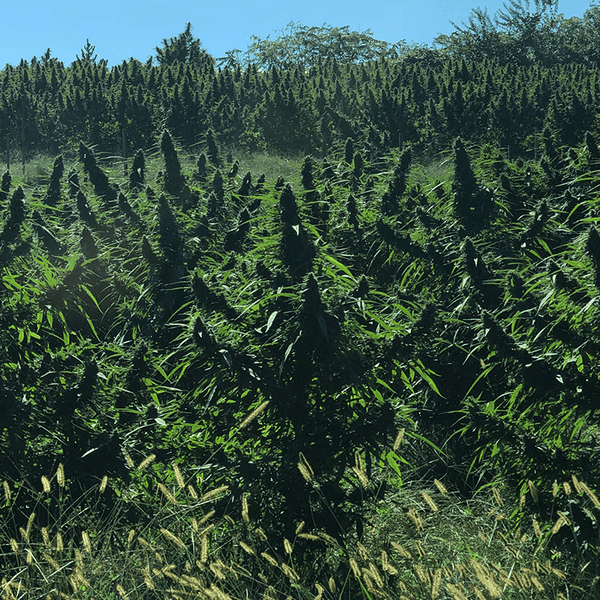
On the other hand, growing outdoors lets you harness the power of the sun for free. Plants often have more room to stretch out, potentially leading to larger yields than their indoor counterparts. However, you’re also at the mercy of mother nature. An unexpected heatwave, a sudden frost, or a pest infestation can quickly become a major headache. Many growers find a happy medium, using a greenhouse to get the best of both worlds—natural sunlight with added protection. Ultimately, both methods can produce an amazing harvest, especially when you start with high-quality autoflower seeds designed to thrive in either setting.
Setting Up Your Indoor Grow
Growing indoors is all about creating the perfect world for your plants. Since autoflowers don't rely on light changes to start flowering, you can give them a consistent schedule to maximize growth. A light cycle of 18 hours on and 6 hours off is a great starting point. This gives your plants plenty of light to photosynthesize without over-stressing them. You’ll also need good ventilation to keep the air fresh and prevent mold. Choosing the right indoor cannabis seeds is key, as many strains are specifically bred to flourish in a controlled environment. With the right setup, you can harvest beautiful buds regardless of the season outside.
Managing Odor with Carbon Filters
Let's be real: cannabis plants have a powerful aroma, especially once they start flowering. While you might love the smell, your neighbors might not. This is where a carbon filter becomes your best friend for a discreet indoor grow. A carbon filter, or "scrubber," attaches to your exhaust fan and works by pulling all the air from your grow tent through a bed of activated carbon. This carbon neutralizes any odors before the air is vented out, effectively scrubbing it clean. It’s a simple but incredibly effective way to keep your garden private and your air fresh, ensuring the only person who knows about your grow is you.
Planning Your Outdoor Grow
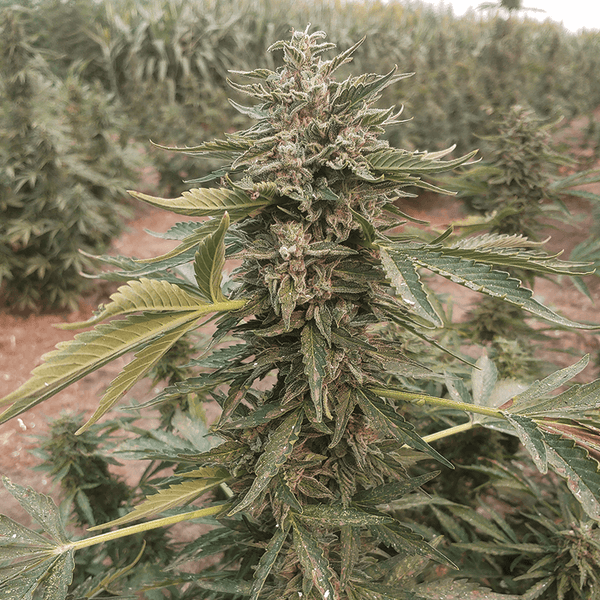
If you have the space, growing outdoors can be incredibly rewarding. The sun provides a full spectrum of light that even the best grow lamps can't perfectly replicate. To get started, find a spot that gets plenty of direct sunlight. You can plant your seeds anytime from February to September, as long as you’re past the last frost. A great strategy is to stagger your planting, putting new seeds in the ground every few weeks. This allows you to create a continuous harvest throughout the growing season. Just be sure to select hardy outdoor marijuana seeds that can handle variable conditions.
How to Control Your Grow Environment
Whether you’re indoors or out, maintaining the right environment is crucial for healthy plants. Autoflowers are pretty resilient, but they do best within a specific temperature and humidity range. Aim to keep the temperature between 70–80°F (21–27°C). For humidity, a good target is 60–70% during the vegetative stage, when the plant is focused on growing leaves and stems. Once it starts flowering, you’ll want to lower the humidity to around 40% to help prevent bud rot. Monitoring these conditions will help your plants thrive and produce the best possible results.
Making the Most of Your Grow Space
One of the best things about autoflowers is their compact size, which makes them perfect for growers with limited space. To give your plants a solid foundation, choose the right container. For an indoor grow, a 3- to 5-gallon pot is usually sufficient. If you’re growing outdoors and want to give your plants more room to expand, a 5- to 10-gallon pot is a better choice. The right pot size ensures the root system has enough space to develop without becoming root-bound, which is essential for nutrient uptake and overall plant health. Many of our feminized seeds are autoflowers that stay manageable in size, perfect for any setup.
Growing Different Strains Together
One of the best parts about growing autoflowers is the flexibility they offer. You can absolutely grow different strains together in the same space, even if they're a mix of Indica, Sativa, and Hybrids. Because all autoflower seeds operate on the same internal clock and thrive under a consistent light schedule, you don't have to worry about managing different lighting needs. This makes it easy to cultivate a variety of flavors, aromas, and effects all in one tent. Their naturally compact size also means you can fit several different plants without overcrowding your garden. It’s a perfect strategy for growers who want to experiment and discover new favorites without dedicating an entire grow cycle to a single strain.
How to Maximize Your Autoflower Yield
Autoflowers are known for their speed and simplicity, but that doesn't mean you can't influence the outcome. With a few smart techniques, you can push your plants to produce the best possible harvest. Getting a bigger yield from your autoflowers comes down to creating the perfect environment and minimizing stress throughout their short life. From training your plants to timing your harvest just right, these strategies will help you get the most out of every seed.
Using Low-Stress Training (LST)
One of the best ways to increase your yield is with Low-Stress Training (LST). This technique involves gently bending and tying down the branches of your plant to create a flat, even canopy. By doing this, you allow light to penetrate deeper into the plant, reaching bud sites that would otherwise be shaded. More light exposure means more energy for bud production, resulting in a heavier harvest.
Unlike high-stress methods like topping, LST doesn't involve cutting the plant, which is crucial for fast-growing autoflower seeds. Since autoflowers have a limited time to grow, they can't afford the recovery time needed after intense stress. Start LST early, when your plant has developed a few nodes, and use soft plant ties to avoid damaging the stems.
Level Up with Advanced Growing Methods
Autoflowers have unique nutritional needs compared to their photoperiod cousins. Because they have a shorter vegetative stage, they generally require fewer nutrients overall. It’s a common mistake to overfeed them, which can lead to nutrient burn and stunted growth. A good rule of thumb is to start with half the recommended dose of nutrients listed on the packaging.
During the vegetative stage, your plants will need more nitrogen (N) to support leafy growth. As they transition into the flowering stage, you’ll want to reduce the nitrogen and increase phosphorus (P) and potassium (K) to help them develop dense, resinous buds. Paying close attention to your plant’s nutrient intake is a simple yet effective way to guide its growth and improve your final yield.
Time Your Harvest Perfectly
Knowing exactly when to harvest is an art, and it can make all the difference in the quality and potency of your buds. If you harvest too early, your buds won't be fully developed; if you wait too long, the THC can begin to degrade. The most reliable way to check for ripeness is by inspecting the trichomes—the tiny, crystal-like glands on the flowers—with a jeweler's loupe or magnifying glass.
For peak potency, you should harvest your plants when about 80% of the trichomes have turned from clear to a milky or cloudy white color. If you see a few amber trichomes, that’s okay, but a majority of amber indicates the THC is converting to CBN, which produces a more sedative effect.
Avoid Common Growing Mistakes
Because autoflowers operate on a tight schedule, they have very little time to recover from mistakes. Simple errors that a photoperiod plant could easily bounce back from can permanently stunt an autoflower, significantly reducing your yield. One of the most common mistakes is transplanting. The shock of being moved can stall growth for a week or more—time an autoflower simply doesn’t have. To avoid this, plant your germinated seeds directly into their final container.
Overwatering is another frequent issue. It’s better to let the soil dry out slightly between waterings to ensure the roots get enough oxygen. Using the right size pot (at least 3-5 gallons) is also key to giving your feminized seeds the space they need to thrive without restriction.
Your Essential Autoflower Grow Gear
While autoflowers are known for their resilience, giving them a great environment starts with having the right equipment. You don’t need a high-tech lab to get an amazing harvest, but a few key items will make the process smoother and your results more consistent. Think of this as building the perfect foundation for your plants to thrive. Investing a little in your setup from the start pays off with healthier plants and more impressive yields down the line. It’s all about creating a stable, happy home where your autoflowers can reach their full potential with minimal stress.
Your Basic Setup Checklist
Autoflowers are wonderfully straightforward, making them a fantastic choice for new and experienced growers alike. To get started, you only need a few essentials. First, choose your containers. Fabric pots or air pots are excellent because they promote healthy root growth by allowing for better aeration. Next, select a quality growing medium. A light, airy soil mix with a neutral pH is ideal. You can find pre-mixed soils designed for cannabis that already contain the right balance of nutrients. Finally, if you’re growing indoors, you’ll need a reliable grow light. Full-spectrum LEDs are a popular, energy-efficient option that provides everything your plants need from seedling to harvest. And of course, it all begins with great genetics, so be sure to pick up some quality autoflower seeds.
Must-Have Climate Control Tools
Your plants' environment plays a huge role in their health and development. Your main goal here is to maintain consistency. Autoflowers do best with temperatures between 70–79°F (21–26°C). Big temperature swings can stress them out, so try to keep it steady. Humidity is also important. Aim for a relative humidity of 50–60% during the vegetative stage, then drop it to around 40% during the flowering stage to help prevent mold. Depending on your climate, you might need a small heater, an air conditioner, a humidifier, or a dehumidifier to keep things in the sweet spot. This level of control is especially crucial when growing indoor cannabis seeds.
Essential Monitoring Tools
You can’t manage what you don’t measure. A simple digital thermo-hygrometer is one of the most valuable tools you can own. This device measures both temperature and humidity, giving you an accurate, at-a-glance reading of your grow space conditions. Place it at canopy level to get the most relevant data. Another must-have is a small oscillating fan. Good air circulation is critical for strengthening your plant’s stems, preventing pests, and reducing the risk of mold or mildew. A gentle, constant breeze works wonders. Regularly checking your monitoring tools allows you to make small adjustments before they become big problems, ensuring your plants stay on track. When you're ready to expand your garden, you can shop all seeds to find your next strain.
Choosing Nutrient and pH Testers
Feeding your autoflowers correctly is a balancing act. Because they have a shorter life cycle, they generally require fewer nutrients than photoperiod plants. A good rule of thumb is to start with half the recommended dose listed on your nutrient solution and see how the plant responds. To ensure your plants can actually absorb those nutrients, you need to monitor the pH of your water. For soil grows, a pH between 6.0 and 7.0 is ideal. You can use simple pH test strips or a digital pH pen to check your water before feeding. This simple step prevents nutrient lockout and keeps your plants happy. As you gain experience, you might explore other varieties like our feminized seeds.
How to Troubleshoot Common Problems
Even with the best care, every grower runs into a few bumps along the road. The good news is that autoflowers are incredibly resilient, and most common issues are easy to fix once you know what to look for. Whether it’s a nutrient imbalance or a stuffy grow tent, a few simple adjustments can get your plants back on track. The key is to catch problems early and act quickly. Think of this as your go-to guide for diagnosing and solving the most frequent challenges you might face. With a little attention to detail, you can handle anything your grow throws at you and keep your plants thriving from seedling to harvest.
Solving Common Nutrient Issues
One of the most common mistakes with autoflowers is overfeeding them. Because of their quick life cycle, they require fewer nutrients than their photoperiod cousins. A good rule of thumb is to start with half the recommended dose on any nutrient package and see how your plants respond. During the vegetative stage, a fertilizer with a balanced NPK ratio around 10-7-5 works well. Once they begin to flower, switch to a mix lower in nitrogen and higher in phosphorus and potassium, like a 5-10-10 ratio. Most importantly, avoid adding any nutrients at all during the first couple of weeks when your plant is just a seedling—the soil has everything it needs to get started.
Is Your Plant Stressed? Here's What to Do
Your growing environment plays a huge role in your plants' health. Autoflowers are happiest with consistent conditions, so keeping an eye on temperature and humidity is crucial. During the early vegetative stage, aim for a temperature between 70–80°F and humidity around 60–70%. As your plants enter the flowering stage, you can lower the humidity to 40–50% to help prevent mold on those dense buds. Speaking of which, good air circulation is non-negotiable. Using a couple of oscillating fans will keep air moving, strengthen stems, and make your grow space less inviting for pests and mold. This is especially important when growing dense, resinous indoor cannabis seeds.
Keeping Pests Away from Your Plants
The ruderalis genetics in autoflowers give them a natural toughness against many common pests and diseases. While they are more resilient than other cannabis types, they aren’t invincible. The best way to manage pests is to prevent them from showing up in the first place. Keep your grow area clean, ensure you have great airflow, and avoid overwatering. Regularly inspect your plants, paying close attention to the undersides of leaves where pests like to hide. Starting with strong, healthy genetics is your best defense, as vigorous plants are much better at fending for themselves. Choosing high-quality autoflower seeds from the start will save you a lot of headaches later.
Prevent Problems Before They Start
A successful harvest begins long before you see your first sprout. Setting your grow up for success is the best way to prevent issues down the line. Start with the right soil—a light, airy mix that drains well is perfect. You can create your own with perlite, coco coir, and peat moss. Be careful with standard potting mixes from a garden center, as they can be too nutrient-dense for young seedlings. Proper seed storage is also key. Keep your seeds in a cool, dark, and dry place inside an airtight container. For long-term storage of six months or more, you can refrigerate them at a stable temperature between 43–46°F.
Simple Tips for a Better Harvest
Once your plants are thriving, the final stretch is all about maximizing quality and preserving your hard work. These expert tips will help you fine-tune your process from the late flowering stage through curing, ensuring you get the best possible results from your autoflower grow. It’s about paying attention to the details that make a good harvest great. From understanding your plant’s rapid timeline to perfecting the final cure, each step plays a crucial role in the final product's potency, flavor, and aroma. Let's get into the specifics.
Understanding the Autoflower Growth Timeline
One of the biggest draws of autoflower seeds is their incredibly fast life cycle. Most autoflowering plants are ready for harvest in just 7 to 10 weeks from seed to bud. This quick turnaround is fantastic for growers who want multiple harvests in a season or simply don't want to wait long. However, this speed also means there’s less room for error. Unlike photoperiod plants, autoflowers don’t have extra time to recover from stress or mistakes. It’s essential to have your environment, nutrients, and watering schedule dialed in from the start to keep your plants on track and thriving within this compressed timeline.
A Week-by-Week Breakdown
To give you a clearer picture, here’s a general timeline. Week 1 is all about germination and the delicate seedling stage, where your plant establishes its first roots and true leaves. During Weeks 2-4, the plant enters its short vegetative phase, focusing on building a strong structure with more leaves and branches. This is when you'll see the most foliage growth. Around Week 5, the magic happens as your plant automatically transitions into the flowering stage. From Weeks 5 to 10, you'll watch as buds form, swell, and ripen. This is when you'll want to monitor the trichomes closely to pinpoint that perfect harvest window. Every strain is a little different, but this timeline gives you a solid roadmap for what to expect from your feminized seeds.
Spot the Signs of a Healthy Plant
Autoflowering plants are known for their resilience. Thanks to their Cannabis ruderalis heritage, they are naturally tough and can often handle pests, diseases, and cooler temperatures better than other cannabis types. A healthy plant will have vibrant, green leaves, strong stems, and steady growth. Keep an eye out for any discoloration, drooping, or spots on the leaves, as these can be early signs of trouble. Starting with high-quality genetics is your best defense, as it gives you a plant with a strong foundation. A robust plant is better equipped to fend for itself, making your job as a grower much easier and more rewarding.
Perfect Your Airflow
Good air circulation is non-negotiable for a healthy grow, especially indoors. Use oscillating fans to create a gentle breeze that moves through your canopy. This helps strengthen stems, prevents pockets of stale, humid air, and reduces the risk of mold and pests. With autoflowers, it’s best to keep things simple. Because their life cycle is so short, you should minimize pruning and avoid high-stress training techniques like topping or bending branches. These methods can stress the plant and slow down growth, which is something you can't afford with their limited vegetative period. Let your indoor cannabis seeds grow naturally with just a bit of guidance.
Cure and Store Your Harvest Properly
You’ve made it to harvest—congratulations! But don't rush the final steps, as they are critical for quality. After drying your buds, the curing process begins. Place the trimmed buds into airtight glass jars, filling them about three-quarters full. For the first week or two, "burp" the jars by opening them for a few minutes each day to release moisture and exchange the air. After that, you can reduce burping to once every few days. While you can technically use your buds after a couple of weeks, a longer cure of several months will dramatically improve the flavor and aroma. Proper curing makes all the difference between an average and an exceptional harvest.
The Ideal Drying Process
The drying process is where you lock in all the hard work you've put into your grow. Rushing this step can ruin your harvest, while doing it right preserves the flavor, aroma, and potency of your buds. After you've cut your plants, hang them upside down in a dark, well-ventilated room. You're aiming for a "low and slow" approach, with temperatures around 60–65°F and humidity just under 50%. This environment prevents mold from developing while ensuring the buds don't dry out too quickly, which can lead to a harsh smoke. The process typically takes about 14 days. You'll know they're ready when the smaller stems snap cleanly instead of bending. This careful drying process is the essential first step to properly preserve the quality of your harvest before moving on to the cure.
Related Articles
- Highest Yielding Autoflower Seeds: Top Picks & Guide
- Auto Strain 101: A Complete Grower's Guide
- Auto Seeds 101: Your Ultimate Grower's Guide
- Best Autoflower Seed Company for You: Top Breeders Ranked
- Autoflower Seeds for Beginners: Grow Fast & Easy
Frequently Asked Questions
What’s the difference between autoflower and feminized seeds? This is a great question because the terms aren't mutually exclusive. "Feminized" means a seed is bred to grow into a female plant nearly 100% of the time, which is what you want for producing buds. "Autoflower" refers to a plant's genetic trait of flowering based on age, not light cycles. Most autoflower seeds on the market today are also feminized, giving you the best of both worlds: a plant that flowers automatically and is guaranteed to be female.
How long does it really take to grow autoflowers from seed to harvest? One of the best parts about growing autoflowers is their speed. While every strain is a little different, you can generally expect to go from a germinated seed to a ready-to-harvest plant in about 7 to 10 weeks. This rapid timeline means you have less time to wait for your buds and can even fit multiple harvests into a single outdoor growing season.
Can I still train my autoflower plants to get a bigger yield? Yes, you absolutely can, but you need to be gentle. Because autoflowers have such a short life, they don't have time to recover from intense stress. That's why low-stress training (LST) is the perfect technique. It involves carefully bending and tying down branches to expose more of the plant to light, which encourages more bud development without causing the shock that could stunt its growth.
What's the biggest mistake new growers make with autoflowers? The most common slip-up is treating them like traditional photoperiod plants, especially when it comes to feeding and transplanting. Autoflowers have a much shorter life and are more sensitive to stress. Overfeeding them with nutrients can easily burn them, and transplanting can shock the plant so much that it never fully recovers. The best approach is to plant your seed in its final pot and start with a very light nutrient schedule.
When is the best time to plant autoflower seeds outdoors? Since autoflowers aren't dependent on changing seasons to start flowering, you have a lot of flexibility. The main thing is to make sure you're past the last frost of spring. As long as your plants can get at least two months of decent weather and plenty of sunshine, they will do just fine. Many outdoor growers will even stagger their planting every few weeks to ensure a continuous harvest all summer long.