Taking your cannabis cultivation indoors puts you in the driver's seat. Unlike growing outdoors where you’re at the mercy of the weather, an indoor setup gives you complete control over every element of your plant's life. You become the sun, the rain, and the wind. This level of control is what allows you to create the perfect conditions for dense, resinous buds packed with flavor and potency. It all starts with a solid plan and the right foundation. This guide is your roadmap, breaking down exactly how to grow a cannabis seed indoors, from selecting premium feminized seeds to mastering your environment for a truly exceptional harvest.
Key Takeaways
- Get the Setup Right from Day One: The two most important investments you can make are in high-quality genetics and a well-planned grow space. Nailing your lighting, ventilation, and climate control from the start prevents most common issues down the road.
- Listen to Your Plants and Adapt: Your plants' needs for light, water, and nutrients will change throughout their life. Learn to read the signs they give you and be ready to adjust your environment to match each growth stage for a healthy, stress-free grow.
- Don't Rush the Finish Line: Your job isn't done at harvest. A slow, patient drying and curing process is what transforms good buds into great ones by developing their full flavor, potency, and aroma. This final step is non-negotiable for a top-quality result.
What You Need for Your Indoor Grow
Getting your indoor grow started on the right foot is all about preparation. Before you even think about germinating a seed, taking the time to gather the right supplies and set up your space properly will save you a ton of headaches down the line. Think of it as building a five-star hotel for your plants—when they have everything they need, they’ll reward you with a fantastic harvest. By growing indoors, you become the master of your plants' universe. You control the light, the temperature, the humidity, and the nutrients. This level of control is what allows you to fine-tune conditions for truly impressive results, leading to dense, resinous buds.
We’re going to cover the absolute essentials you’ll need to get going. It really boils down to two key areas: starting with excellent genetics and creating the perfect physical environment. Nailing these fundamentals is the secret to a smooth and successful grow, whether it’s your first or your fiftieth. Investing in the right gear from the start doesn't have to be complicated or break the bank, but it does require a bit of planning. Let’s get your shopping list sorted out so you can move on to the fun part: watching your plants grow.
Start with High-Quality Seeds
Your final harvest can only be as good as the genetics you start with. It’s tempting to cut corners, but starting with fresh, high-quality seeds from a reputable source is the single best investment you can make in your grow. Good seeds have higher germination rates and carry the genetic blueprint for potency, flavor, and yield. If you're just starting out, I highly recommend looking into autoflower seeds. They are incredibly beginner-friendly because they automatically switch from vegetative growth to the flowering stage without you needing to change the light cycle. For growers who want to guarantee a crop of smokable flower, feminized seeds are the way to go, as they ensure every plant is a female.
Set Up Your Grow Space
Once you have your seeds, it's time to build their home. A dedicated grow tent is a perfect solution for containing your setup and making it easy to manage the environment. Here’s a basic checklist of what you’ll need: a grow tent, grow lights (LEDs are efficient and popular), a ventilation system with an exhaust fan and carbon filter to manage heat and smell, containers, and your growing medium. When you assemble your tent, hang the lights about 18-24 inches above where the tops of your plants will be. You’ll want to maintain temperatures between 70-85°F. For humidity, aim for 60-70% for seedlings, then gradually lower it to 40-50% during the flowering stage. Getting these elements right is crucial for growing healthy indoor cannabis seeds.
How to Germinate Your Cannabis Seeds
Germination is the very first step in your plant's life—it's the process of waking a dormant seed up and encouraging it to sprout. Think of it as the official kickoff to your growing adventure. Inside every seed is a tiny, sleeping plant embryo, and your job is to provide the perfect combination of water, warmth, and darkness to signal that it's time to grow. Getting this part right is so important because it sets your seedlings up for a strong, healthy start that carries them all the way to harvest. A successful germination leads to a vigorous seedling, which is exactly what you want.
While starting with premium genetics is the foundation of a great harvest, your germination technique is what turns that potential into a living, breathing plant. There are several ways to germinate seeds, but one of the most trusted and straightforward methods is the paper towel technique. It’s a favorite among new and experienced growers alike because it’s simple, requires minimal equipment, and gives you a clear view of the process. Before you begin, make sure you have your chosen cannabis seeds ready to go. If you're aiming for a straightforward grow without the guesswork of sexing plants, starting with feminized seeds is a fantastic choice because they guarantee you'll get bud-producing female plants. Once you have your seeds, you just need a few household items to get started.
The Paper Towel Method: A Step-by-Step Guide
This classic method is simple and effective. Here’s how to do it:
- Lightly moisten a paper towel with distilled water. It should be damp, not soaked.
- Place your seeds on one half of the towel, giving them some space. Fold the other half over the top.
- Put the folded towel inside a plastic bag or between two plates to create a dark, humid environment.
- Store it in a warm, dark place, like on top of your refrigerator.
- Check on your seeds daily. In about 24 to 72 hours, you should see a small white taproot emerge. Once the taproot is about a quarter-inch long, it’s time to plant.
Avoid These Common Germination Mistakes
Your seeds are resilient, but they need the right conditions to thrive. Keep an eye out for these common slip-ups to give your seeds the best chance of success. The biggest challenge is moisture management. If your paper towel dries out, the germination process will stop. On the other hand, too much water can drown your seeds or lead to mold. Aim for a consistently damp environment. Also, avoid big temperature swings and try not to handle the delicate seeds too much once the taproot appears. A steady, gentle approach is the key to helping your new plants get started on the right foot.
Plant and Care for Your Seedlings
Once your seeds have sprouted a taproot, it’s time to move them to their first home. This seedling stage is one of the most delicate phases of a cannabis plant's life. Your tiny plant is working hard to establish a strong root system and grow its first set of true leaves (the ones with the iconic serrated edges). Giving your seedlings the right care now sets them up for vigorous growth later on. Think of it as building a strong foundation. Your main focus during this time will be providing the perfect growing medium, just the right amount of water, and gentle light. Getting these three elements right is the key to helping your seedlings transition into healthy, thriving vegetative plants. It’s a rewarding process that starts with choosing the right home for your new cannabis seeds.
Select the Right Growing Medium
Your seedlings need a light, airy home for their roots to grow strong. A heavy, dense soil can suffocate the delicate new roots and hold too much water, leading to rot. To avoid this, start with a high-quality potting soil specifically designed for seedlings. I recommend mixing in some perlite to improve drainage and aeration. This creates little air pockets in the soil, giving the roots room to breathe and expand. You don’t need a large container at this stage; a small pot or a seedling tray will do just fine. A good medium is the first step to success when growing your indoor cannabis seeds and ensures your plants get the best possible start.
Master Your Watering and Feeding Schedule
When it comes to watering seedlings, less is definitely more. One of the most common mistakes new growers make is overwatering. Your seedlings have tiny root systems that can't absorb a lot of water, and constantly wet soil can lead to root rot and other fungal issues. A good rule of thumb is to let the top inch of soil dry out completely before watering again. You can check this by simply sticking your finger into the soil. As for feeding, hold off on the nutrients for now. Your seedling gets all the energy it needs from its cotyledons (the first two little leaves that appear) for the first week or two.
Optimize Light Cycles for Healthy Growth
Seedlings need light to grow, but it shouldn't be too intense. Strong lights can easily overwhelm and burn them. A simple setup with "cool white" fluorescent or LED grow lights works perfectly. Position the lights about two inches away from the tops of your seedlings to give them enough energy without causing stress. If you notice your seedlings are getting long and stretchy, it means they're reaching for the light, so you may need to move it a bit closer. For photoperiod plants, an 18/6 light cycle (18 hours on, 6 hours off) is standard. If you're growing autoflower seeds, you can keep the lights on for 18 to 20 hours a day, as they don’t rely on light cycles to begin flowering.
Guide Your Plants Through Each Growth Stage
Once your seedlings have established a healthy root system and a few sets of true leaves, they’re ready to move into the main phases of their life: the vegetative and flowering stages. Each stage has its own distinct requirements for light, nutrients, and care. Paying close attention to your plants’ needs during these periods is what separates an average harvest from an exceptional one. Your goal is to build a strong, robust plant structure during the vegetative stage that can support heavy, dense buds in the flowering stage. This means creating the right environment and providing the proper inputs at the right time. Let’s walk through what your plants need to thrive as they grow.
Vegetative Stage: Prune and Train Your Plants
This is your plant's period of explosive growth. During the vegetative stage, it will focus all its energy on developing a strong stalk and lush, green foliage. To support this, keep your lights on an 18-hour-on, 6-hour-off schedule. When it comes to watering, a good rule of thumb is to wait until the top inch of soil feels dry to the touch before watering again. This prevents overwatering and root rot. Start with a light touch on nutrients, using about a quarter of the recommended strength to avoid burning your young plants. If you're growing autoflower seeds, remember their vegetative stage is short and automatic. The key is to simply keep them happy and healthy without too much stress from aggressive training.
Flowering Stage: Encourage Strong Bud Development
The flowering stage is when all your hard work starts to pay off as your plants begin to produce buds. For photoperiod strains, you’ll trigger this stage by switching your light cycle to 12 hours of light and 12 hours of uninterrupted darkness. Now is the time to change your nutrient mix to one designed for flowering, which will have less nitrogen and more phosphorus and potassium. To protect your developing buds, lower the humidity in your grow space to around 40-50%. This simple adjustment helps prevent mold and mildew from taking hold. Keep a close watch on your plants for any signs of pests or nutrient deficiencies. Catching issues early is crucial for protecting the quality of your final harvest, especially when growing high-quality THCA seeds.
Fine-Tune Nutrients and Light
Throughout your grow, maintaining a stable environment is key. Aim to keep the temperature between 70-85°F. Your humidity needs will change; start with higher levels around 60-70% for seedlings and gradually decrease it to 40-50% by the late flowering stage. One of the most important factors for plant health is the pH of your soil or growing medium. Keeping it in the 6.0-7.0 range ensures your plants can properly absorb nutrients. If you’re new to this, don’t feel overwhelmed. You can find plenty of beginner-friendly nutrient kits that take the guesswork out of feeding. These kits provide a complete schedule, making it easy to give your feminized seeds exactly what they need to flourish.
Create the Perfect Grow Environment
Think of your grow space as the home you’re building for your plants. Just as you chose the best genetics by starting with high-quality seeds, you also need to create an environment where they can truly thrive. Getting your temperature, humidity, and airflow right is the secret to unlocking the full potential of your plants, leading to healthier growth and more impressive yields. While you can’t control the weather for outdoor cannabis seeds, growing indoors gives you complete authority over the climate.
Dialing in these environmental factors is a continuous process, not a set-it-and-forget-it task. Your plants' needs will change as they move from the seedling to the vegetative and flowering stages. A small investment in a few key pieces of equipment will pay off by helping you maintain the ideal conditions. This proactive approach prevents common problems like mold, pests, and stunted growth, ensuring your journey from seed to harvest is a smooth one. By mastering your grow environment, you give your plants the stable, nurturing home they need to flourish.
Control Temperature and Humidity
Your cannabis plants are happiest when they feel like they’re in their ideal natural habitat. To achieve this, aim to keep the temperature between 75 and 85°F. When your plants are seedlings, they love higher humidity, around 60-70%, which helps them absorb water through their leaves. As they mature and enter the flowering stage, you’ll want to gradually lower the humidity to about 40-50%. This change mimics the shift from a damp spring to a drier late summer and is crucial for preventing mold from developing on your dense buds. A simple digital thermo-hygrometer is an essential tool for monitoring these levels and making adjustments as needed.
Plan Your Ventilation Strategy
Good airflow is non-negotiable for a healthy indoor grow. Stale, stagnant air can lead to a host of problems, including mold, pests, and weak stems. A proper ventilation system serves two main purposes: it helps manage heat from your grow lights and it scrubs the air of that distinct cannabis odor. For most small- to medium-sized tents, a simple inline fan connected to a carbon filter is the perfect solution. The fan pulls warm, old air out of the space, while the filter neutralizes smells before the air is exhausted. This constant air exchange ensures your plants always have a fresh supply of CO2 for photosynthesis and helps them build strong, sturdy stalks.
Prevent and Manage Pests
The best way to deal with pests is to prevent them from showing up in the first place. A clean grow space with a well-managed climate is your strongest defense. Pests and mold thrive in environments that are too hot, too damp, or have poor airflow, so staying on top of your temperature, humidity, and ventilation is key. Make it a habit to inspect your plants regularly, paying close attention to the undersides of leaves where pests often hide. Starting with robust genetics from vigorous cultivars like our triploid cannabis seeds also gives your plants a natural advantage in fending off stress and potential invaders.
Understand Your Indoor Lighting Options
Light is the single most important factor for a successful indoor grow. Since you don’t have the sun, you need to provide a powerful, full-spectrum light source that mimics its energy. Your choice of lighting will directly influence your plant’s growth, health, and final yield. While there are several types of grow lights on the market, including High-Pressure Sodium (HPS) and Ceramic Metal Halide (CMH), most modern growers agree on one clear winner for its efficiency, ease of use, and excellent results.
For home cultivators, especially those just starting, LED (Light Emitting Diode) technology is the way to go. LEDs have revolutionized indoor growing by offering a powerful light source that runs cool and uses significantly less electricity than older lighting systems. This makes it much easier to manage the temperature in your grow space and keeps your energy bills in check. Getting the right light setup is a foundational step that sets your plants up for vigorous growth from seedling to harvest.
Why Choose LED Grow Lights
LED grow lights are the top choice for a reason, particularly if you're new to indoor cultivation. They are incredibly efficient, user-friendly, and don't produce a ton of excess heat, which helps you avoid scorching your delicate seedlings. This lower heat output means you'll have an easier time maintaining the ideal temperature and humidity in your grow tent. Plus, their simple plug-and-play design makes setup a breeze. As a general guideline, aim for about 100 watts of actual power draw per plant to ensure they get the energy they need. This makes them perfect for growing any of our high-quality indoor cannabis seeds.
Adjust Light Distance and Intensity
Where you place your light is just as important as the light itself. If it’s too close, you risk burning your plants. If it’s too far, they’ll stretch and become weak. A great starting point is to hang your LED light 18–24 inches above the top of your plants. As your plants grow taller, you’ll need to raise the light to maintain this optimal distance. Most quality LED lights also come with a dimmer, allowing you to adjust the intensity. You can start seedlings at a lower intensity (around 25-50%) and gradually increase it as the plants mature and can handle more light. Always check the manufacturer's recommendations for your specific model.
Match Light Cycles to Growth Stages
Your light schedule tells your plants when to grow and when to flower. This schedule depends entirely on the type of seeds you’re growing. For autoflower seeds, the process is simple: they flower based on age, not light cycles. You can keep your lights on for 18–20 hours a day for their entire life. For photoperiod strains, like most feminized seeds, you control their stages. During the vegetative stage, provide 18 hours of light and 6 hours of darkness (18/6). When you’re ready for them to flower, switch the schedule to exactly 12 hours of light and 12 hours of uninterrupted darkness (12/12). This change mimics the shifting seasons and signals the plant to start producing buds.
How to Troubleshoot Common Grow Problems
Every grower, from the first-timer to the seasoned pro, runs into challenges. Don’t worry—it’s part of the process. The key is learning to read your plants, identify the signs of stress early, and act decisively. Think of yourself as a plant detective. Your plants will tell you what they need through their leaves, stems, and overall posture. Starting with strong, stable genetics from quality feminized seeds gives you a resilient foundation, but even the healthiest plants can struggle if their environment isn’t right. This guide will walk you through diagnosing and fixing the most common issues related to nutrients, light, water, and other beginner missteps, so you can get your grow back on track.
Identify and Fix Nutrient Deficiencies
When your plants show discolored leaves, spots, or curled tips, they’re often signaling a nutrient issue. While it might seem like they need more food, the problem is frequently "nutrient lockout." This happens when the pH of your water or soil is off, preventing the roots from absorbing the nutrients that are already there. Overwatering is another major cause, as soggy roots can’t function properly. Before adding more fertilizer, first check the pH of your water and growing medium. For most soil grows, a pH between 6.0 and 7.0 is ideal. By correcting the pH and letting your soil dry out between waterings, you can often solve the deficiency without adding a single drop of extra nutrients.
Solve Common Light and Water Issues
Finding the right balance with light and water is fundamental to a healthy indoor grow. It’s one of the most common hurdles for new growers. The easiest way to check if your plants need water is to feel the weight of the pot or stick your finger an inch into the soil. If it’s dry, it’s time to water. If it’s damp, wait. Overwatering is far more dangerous than underwatering because it suffocates the roots. For lighting, look for signs of stress. If your plants are growing tall and spindly, they’re "stretching" for more light. If the top leaves are yellowing or look burnt, your light is too close. Check your light manufacturer’s recommendations for the correct hanging distance and adjust as your indoor cannabis seeds grow.
Overcome Beginner Growing Mistakes
Beyond nutrients and light, a few other simple mistakes can trip up a new grower. The most common ones are neglecting ventilation, ignoring pH levels, and failing to monitor temperature and humidity. Good air circulation from a small fan prevents stale, humid air from settling around your plants, which helps ward off mold and pests. We’ve already covered pH, but it’s worth repeating: if your pH is wrong, your plants can’t eat. Finally, keep your grow room temperature and humidity stable. Big swings stress your plants and make them vulnerable. Forgiving strains like autoflower seeds can handle some fluctuations, but building good habits around managing your environment will set you up for long-term success.
How to Harvest Your Cannabis
After weeks of careful nurturing, the moment you’ve been waiting for is finally here: harvest time. This is where all your hard work pays off, but timing and technique are everything. Harvesting too early or too late can seriously impact your final product's potency, flavor, and aroma. A successful harvest is the critical step that transforms your beautiful plants into high-quality buds. Let's walk through how to pinpoint that perfect harvest window and the exact steps to take to properly cut, dry, and prepare your cannabis for the final curing stage.
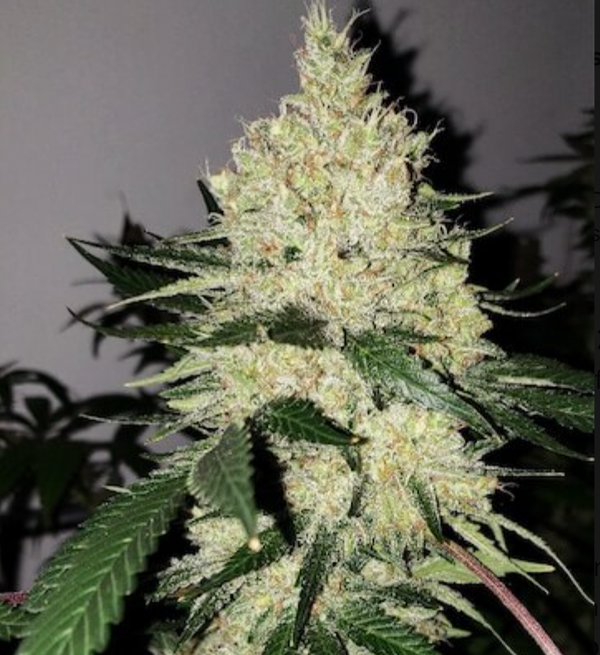
Know When It's Time to Harvest
Timing your harvest is more of an art than an exact science, but your plants will give you clear signals when they're ready. The two most reliable indicators are the trichomes and pistils. Trichomes are the tiny, crystal-like glands covering your buds that contain cannabinoids and terpenes. You’ll need a jeweler's loupe to see them clearly. For peak potency, harvest when most trichomes are a milky or cloudy white. If you prefer a more relaxing, sedative effect, wait until about 20-30% have turned amber. You should also check the pistils—the small hairs on the buds. When about 70-90% of them have darkened from white to a reddish-brown color and curled in, your feminized seeds have likely reached full maturity.
Follow This Step-by-Step Harvesting Guide
Once you've decided it's time, the process is straightforward. Start by cutting your plants down. I find it easiest to cut individual branches rather than the whole stalk at once, as this makes them easier to handle for trimming and drying. Next, you'll want to trim away the large fan leaves. You can do a more detailed trim of the sugar leaves now (wet trimming) or wait until after the buds are dry (dry trimming). Hang the trimmed branches upside down in a cool, dark room with good air circulation and a humidity level between 50-60%. Your harvest should be ready in about 7-14 days. You’ll know it’s done when the smaller stems snap instead of bend. This careful process ensures all the amazing genetics from your chosen THCA seeds are perfectly preserved.
Master the Post-Harvest Process
Congratulations, you’ve made it to harvest! But don't get too comfortable just yet. The steps you take after cutting down your plants are just as important as the care you gave them during their growth. This is where you transform your raw cannabis into the high-quality, flavorful, and potent buds you’ve been dreaming of. The post-harvest process is all about preservation and enhancement, and it’s divided into two key stages: drying and curing.
Skipping or rushing these final steps is a common mistake that can undo months of hard work. Proper drying prevents mold and preserves the delicate cannabinoids and terpenes that define your strain's unique profile. Meanwhile, a slow, patient cure is what develops the rich aromas and ensures a smooth, enjoyable experience. Think of it as the final lap of the race—finishing strong is what separates a good harvest from a truly exceptional one. Taking your time here will reward you with a final product that truly reflects the genetic potential of the indoor cannabis seeds you started with. It’s the difference between cannabis that’s just okay and cannabis that’s unforgettable.
Dry Your Harvest to Preserve Quality
After you’ve trimmed your plants, the first step is to dry the buds slowly and evenly. The goal is to reduce the moisture content without stripping away the good stuff. Hang your branches upside down in a cool, dark spot with good airflow. You’re aiming for a room with a relative humidity of about 50-60%. This process typically takes 7-10 days. You’ll know your buds are ready for the next step when the smaller stems snap when you bend them, instead of folding over. Keeping the room dark is key, as light can degrade THC and other cannabinoids, diminishing the potency of your final product.
Cure Your Buds to Enhance Flavor and Potency
Curing is the magic that happens after drying. This slow process breaks down chlorophyll and sugars, which dramatically improves the flavor, aroma, and smoothness of your cannabis. Place your dried buds into airtight glass jars, filling them about three-quarters full to leave some room for air. For the first week, open the jars daily for a few minutes to "burp" them, which releases excess moisture and replenishes the oxygen. After the first week, you can reduce burping to once every few days. A proper cure takes at least two weeks, but many growers find that the quality of their high-terpene THCA seeds continues to improve for months.
Continue to Refine Your Grow Skills
Your journey as a grower doesn’t end at the first harvest. In fact, that’s just the beginning. Becoming a skilled cultivator is a process of continuous learning and refinement. Each plant you grow offers a new set of lessons, and the cannabis community is constantly discovering better techniques and technologies. The most successful growers are the ones who stay curious, pay close attention to their plants, and are always willing to adapt their methods. This isn't about chasing perfection, but about enjoying the process of getting better with every seed you plant.
Think of every grow cycle as a new opportunity to experiment and improve. Maybe you try a different training technique, adjust your nutrient schedule, or test out some exciting new genetics. Exploring different cultivars, from classic strains to the latest New Releases, can teach you a lot about the diverse needs of the cannabis plant. You might find that one strain thrives with less water, while another needs more intense light during flowering. By embracing this mindset of ongoing education, you’ll see the quality and size of your harvests improve time and time again. It’s this dedication to the craft that separates good growers from great ones.
Learn from Every Grow Cycle
Your own grow space is your best classroom. The most direct way to improve is by paying close attention to how your plants respond to your care. Keeping a detailed grow journal is one of the best habits you can build. Note your watering and feeding schedules, environmental conditions, and any training techniques you use.
This hands-on experience helps you avoid common pitfalls. For instance, many beginners struggle with watering. As experts note, one of the most common indoor growing problems is that novices often give more water than the plant needs. By documenting your actions and the plant’s reactions, you can learn the unique rhythm of your garden and develop an intuition that can’t be learned from a book.
Stay Current on Cultivation Trends
While learning from your own experience is crucial, you can also learn from the collective knowledge of the growing community. Cultivation science is always moving forward, with new research, equipment, and innovative genetics like Triploid Cannabis changing what’s possible for growers. Staying informed helps you sidestep issues that have already been solved by others.
As the team at NPK Industries explains, growers can improve their yields by understanding and avoiding common mistakes like neglecting ventilation, overwatering, and using incorrect lighting. Following reputable blogs, forums, and seed banks keeps you connected to these valuable insights. This combination of personal practice and community knowledge will help you consistently produce impressive results.
Related Articles
- How to Grow Cannabis at Home: A Simple Guide
- Tips and Tricks for Growing Weed Easily: Excellent Results With Minimal Effort
- How to Germinate Marijuana Seeds Successfully
- What are Autoflower Seeds?
- The Ultimate Guide to Autoflower Seeds
Frequently Asked Questions
What’s the real difference between autoflower and feminized seeds? Think of it this way: feminized seeds are your guarantee that every plant will be a female, which is what you want since only female plants produce buds. However, you still have to act as the director, telling them when to start flowering by changing the light schedule to 12 hours on, 12 hours off. Autoflowers are even more straightforward. They are also female, but they run on their own internal clock and will start flowering automatically after a few weeks, no matter what the light schedule is. For a first-time grower, autoflowers are a fantastic way to learn the ropes with less room for error.
When should I actually start giving my plants nutrients? It's tempting to want to feed your new plants right away, but you should hold off for a bit. For the first week or two, your seedling gets all the energy it needs from its first little round leaves, called cotyledons. You should only start introducing nutrients once your plant has grown a few sets of its "true" leaves—the iconic serrated ones. Even then, start with a very weak dose, about a quarter of what the nutrient bottle recommends, to avoid burning the delicate new roots.
What happens if I harvest my buds too early or too late? Timing your harvest is crucial because it directly affects the potency and the type of effect you'll get. If you harvest too early, when the trichomes are still clear, your buds won't have reached their full potential, resulting in lower potency and a less developed flavor. If you wait too long and most of the trichomes have turned amber, the THC has started to degrade into a different cannabinoid, which often results in a much more sedative, sleepy feeling rather than a vibrant high.
How do I keep my indoor grow from smelling up my house? This is a really common and valid concern for anyone growing indoors. The most effective and standard solution is to use a carbon filter connected to your exhaust fan. The fan pulls air out of your grow tent, and as the air passes through the carbon filter, the activated carbon traps the odor molecules. This system scrubs the air clean before it's vented out, effectively neutralizing that distinct cannabis smell and keeping your grow discreet.
If you could only give one piece of advice to a new grower, what would it be? Without a doubt, it would be to learn how not to overwater your plants. It is the single most common mistake beginners make, and it's far more dangerous than underwatering. Constantly soggy soil suffocates the roots, preventing them from absorbing oxygen and nutrients, which leads to all sorts of problems. The best way to avoid this is to wait until the top inch of soil is completely dry before watering again. When in doubt, it's always better to wait another day.