Autoflowers get a bad rap for small yields. Many growers think that speed comes at the expense of size. While that might have been true years ago, modern genetics have completely changed the game. You can absolutely grow autoflowers that are not only quick but also incredibly productive, delivering harvests that rival their photoperiod cousins. The secret isn't a single trick; it's about starting with the right blueprint. This all begins with selecting the highest yielding autoflower seeds you can find. This guide will walk you through the exact techniques needed to get a truly impressive harvest.
Key Takeaways
- Give your plants a head start: Your harvest potential is set at the beginning, so choose high-yielding autoflower genetics and plant them directly into their final 4-5 gallon pots to avoid transplant shock.
- Treat autoflowers gently: Their fast lifecycle leaves no room for recovery, so avoid overfeeding by starting with a quarter-dose of nutrients and use Low-Stress Training (LST) instead of more aggressive techniques.
- Harvest at peak potency: Don't guess when your buds are ready. Use a magnifying glass to inspect the trichomes and harvest when most have turned from clear to a cloudy, milky white for the best results.
What Are Autoflower Seeds?
If you’re looking for a straightforward path to a quick harvest, let me introduce you to autoflower seeds. Think of them as the express lane of cannabis cultivation. Unlike traditional photoperiod plants that require a specific light schedule to start producing buds, autoflower seeds operate on their own internal clock. They will automatically switch from vegetative growth to the flowering stage after just a few weeks, regardless of how many hours of light they get. This means you can keep them on a consistent light schedule, like 18 hours on and 6 hours off, from seedling to harvest.
This unique trait comes from their genetic ancestor, Cannabis ruderalis, a hardy variety that adapted to grow in harsh climates with short summers where the growing season is brief. Breeders have skillfully crossed ruderalis with popular indica and sativa strains to create autoflowers that deliver impressive potency and flavor without the fuss of managing light cycles. This genetic magic gives you the best of both worlds: the resilience and speed of ruderalis combined with the desirable characteristics of well-known strains. This makes them a fantastic option for growers of all skill levels who value speed and simplicity. Whether you have a small indoor tent or a sunny spot on your balcony, autoflowers offer a reliable and efficient way to grow your own cannabis.
What Makes Autoflowers Different?
The biggest distinction between autoflowers and photoperiod strains is how they flower. Photoperiod plants need a change in the light cycle—typically a switch to 12 hours of darkness—to trigger their flowering phase. Autoflowers, on the other hand, will start budding automatically after about 2-4 weeks of growth. This fundamental difference impacts their entire lifecycle.
Because they’re on a fast track, autoflowers go from seed to harvest in as little as 7 to 10 weeks. Their speed is their superpower. While an individual autoflower plant might produce a smaller yield than a massive photoperiod plant that has vegged for months, their quick turnaround means you can fit multiple harvests into a single season. You can learn more about the key differences between autoflower and feminized seeds to decide which is right for your setup.
Why Choose Autoflower Strains?
Autoflower strains are an excellent choice for beginners because they remove one of the trickiest variables in growing: light cycle management. You don’t have to worry about light leaks or timers, making the whole process much more forgiving. Their compact size also makes them ideal for discreet grows or cultivators with limited space. But they aren't just for newcomers; experienced growers appreciate autoflowers for the ability to produce a perpetual harvest, staggering plantings to ensure a constant supply.
The one thing to remember is that their short lifespan means they have very little time to recover from stress. Issues like overwatering, nutrient burn, or improper transplanting can significantly impact your final yield because the plant doesn't have weeks to bounce back. Providing a stable, low-stress environment from the start is the key to helping them reach their full potential.
Typical Autoflower Characteristics
Plant Size and Structure
One of the most defining features of autoflowers is their compact and manageable size. Most autoflower plants stay relatively short, often topping out between two and four feet tall. This smaller stature makes them a perfect match for growers with limited space, whether you’re working with a small indoor tent, a closet, or a discreet corner of your balcony. While they are naturally smaller, don't mistake their size for a lack of potential. Modern breeding has focused heavily on developing genetics that maximize yield within this compact frame, resulting in bushy plants with dense bud structures. This means you can achieve an impressive harvest without needing a massive grow room, making cultivation accessible to almost anyone.
THC and Potency Levels
Let’s clear up a common misconception: autoflowers are not weak. While their early ancestors were low in THC, today’s autoflowers are a completely different story. Thanks to expert breeding, modern autoflower strains have been crossed with some of the most potent photoperiod varieties on the market. This has resulted in plants that deliver both speed and serious strength. It’s now common to find autoflowers with high cannabinoid content, including high-potency THCA seeds that rival their photoperiod counterparts. This genetic advancement means you no longer have to choose between a fast harvest and a quality product; you can truly have it all.
The Evolution of Autoflower Genetics
The story of autoflowers begins with Cannabis ruderalis, a tough and resilient cannabis subspecies native to the harsh climates of Central Asia and Siberia. To survive the short, cool summers, it evolved the unique ability to flower based on age rather than changes in light. Early breeders saw the potential in this trait but were faced with the challenge of ruderalis’s low potency and small yields. The real breakthrough came when these pioneers began skillfully cross-breeding ruderalis with high-potency indica and sativa strains. This meticulous process has led to the incredible diversity of autoflower seeds available today, combining the automatic flowering trait with the impressive flavors, aromas, and effects of classic cannabis varieties.
How to Choose the Best High-Yielding Autoflower Strains
Choosing the right seeds is the first and most critical step toward a massive harvest. While your growing environment and techniques play a huge role, you can’t outperform the genetic potential baked into the seed itself. Think of it as the blueprint for your plant—a great blueprint gives you the foundation for building something incredible. When you’re aiming for quantity without sacrificing quality, starting with proven high-yielding genetics is non-negotiable.
The good news is that breeders have developed a fantastic variety of autoflower seeds specifically for impressive production. These strains are engineered to grow vigorously, develop dense bud structures, and finish strong, giving you more weight at harvest time. By focusing your search on these specific genetics, you set yourself up for success from day one. Let’s walk through what to look for, which strains deliver, and how to set realistic expectations for your yield.
What Makes a High-Yield Autoflower Strain?
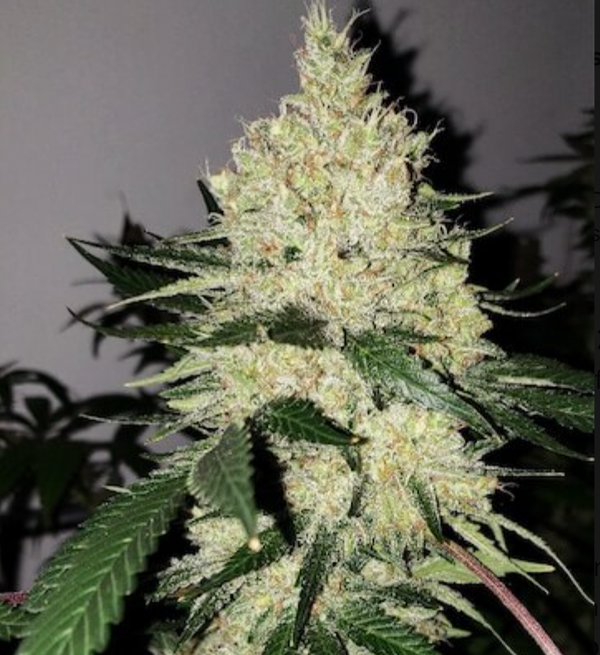
When you're hunting for high-yield genetics, the strain's lineage is your best clue. Look for plants that have been selectively bred over generations for size, bud density, and overall vigor. The description of the seed should give you a clear idea of its potential output, often listing expected grams per plant or per square meter. Pay attention to terms like "robust," "vigorous," and "heavy-producing." These aren't just marketing fluff; they indicate that the plant has the genetic framework to support a large harvest. A strain bred for stealth and small size won't suddenly produce massive colas, no matter how well you care for it. Start with a genetic powerhouse to get powerful results.
Understanding "Super Autoflowers"
You might come across the term "super autoflower" in your research, and it's exactly what it sounds like: a new generation of autoflowers bred specifically for size and yield. These aren't your classic, compact ruderalis-dominant plants. Thanks to incredible advancements in breeding, these strains can produce harvests that seriously compete with photoperiod varieties, sometimes yielding over 100 grams per plant with the right care. They represent the peak of autoflower genetics, combining the speed and simplicity of automatic flowering with the vigorous growth and heavy bud production of their photoperiod parents. However, reaching that "super" potential is a partnership between the plant's genetics and your cultivation skills. Starting with top-tier autoflower seeds is the first step, but providing a stable, low-stress environment is what will truly help you achieve those impressive results.
My Top Picks for a Big Harvest
Certain strains have built a reputation for consistently delivering heavy harvests. Cultivars with genetics from classics like Gorilla Glue, Bruce Banner, and Girl Scout Cookies are often excellent choices because their parentage is known for high production. For example, our Godzilla Glue Auto is a fantastic option that carries the heavy-yielding traits of its famous ancestors. Another one to consider is Joker Juice Auto, which is known for its vigorous growth and dense, resinous buds. When you shop for seeds, always check the breeder’s notes for yield estimates and growth characteristics to find a strain that matches your goals and growing style.
How to Estimate Your Yield
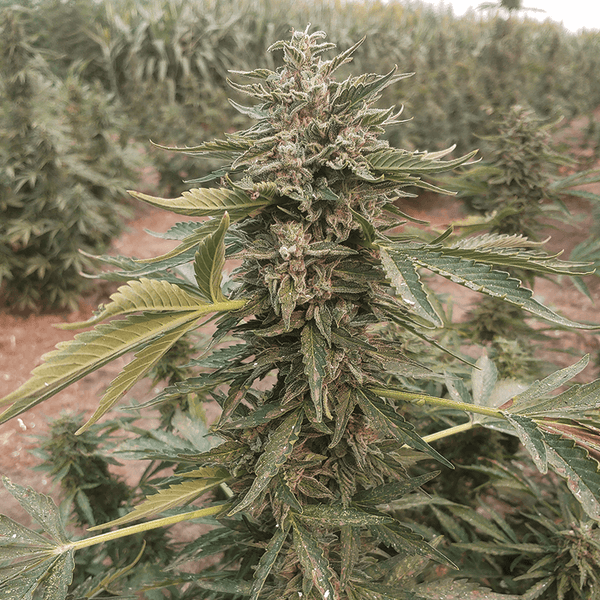
Setting realistic expectations is key to a satisfying grow. While genetics set the upper limit, your environment determines how much of that potential you’ll achieve. As a general benchmark, you can expect an outdoor autoflower to produce up to 200 grams per plant, while an optimized indoor setup can yield up to 600 grams per square meter. One of the best features of autoflowers is their speed, which often allows for two full harvest cycles in a single outdoor season. This means you can effectively double your total yield compared to a single photoperiod run. Just remember these are estimates—your final weight will depend on light, nutrients, and your skill as a grower.
Understanding Wet vs. Dry Weight
That moment when you finally chop down your plant and weigh your harvest is incredibly rewarding. But before you start celebrating that big number on the scale, it's important to understand the difference between wet and dry weight. Your freshly harvested buds are mostly water—about 75%, to be exact. As the buds dry and cure, this water will evaporate, and the final weight will be significantly lower. To get a realistic preview of your final stash, you can use a simple rule of thumb: multiply the wet weight by 0.25. So, if your scale reads 100 grams right after you chop, you can expect to have around 25 grams of dried, cured flower. Knowing this ahead of time helps manage expectations and gives you a much more accurate picture of your success.
Realistic Yields for Home Growers
So, what is a realistic yield for a home grower? With quality autoflower seeds and a basic setup, a regular grower can expect to harvest about 30 to 80 grams of dried flower per plant. Of course, this can vary widely. Some autoflower plants yield between 50 and 250 grams, depending on the strain's genetics and the growing environment you provide. As a general benchmark, a healthy outdoor autoflower can produce up to 200 grams per plant, while an optimized indoor setup can yield up to 600 grams per square meter. These numbers show what's possible when you combine top-tier genetics with the right care and attention, proving that you don't have to sacrifice quantity for the speed and convenience of an autoflower.
Creating the Perfect Environment for High Yields
Even the best genetics need the right conditions to shine. Creating a stable and supportive environment is your next big step toward a massive harvest. Think of yourself as the architect of your plant's world—every detail, from light to soil, plays a part in its success. Let's walk through the key elements you need to get right.
How Much Light Do Autoflowers Really Need?
If you're growing indoors, give your plants a generous 18 hours of light and 6 hours of darkness daily. This extended light cycle fuels vigorous growth and helps maximize bud production. More light often means a heavier yield, so a quality grow light is a worthwhile investment for your indoor cannabis seeds. If you're growing outside, the sun is your best asset. Choose a location for your plants that receives plenty of direct, uninterrupted sunlight. Natural light is incredibly powerful and will help your autoflowers reach their full potential.
Exploring Alternative Light Schedules
While the 18/6 schedule is a fantastic baseline, it’s not your only option. Some growers looking to really maximize growth will push the light to a 20/4 cycle, giving their plants 20 hours of light and just 4 of rest. This can lead to even more vigorous growth as the plants have more time to photosynthesize and pack on weight. On the other hand, you might be tempted to use a 12/12 schedule, especially if you’re running photoperiod plants in the same space. You can certainly grow autoflowers this way, but it’s not ideal for yield. Since autoflowers will bloom regardless of the light schedule, giving them less light simply means giving them less energy to create dense, heavy buds. For the biggest possible harvest, sticking to a longer light cycle like 18/6 or 20/4 is your best strategy.
Dialing In Your Temperature and Humidity
Cannabis plants thrive in stable conditions. Aim to keep your grow space between 65–85°F (18–29°C). Humidity needs change with the growth stage: stick to 50–60% during the vegetative phase and drop it to 40–50% during flowering to protect your buds from mold. Don't forget about airflow. A gentle breeze from an oscillating fan keeps the air fresh, strengthens stems, and helps maintain consistent temperature and humidity levels throughout your canopy. This simple step is key to preventing common environmental problems and keeping your plants healthy.
Choosing the Best Soil and Pot for Your Autoflowers
To get big plants, you need to give their roots space to expand. We recommend using pots that are at least 4-5 gallons (15-20 liters). Starting your autoflower seeds in their final home also helps you avoid the stress of transplanting. The right soil is just as crucial. Use a light, well-draining potting mix that is rich in organic matter. This type of soil prevents waterlogging and allows roots to breathe, ensuring they can absorb all the water and nutrients they need for explosive growth.
A Simple Soil Recipe for Success
You don't need a degree in soil science to create a perfect medium for your autoflowers. A simple, effective mix can be made with just a few key ingredients. A great starting point for a DIY soil is a blend of equal parts peat moss (or coco coir), compost, and perlite. This combination creates a light, airy foundation that your plant's roots will love. The compost provides a gentle source of organic nutrients, the peat moss or coco coir helps retain the right amount of moisture, and the perlite ensures excellent drainage and aeration. This prevents the soil from becoming compacted and waterlogged, which is a common issue that can stunt the growth of fast-growing autoflowers. With this straightforward recipe, you give your plants a balanced environment to develop strong roots and absorb everything they need to thrive.
Maintaining the Correct pH Level
The pH level of your soil is a crucial factor that determines whether your plants can access the nutrients you provide. For cannabis grown in soil, the sweet spot is a pH range between 6.0 and 7.0. If the pH is too high or too low, your plants can experience nutrient lockout, meaning they can't absorb essential nutrients even if they're present in the soil. The good news is that a well-balanced organic soil mix, like the one mentioned above, acts as a natural buffer to help stabilize pH levels. The inclusion of components like perlite improves drainage and aeration, which is key to preventing the soil from becoming overly acidic. This creates a stable root zone, giving you one less thing to worry about and allowing your autoflowers to focus on explosive growth.
Watering and Feeding for a Bigger Harvest
Autoflowers are efficient and generally require less water and nutrients than photoperiod plants. A common mistake is overdoing it. Water your plants only when the top inch of soil feels dry to the touch. When it comes to feeding, start with a light hand. Use just 25–50% of the recommended nutrient dosage and carefully observe how your plant responds. Because of their quick life cycle, autoflowers are sensitive to nutrient burn. It’s always easier to add more nutrients later than it is to fix an overfed plant.
Considering Hydroponics for Maximum Growth
If you're looking to push your harvest to its absolute limit, you might want to consider hydroponics. This method involves growing plants without soil, using a water-based solution packed with all the essential nutrients. Hydroponics gives you ultimate control over your plant's diet, ensuring it gets exactly what it needs, when it needs it. This constant access to a perfectly balanced mix of nutrients, oxygen, and water can lead to significantly faster growth and more efficient development compared to soil. For fast-growing autoflowers, this direct nutrient delivery system can be a game-changer, often resulting in healthier plants with more productive and potent buds. While it requires a bit more setup and monitoring, the potential for a truly massive yield makes it an exciting option for dedicated growers.
Setting Up Your Grow Space for Success
Your seeds have incredible genetic potential, but they need the right environment to truly shine. Creating a proper grow space from the start is one of the most important steps you can take to ensure a heavy harvest. Whether you’re growing in a dedicated tent or in your backyard, a few key adjustments can make all the difference in your final yield. Getting these fundamentals right will set your plants up for healthy, vigorous growth from seedling to harvest.
Growing Indoors? Read This First
When growing indoors, you have complete control over the environment, so use it to your advantage. For your indoor cannabis seeds, a consistent light schedule is crucial. Aim for 18 hours of light followed by 6 hours of complete darkness each day. More light exposure generally leads to more robust bud development. Give your plants plenty of room to stretch out by using large pots—something in the 4- to 5-gallon range is ideal. A bigger pot allows for a more extensive root system, which directly supports a larger, more productive plant. Finally, pay attention to your soil. It should be light and airy, not dense. If it feels heavy, mix in some perlite or coco coir to improve drainage and aeration, making it easier for roots to expand.
Taking Your Autoflowers Outdoors? Key Tips
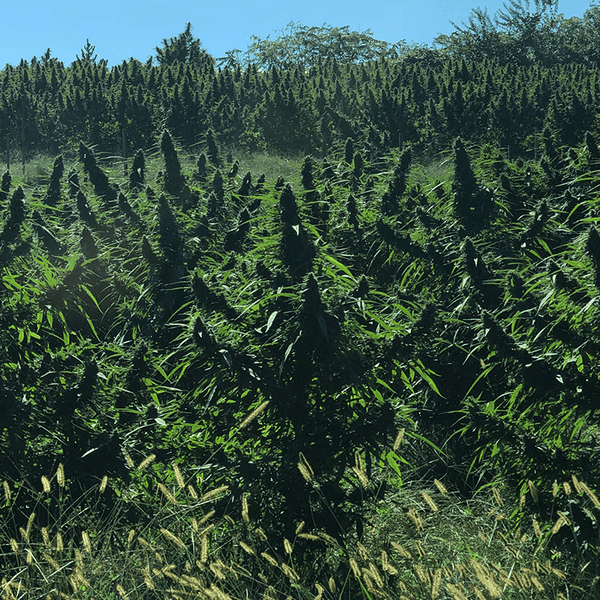
One of the biggest perks of growing autoflowers outside is their impressive speed. Most varieties are ready to harvest in 60 to 90 days and will begin to flower on their own, regardless of the light cycle. While you can’t control the weather, you can manage your plant’s immediate environment. Young plants do well with more humidity, but as they enter the flowering stage, they need less moisture to prevent mold. Planting your outdoor marijuana seeds in a spot with good airflow can make a huge difference. Do your best to keep conditions within the optimal range of 65–85°F (18–29°C). Choose a location that gets plenty of direct sunlight but also has some protection during the hottest part of the day to avoid stress.
Staggered Planting for a Continuous Harvest
One of the smartest ways to capitalize on the rapid growth of autoflowers is with a technique called staggered planting. Instead of growing all your plants at once, you start a new batch of seeds every two to four weeks. This simple strategy creates a perpetual harvest cycle, meaning you’ll always have some plants in the vegetative stage, some flowering, and some ready for harvest. It’s a fantastic way to ensure a constant supply of fresh buds without the overwhelming task of trimming an entire crop at once. For outdoor growers, this method is a game-changer, allowing you to fit multiple harvests into a single season and truly maximize your space. By staggering your autoflower seeds, you turn your garden into a consistent production line.
Why Supporting Your Plants Leads to Bigger Buds
As your plants mature and the buds get heavy, the branches might start to sag under the weight. This is a great sign, but you’ll want to provide some support to prevent them from snapping. Use bamboo stakes, garden ties, or a trellis net to keep your plants upright so they can focus their energy on bud production. You can also guide your plant’s structure with a gentle technique called Low-Stress Training (LST). This involves carefully bending and tying down branches to create a flatter, more even canopy. Doing this allows light to penetrate deeper into the plant, encouraging the lower bud sites to develop as fully as the ones at the top. It’s a simple way to work with your autoflower seeds to get a more impressive harvest.
The Importance of Keeping a Grow Journal
Think of a grow journal as your personal playbook for cultivation. It’s where you track every detail—watering schedules, nutrient amounts, pH levels, and daily observations—to create a roadmap of what works and what doesn't in your specific environment. For autoflowers, this practice is especially critical. Their life cycle is so compressed that there’s very little room for error, and a journal helps you spot potential issues before they derail your harvest. By documenting how your favorite strains perform, you can replicate your successes with precision and learn from any mistakes. This simple habit of taking notes transforms every grow from a game of chance into a valuable learning experience, making you a more confident and successful cultivator over time.
Advanced Training Techniques to Maximize Your Yield
Once you have your growing environment dialed in, you can start exploring techniques that push your plants to their full potential. This means you're already comfortable with managing your light schedule, temperature, and humidity, and you have a good handle on the basics of watering. These advanced methods aren't complex, scientific procedures reserved for commercial growers; they're simple, hands-on adjustments that can make a huge difference in your final harvest. Think of it as moving from a beginner to an intermediate grower. You're not just providing what the plant needs to survive—you're actively guiding its growth to produce more, higher-quality buds.
The key with any advanced technique, especially for autoflowers, is to introduce stress carefully. While some stress encourages the plant to grow more vigorously, too much can have the opposite effect, stunting its growth and reducing your yield. This is particularly true for autoflowers, which have a finite lifespan and less time to recover from mistakes. The methods we'll cover focus on gently manipulating the plant's structure and nutrient intake to optimize light exposure and energy distribution. By learning how to train and feed your plants with a bit more intention, you can significantly increase the size and density of your colas. It’s all about working with the plant’s natural tendencies to get the results you want.
A Beginner's Guide to Low-Stress Training (LST)
Low-Stress Training, or LST, is exactly what it sounds like: a gentle way to shape your plant for better yields. The goal is to break the plant's natural tendency to grow one main stalk (apical dominance) and instead create a flat, even canopy. You do this by carefully bending the main stem and side branches downwards and tying them in place. This simple action exposes more bud sites to direct light, encouraging them to develop into full, dense colas instead of small, secondary buds. LST is a fantastic technique for beginners because it’s very forgiving and highly effective with autoflower seeds, helping you maximize your harvest without causing major stress.
Other Training Methods: SOG and SCroG
Beyond LST, two other popular methods are the Sea of Green (SOG) and Screen of Green (SCroG). With SOG, the idea is to grow many smaller plants close together, creating a dense canopy that makes the most of your light and space. This technique works especially well with autoflower seeds because their naturally compact size and rapid growth cycle are a perfect fit. It’s an incredibly efficient way to maximize your yield per square foot. SCroG, on the other hand, uses a screen to train fewer plants into a wide, flat canopy. By weaving branches through the net, you ensure all bud sites get direct light, which can lead to a harvest of uniform, high-quality buds. Both are great options for taking your yields to the next level.
To Prune or Not to Prune? A Guide for Autoflowers
Pruning can feel a little scary at first—after all, you're cutting parts of your plant off! But when done correctly, it’s a powerful tool. Strategic pruning involves selectively removing large fan leaves that are shading lower bud sites. This improves both light penetration and airflow throughout the plant, which helps prevent mold and encourages lower buds to fatten up. The key is to be conservative. Only remove leaves that are truly blocking light, and avoid taking too much off at once. Over-pruning can shock your plant, so a "less is more" approach is always best, especially since autoflowers have a limited time to recover.
Nutrient Timing: When to Feed Your Autoflowers
One of the most common mistakes growers make with autoflowers is overfeeding them. These plants have a shorter life cycle and generally require fewer nutrients than their photoperiod cousins. To avoid nutrient burn, which can stunt growth and damage your plants, it's best to start with a light touch. Use a lightly fertilized soil and begin with just 25-50% of the nutrient dosage recommended on the bottle. Watch your plants closely for signs of how they're responding. You can always add more nutrients later if needed, but it’s much harder to fix the damage from giving them too much too soon. Perfecting your nutrient schedule is about observation and response, not a rigid formula.
Important Considerations for Autoflower Growers
Before you jump in and start popping seeds, it's smart to get a full picture of what you're working with. Autoflowers are fantastic, but like anything, they have their own set of quirks. Understanding their strengths and weaknesses will help you decide if they’re the right fit for your specific goals and growing style. It also means you'll be better prepared to handle any challenges that come up along the way. We'll also touch on the legal side of things, because knowing the rules in your area is a crucial first step for any grower. This isn't about scaring you off; it's about making sure you're set up for a smooth, successful, and stress-free grow from the very beginning.
The Pros and Cons of Autoflowers
Autoflowers have a lot going for them, especially when it comes to speed and simplicity. They’ve opened up home growing to a whole new group of people who might have been intimidated by the complexities of photoperiod plants. However, their unique characteristics also come with a few trade-offs. Their rapid growth cycle is a huge advantage, but it also means they have less time to recover from any mistakes you might make. Weighing these pros and cons isn't about deciding if autoflowers are "good" or "bad"—it's about understanding their nature so you can give them exactly what they need to thrive and produce an amazing harvest.
Advantages of Autoflowers
Autoflower strains are an excellent choice for beginners because they remove one of the trickiest variables in growing: light cycle management. You don’t have to worry about light leaks or complicated timer setups, which makes the entire process much more forgiving for newcomers. Their compact size also makes them ideal for discreet grows or for cultivators who are working with limited space, like a small tent or a balcony. But they aren't just for first-timers; experienced growers love autoflower seeds for the ability to produce a perpetual harvest. By staggering your plantings, you can ensure you have a constant supply of fresh buds ready to go throughout the year.
Disadvantages to Keep in Mind
The main thing to remember with autoflowers is that their short lifespan means they have very little time to recover from stress. Issues like overwatering, nutrient burn, or improper transplanting can significantly impact your final yield because the plant doesn't have weeks to bounce back like a photoperiod might. Because they are on a fixed timeline, they are also usually smaller and may produce less cannabis per plant compared to a photoperiod that has been vegged for a long time. This might mean you need to grow a few more plants to reach your harvest goals, but their incredible speed often makes up for the difference in size.
A Note on Seed Legality
Before you purchase any seeds, it's essential to understand the rules in your area. Federally, cannabis seeds are legal in the US as long as they contain less than 0.3% THC, which classifies them as hemp products. However, state and local laws can vary significantly when it comes to possessing and cultivating them. Some states have fully embraced home growing, while others still have restrictions in place. Taking a few minutes to check your local regulations is a critical step that ensures you can start your grow with peace of mind. It's always better to be informed and confident in your decision before you shop for seeds.
Are You Making These Common Autoflower Mistakes?
We all want that picture-perfect harvest, but a few common slip-ups can get in the way. The good news is that these mistakes are completely avoidable. Autoflowers are resilient, but their fast-paced life cycle means they have less time to recover from stress compared to photoperiod plants. A small mistake early on can have a big impact on your final yield.
Getting the fundamentals right from the start is the key to helping your plants reach their full genetic potential. By paying close attention to how you handle your plants, feed them, and manage their environment, you can sidestep the most common issues growers face. Let’s walk through some simple adjustments you can make to ensure your autoflowers stay happy, healthy, and productive from seedling to harvest.
Transplanting and Root Care: Handle with Care
Autoflowers are sprinters, not marathon runners, and their root systems are sensitive to disruption. The biggest mistake you can make is stressing them with a transplant. When you move a young plant from a small pot to a larger one, it can experience transplant shock, which slows down growth. Since an autoflower’s entire life is on a fixed schedule, it doesn’t have time to recover from that stunting.
To avoid this, plant your autoflower seeds directly into their final containers. Choose a pot that’s large enough to accommodate the mature plant, typically around 4-5 gallons (15-20 liters). This gives the roots plenty of room to expand. Fabric pots are an excellent choice because they promote healthy root growth through air pruning and prevent overwatering by allowing excess moisture to escape.
How to Avoid Overfeeding Your Plants
It’s easy to think that more food equals bigger plants, but with autoflowers, less is often more. Overfeeding is one of the most frequent mistakes growers make, leading to nutrient burn that can damage leaves and reduce your yield. Autoflowers generally require fewer nutrients than their photoperiod counterparts, especially during the early stages of growth.
Start with a light, airy soil mix that isn’t packed with nutrients. When you do begin feeding, use only 25-50% of the manufacturer's recommended dose and see how your plants respond before increasing the amount. It’s always easier to add more nutrients if you see a deficiency than it is to fix the damage from overfeeding.
How to Spot and Fix Environmental Stress
Your plants are a bit like Goldilocks—they want their environment to be just right. Drastic swings in temperature or humidity can cause stress, slowing growth and making them more susceptible to pests and mold. For seedlings, aim for higher humidity to help them get established. As your plants enter the flowering stage, you’ll want to lower the humidity to prevent mold from forming on your dense buds.
Good air circulation from a small fan will help manage both temperature and humidity. Also, consider your water source. Tap water can contain chlorine and other chemicals that harm the beneficial microbes in your soil. Using filtered or reverse osmosis water is a simple way to keep your soil ecosystem healthy, which is especially important for indoor cannabis seeds.
Training Your Autoflowers? Don't Make These Mistakes
While training can shape your plant for a bigger harvest, the wrong kind can do more harm than good. High-stress training (HST) techniques like topping or fimming, which involve cutting the plant, are generally not recommended for autoflowers. These methods cause significant stress, and because autoflowers have a limited vegetative period, they often don’t have enough time to fully recover before they start flowering.
Instead, stick to Low-Stress Training (LST). This gentle technique involves carefully bending and tying down branches to create a more even canopy. By exposing more bud sites to direct light, LST can dramatically increase your yield without causing the plant to slow down. It’s a beginner-friendly method that works perfectly with the autoflower timeline.
Harvesting Your Autoflowers for Maximum Yield
You’ve nurtured your plants from seed to flower, and now it’s time for the most rewarding step: the harvest. Getting this final stage right is crucial for locking in the potency, flavor, and yield you’ve worked so hard to achieve. Proper timing and technique will ensure your high-quality genetics translate into a top-shelf final product. Let’s walk through how to identify the perfect harvest window and process your buds like a seasoned pro.
Is It Time to Harvest? Here's How to Tell
Patience is key when it comes to harvesting autoflowers. Since the top colas receive the most light, they often mature faster than the lower buds. To get the most out of your plant, plan for a staggered harvest. You can harvest the top buds as soon as they’re ready and then give the lower sections another week or two to fully ripen. This simple two-step process ensures every part of the plant reaches its full potential. Most autoflower seeds benefit from these two harvest cycles, giving you a more consistent and abundant yield. Keep a close eye on your plants as they approach the end of their lifecycle to pinpoint that perfect moment.
How to Read Trichomes Like a Pro
Your plant will give you clear visual cues when it’s ready. The two best indicators are the pistils (the small hairs on the buds) and the trichomes (the tiny, crystal-like glands). As the plant matures, the pistils will darken from white to a reddish-brown color. For a more precise reading, grab a jeweler’s loupe or a small magnifying glass to inspect the THCA seeds.
Ensuring a Seedless Harvest: Checking for Male Flowers
The goal for most growers is a sinsemilla harvest—buds that are rich in cannabinoids and free of seeds. Pollination is the enemy of potency because once a female plant is pollinated, it shifts its energy from producing resinous flowers to creating seeds. While starting with high-quality feminized seeds is the best first step, environmental stress can sometimes cause a female plant to develop male flowers. Because autoflowers are on such a tight schedule, a small mistake can have a big impact on your final yield. Regular, careful inspection is your best defense against a seeded crop, ensuring all that plant energy goes right where you want it: into producing dense, potent buds.
Make it a habit to check your plants for male flowers as they enter the flowering stage. Look closely at the nodes—the points where branches meet the main stem. Female flowers show wispy white pistils, while male flowers appear as small, greenish-yellow sacs that resemble tiny bunches of grapes. If you spot these, you must act immediately. Carefully remove the plant from your grow space to prevent the sacs from bursting and releasing pollen. For growers who want to eliminate this risk, our innovative triploid cannabis seeds are bred to be 99%+ sinsemilla, making them highly resistant to pollination even when male plants are nearby.
Drying and Curing: The Final Steps to a Perfect Harvest
Once you’ve decided it’s time, the real work begins. Start by cutting the plant at its base or removing individual branches. Next, you’ll trim away the large fan leaves and then the smaller, sugar-coated leaves around the buds. You can save this "trim" for making extracts or edibles. After trimming, hang the branches upside down in a dark, well-ventilated space with a temperature around 60-70°F and humidity between 45-55%. The drying process usually takes 7 to 14 days. You’ll know the buds are ready when the smaller stems snap instead of bend. From there, you can begin the curing process to fully develop the flavor and aroma of your beautiful harvest.
Something Wrong? How to Troubleshoot Common Issues
Even the most experienced growers run into issues now and then. The key with autoflowers is to act fast, since their lifecycle is so short. A problem that might be a minor setback for a photoperiod plant can have a much bigger impact on your final yield when you only have a few weeks to fix it. The good news is that most common problems are easy to spot and solve if you know what to look for. Paying close attention to your plants daily will help you catch discoloration, drooping, or pests before they get out of hand. Think of it as a daily check-in to make sure your plants have everything they need to thrive.
How to Spot Plant Problems Before They Get Worse
Your plants will tell you when something is wrong—you just have to learn their language. Look for changes like yellowing or browning leaves, spots, curling edges, or slow, stunted growth. These are often the first signs of nutrient issues or environmental stress. A strong, healthy root system is the foundation for big yields, and one of the most common mistakes growers make is over-feeding. Too many nutrients can burn the roots, locking the plant out from absorbing what it actually needs. When you start with high-quality autoflower seeds, you’re already setting yourself up for success with resilient genetics, but daily observation is still your best tool for keeping them healthy.
Quick Fixes for Common Autoflower Problems
Once you’ve spotted a problem, the next step is a quick fix. If you suspect nutrient burn (yellow or brown leaf tips), flush the soil with pH-balanced water to remove the excess nutrients. Autoflowers are generally lighter feeders than their photoperiod cousins, so it’s a good rule of thumb to start with 25-50% of the recommended nutrient dosage and slowly increase it if needed. Water quality also plays a big role. If your tap water is high in chlorine, let it sit out for 24 hours before using it, or switch to filtered water. These small adjustments can help your plants recover quickly and get back to focusing on producing dense, resinous buds.
How to Prevent Problems in Your Next Grow
The best way to deal with problems is to prevent them from happening in the first place. Keeping a simple grow journal is one of the most effective habits you can build. Note when you water, what nutrients you use, and any changes you observe in your plants. This log will become an invaluable resource for refining your technique with each grow cycle. You should also pay close attention to your climate. Young seedlings prefer higher humidity, while flowering plants need lower humidity to prevent mold and bud rot. Dialing in your environment and learning from past grows will help you produce consistently impressive harvests from your feminized seeds and other varieties.
Related Articles
- Auto Strain 101: A Complete Grower's Guide
- Auto Seeds 101: Your Ultimate Grower's Guide
- Auto Cannabis Seeds: The Ultimate Beginner's Guide
- Autoflower Seeds for Beginners: Grow Fast & Easy
- 10 Best Autoflowering Seeds for Fast Harvests
Frequently Asked Questions
How long does it really take to grow autoflowers from seed to harvest? You can generally expect your autoflowers to be ready for harvest in about 7 to 10 weeks. This quick turnaround is their main advantage. Keep in mind that this is an average, and the exact timing can vary slightly depending on the specific strain you choose and your growing conditions. Some may finish a bit faster, while others might need an extra week to fully mature.
Can I use high-stress training techniques like topping on my autoflowers? It's best to avoid high-stress training methods like topping or fimming with autoflowers. These techniques involve cutting the plant, which causes stress and requires recovery time. Since autoflowers have a very short and fixed vegetative stage, they don't have the extra weeks to bounce back from that kind of stress. Sticking with Low-Stress Training (LST), where you gently bend and tie down branches, will give you a better canopy and bigger yield without slowing the plant down.
Is it better to grow autoflowers indoors or outdoors for the biggest yield? Both indoor and outdoor setups can produce fantastic results, but they offer different advantages. Indoors, you have complete control over light, temperature, and humidity, which allows you to create the perfect environment for maximizing yield. Outdoors, you get the benefit of the sun's powerful, full-spectrum light at no cost. An optimized indoor grow can often produce more grams per square meter, but a healthy outdoor plant in a sunny spot can still deliver a very impressive harvest.
What are the first signs that I'm overfeeding my plants? The most common sign of overfeeding, or nutrient burn, is seeing the very tips of the leaves turn yellow or brown and become dry and crispy. This damage will usually start on the older, lower leaves first. You might also notice that overall growth has slowed down. If you see this, the best course of action is to flush the soil with plain, pH-balanced water to wash out the excess nutrients before reintroducing a much lighter feeding schedule.
What's the single most important factor for getting a big harvest? While so many things contribute to a great harvest, it all starts with the genetics. You can't get a massive yield from a seed that's bred to be small and stealthy. Choosing a high-quality strain known for its vigorous growth and heavy production is the most critical first step. After that, providing your plant with plenty of light is the next most important factor, as light is the direct energy source for creating big, dense buds.