For growers who value efficiency, time is everything. Whether you’re dealing with a short summer season or you simply want to get from seed to harvest as quickly as possible, your choice of genetics is critical. Photoperiod plants can take months, but there’s a faster way. The solution is growing auto flowering feminized seeds outdoor. These plants are built for speed, racing through their entire lifecycle in as little as eight to ten weeks. This rapid growth not only ensures a harvest before the weather turns but can even allow for multiple crops in a single year. This guide will show you how to harness that speed for a productive and rewarding grow.
Key Takeaways
- Embrace Autoflowers for a Faster, Simpler Grow: These seeds are the perfect starting point for outdoor cultivation because they eliminate the two biggest challenges: they flower based on age, not light schedules, and are feminized to guarantee bud-producing plants.
- Prepare a Great Environment, Then Practice Gentle Care: Success comes from setting your plants up in a sunny spot with excellent soil. From there, your main job is to be mindful—avoid the common mistakes of overwatering, overfeeding, and using stressful training techniques.
- Finish Strong to Lock In Quality and Potency: The work isn't over when the plant is grown. The final steps are what create a premium product, so be patient and harvest based on trichome color, dry your buds slowly, and cure them properly to develop the best flavor and effects.
What Are Autoflowering Feminized Seeds?
If you're looking for a straightforward path to a successful outdoor harvest, autoflowering feminized seeds are your new best friend. Think of them as the best of both worlds combined into one tiny, powerful package. They take the guesswork out of two of the most challenging parts of growing: triggering the flowering stage and dealing with male plants. This combination makes them an incredible choice for first-time growers and seasoned cultivators who want a simpler, faster crop.
So, what’s the magic? These seeds come from plants that have been bred to do two things exceptionally well. First, they flower automatically based on their age, not the amount of light they get. Second, they are feminized, which means they are guaranteed to grow into female plants that produce the cannabinoid-rich buds you’re after. This means you get a plant that’s not only low-maintenance but also highly efficient. You can plant them outdoors and let them do their thing without worrying about changing light cycles or weeding out unwanted male plants. The result is a quicker, more predictable harvest with less hassle.
What Makes a Seed "Autoflower"?
The "autoflower" trait is a game-changer, especially for outdoor growing. Autoflowering plants, sometimes called "day-neutral," don't need a change in the light schedule to start producing buds. They run on their own internal clock, typically beginning to flower just a few weeks after sprouting. This unique characteristic comes from their lineage—they are crossbred with a hardy wild cannabis variety called ruderalis, which evolved to flower quickly in harsh climates with short summers.
This means you can say goodbye to stressing over light deprivation techniques or waiting for the seasons to change. Your plants will automatically switch from vegetative growth to flowering, regardless of how many hours of daylight they receive. This predictable autoflower lifecycle gives you more control over your harvest timing.
The Benefits of Feminized Seeds
The "feminized" part of the equation is all about efficiency. Feminized seeds are specifically bred to ensure that nearly every plant you grow will be female. Why does this matter so much? Because only female cannabis plants produce the dense, resinous flowers (or buds) that are desired for consumption. Male plants, on the other hand, produce pollen sacs. If a male plant pollinates your females, they will focus their energy on producing seeds instead of potent buds, which can ruin a harvest.
By starting with feminized seeds, you eliminate the 50/50 gamble of growing regular seeds. You won't have to spend time carefully inspecting your plants to identify and remove males before they can cause problems. Every bit of soil, water, and nutrients goes toward a bud-producing plant, making your entire grow more productive from the start.
Autoflowering vs. Photoperiod Seeds
When you shop for seeds, you'll see two main categories: autoflowering and photoperiod. The key difference is how they flower. As we covered, autoflowers begin flowering based on age. Photoperiod plants, however, depend on the light cycle. They stay in a vegetative state as long as they receive long days (18+ hours of light) and only begin to flower when the light schedule shortens to around 12 hours of light and 12 hours of darkness.
This leads to a few practical differences. Autoflowers are much faster, racing from seed to harvest in about 8 to 12 weeks. Photoperiod plants take significantly longer, often 3 to 5 months. Autoflowers also tend to stay smaller and more compact, which is perfect for discreet grows or limited spaces. While a large photoperiod plant might produce a bigger single yield, the speed of autoflowers often allows for multiple harvests in one outdoor season.
Choose the Right Seeds for Your Outdoor Grow
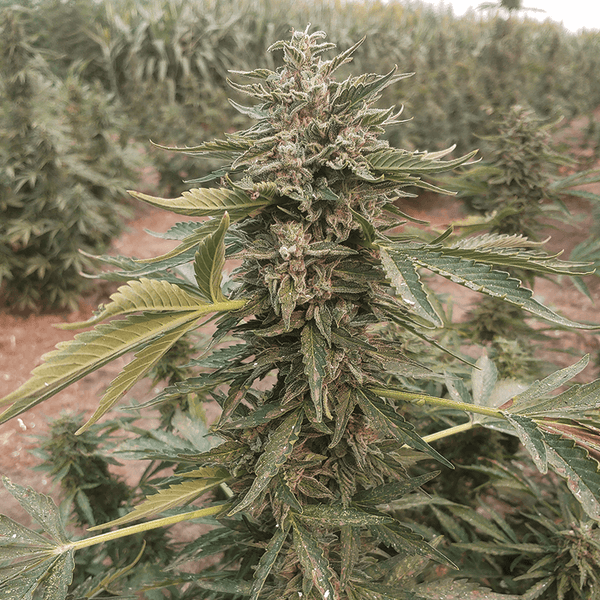
Starting an outdoor grow is incredibly exciting, and your success begins with one crucial decision: choosing the right seeds. The genetics you select are the foundation for your entire season, influencing everything from how your plants handle unpredictable weather to the quality of your final harvest. For outdoor cultivation, you want seeds that produce resilient, adaptable plants that can thrive outside of a perfectly controlled indoor environment. This is where autoflowering feminized seeds truly shine. They are hardy, efficient, and bred to handle the unique challenges of growing under the sun. Let’s walk through what to look for in a quality seed, where to find them, and how to pick the perfect strain for your garden.
What to Look for in a Quality Seed
When you’re shopping for seeds, think of it as hiring the perfect candidate for a job. You want a resilient, hardworking plant that can handle whatever the season throws at it. Look for autoflowering strains, which are created by crossbreeding cannabis with a wild subtype called ruderalis. This special genetic background makes them "day-neutral," meaning they'll flower automatically based on age, not a change in the light cycle. This is a huge advantage for outdoor growers, as it gives you a more predictable timeline and plants that are naturally tough. These strains are built to thrive in a variety of climates, making them a reliable choice whether you’re a beginner or a seasoned pro. A great guide to the autoflower lifecycle can help you understand their unique growth pattern.
Where to Buy the Best Seeds
Finding a trustworthy seed bank is just as important as choosing the right strain. You need a source that stands behind their genetics and provides high-quality, viable seeds. Here are a few reputable companies known for their excellent autoflower selections.
Trilogene Seeds
We’re proud to offer a curated selection of premium, non-GMO genetics perfect for outdoor growing. Our feminized seeds are bred for resilience, efficiency, and fantastic results. We focus on innovation and quality, developing unique genetics like our pioneering triploid cannabis that ensures a successful harvest. Whether you're growing for personal use or a commercial operation, our seeds provide a reliable start for a thriving outdoor garden.
Dutch Passion
As one of the original pioneers in the seed world, Dutch Passion has played a huge role in developing the autoflower genetics we know and love today. They are a well-established and highly respected company with a massive selection of premium, award-winning autoflowering seeds. Their long history and commitment to quality make them a reliable source for any grower looking for proven, stable genetics for their outdoor setup.
Royal Queen Seeds
Royal Queen Seeds is another excellent source, offering a diverse lineup of autoflowering strains that are famously easy to grow. Their seeds are known for producing robust, healthy plants with impressive yields, which makes them a popular choice for outdoor growers who want a straightforward and rewarding experience. If you’re looking for genetics that are both forgiving and productive, their catalog is definitely worth exploring.
Humboldt Seed Company
Based in the heart of California's legendary cannabis-growing region, Humboldt Seed Co. takes a science-first approach to breeding. They offer lab-tested autoflower seeds with a high germination rate, giving you confidence from the moment you plant. Their focus on data-backed breeding and quality control makes them a dependable choice for growers who value consistency and want to ensure a successful outdoor grow from the very beginning.
Fast Buds
If speed is what you’re after, Fast Buds lives up to its name. This company specializes in autoflowering cannabis seeds that are bred for rapid growth cycles and surprisingly large yields. Their strains are particularly well-suited for outdoor growers who have a shorter season or simply want to achieve a quick harvest without sacrificing quality. They offer a wide variety of potent and flavorful autoflowers to choose from.
Top Strains for Outdoor Growing
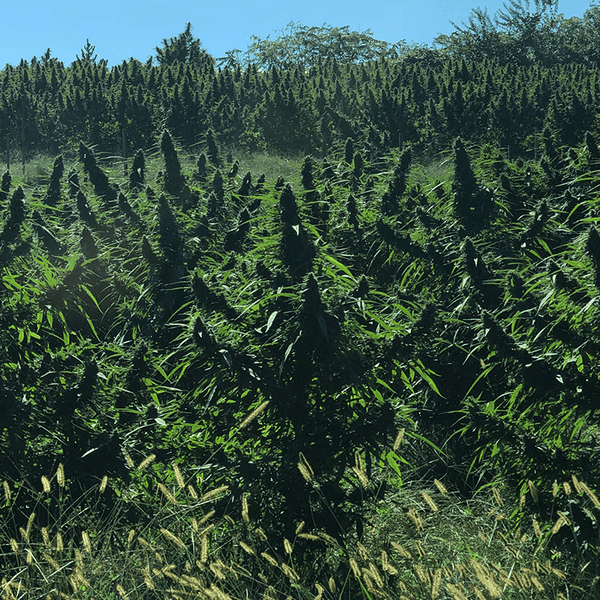
One of the biggest advantages of growing autoflowers outdoors is their physical structure. These plants tend to be shorter and bushier than their photoperiod cousins, which is a major plus for anyone who needs to be discreet. Their compact size makes them easier to manage and conceal in a backyard or on a balcony. This manageable stature also means they are less likely to be damaged by strong winds. When browsing for strains, look for descriptions that highlight resilience to pests and mold, as these are common outdoor challenges. Exploring a collection of autoflower seeds will give you a good sense of the variety available, from fruity indicas to energizing sativas.
Balance Price and Value
It can be tempting to go for the cheapest seeds you can find, but this is one area where a little investment goes a long way. Think of quality seeds as the blueprint for your entire grow. A strong genetic foundation from a reputable breeder will save you countless headaches down the road. High-quality seeds lead to healthier plants, better resistance to stress, and ultimately, a more abundant harvest. Autoflowering seeds already provide incredible value by offering a faster harvest and thriving in various climates. By choosing to shop all seeds from a trusted source, you’re not just buying a product; you’re investing in a successful and satisfying growing experience.
Set Up Your Outdoor Grow Space
Getting your grow space right from the start is one of the most important things you can do for your future harvest. While autoflowers are known for being resilient and relatively low-maintenance, a little preparation goes a long way. Think of it as building a strong foundation. A well-chosen spot with great soil and the right gear will help your plants thrive, leading to healthier growth and more impressive yields.
The beauty of growing autoflowers outdoors is that you don’t need a complicated, high-tech setup. Nature does most of the heavy lifting for you. Your job is to create a safe and supportive environment where your plants can access everything they need. This means finding the perfect location, preparing the soil, deciding between pots or planting in the ground, and gathering a few essential supplies. We’ll walk through each step to make sure you feel confident and ready to go.
Pick the Perfect Spot
Finding the ideal location for your plants is step one. Autoflowers have one non-negotiable need: sunlight. Look for a spot in your yard, on your patio, or on your balcony that gets at least six to eight hours of direct sunlight each day. The more light they get, the more energy they have for growth. Good air circulation is also crucial. A gentle breeze helps strengthen stems and prevents issues like mold or mildew from taking hold. When scouting locations, also consider privacy and security to keep your garden safe and discreet. Choosing the right spot sets your outdoor marijuana seeds up for a successful season.
Prepare Your Soil
Your plants get their nutrients from the soil, so you want to give them the best possible medium to grow in. The ideal soil for autoflowers is light, airy, and drains well, with a neutral pH. This structure allows roots to breathe and expand easily while preventing water from pooling and causing root rot. You can buy a high-quality organic potting mix designed for cannabis or create your own. Look for soil containing ingredients like perlite, coco coir, or peat moss, as these amendments improve drainage and aeration. Starting with great soil ensures your autoflower seeds have the nutrients they need from day one.
Choose: Pots vs. In-Ground
Next, you’ll need to decide whether to plant in containers or directly in the ground. Both methods have their advantages. Pots are a great choice for control and flexibility. Using 5- to 10-gallon fabric pots gives your plant’s roots plenty of room to grow and makes it easy to move them if needed—whether you’re chasing the sun or protecting them from a storm. Planting directly into a prepared garden bed is also an excellent option. It gives your plants unlimited root space, which can lead to larger growth, but it requires you to thoroughly amend the native soil first. This is a great way to plant your cannabis clones if you have a dedicated garden space.
Gather Your Essential Gear
One of the best things about growing autoflowers is that you don’t need a ton of gear. Because you’re using feminized seeds, you won’t have to worry about identifying and removing male plants. And since they flower automatically, there’s no need for complex lighting timers. Your essential gear list is simple:
- High-quality seeds
- Pots or a prepared garden bed
- Nutrient-rich soil
- A watering can or hose
- Basic, cannabis-friendly nutrients for later in the grow
That’s really it. With these basics, you have everything you need to get started and guide your plants from seedling to harvest.
Work With Your Climate
Autoflowering cannabis is incredibly versatile and can thrive in a wide range of climates. Their quick seed-to-harvest time, often under 10 weeks, makes them perfect for growers in regions with short summers. You can easily get a full harvest in before the first frost arrives. If you live in a warmer climate, you can even plan for multiple harvests in a single year. The key is to understand your local weather patterns. If you’re in a hot, dry area, consider adding a layer of mulch to your soil to retain moisture. In a place with intense afternoon sun, a spot with a little natural shade during the hottest part of the day can prevent stress. You can shop all seeds to find a strain that’s a perfect match for your environment.
Protect Your Plants from the Elements
Once your plants are in the ground, your job is to be their guardian. This means protecting them from harsh weather and pests. Keep an eye on the forecast; if a big storm with heavy rain or high winds is coming, you may need to move your pots to a sheltered spot or provide a temporary cover. It’s also important to check your plants regularly for any signs of pests or disease. A healthy plant is the best defense, so ensure they have enough space for good airflow. If you do spot pests, start with natural solutions like neem oil or insecticidal soap. Consistent monitoring is the best way to catch any issues early before they become major problems.
Guide Your Grow: Nutrients and Daily Care
Once your outdoor space is prepped, it’s time for the main event: growing your plants. While autoflowers are famously resilient, a consistent daily care routine is what separates an average harvest from an amazing one. Think of this phase as a partnership with your plant. Your job is to provide the right building blocks—light, water, and nutrients—at the right time, and your plant will handle the rest. From the moment you sprout your seed to the day you see those beautiful, frosty buds, paying attention to your plant’s needs is the key to success.
This guide will walk you through each stage of the autoflower lifecycle, offering simple, actionable steps for daily care. We’ll cover everything from germination to managing the vegetative and flowering stages. You’ll learn exactly how to feed and water your plants without overdoing it—a common pitfall for even experienced growers. We’ll also discuss how to make the most of the natural sunlight in your outdoor space. With these tips, you’ll feel confident guiding your autoflower seeds from tiny sprouts into thriving, harvest-ready plants.
Sprout Your Seeds Successfully
Your journey begins with germination, which is just a fancy word for sprouting your seed. The goal is to coax a tiny white taproot to emerge. A popular and reliable method is the paper towel technique: place your seed between two damp (not soaking wet) paper towels and put them inside a sealed plastic bag or container. Keep it in a warm, dark place. In a few days, you should see the taproot appear. Once it’s about a quarter-inch long, gently transfer it, root-down, into your prepared soil or pot, about a half-inch deep. Be careful not to touch the delicate root with your bare hands.
Care for Plants in the Veg Stage
Welcome to the vegetative stage! During this period, your plant’s mission is to grow strong roots and lush, green leaves. This is where autoflowers really shine for outdoor growers. They are famously tough plants that can handle temperature swings and resist pests better than many of their photoperiod cousins. Your main job here is to avoid overwatering and ensure they get plenty of light. The veg stage for autoflowers is incredibly fast—sometimes just three or four weeks—so every day of healthy growth builds the foundation for bigger buds later. Think of this as the sprint before the marathon of flowering.
Manage the Flowering Stage
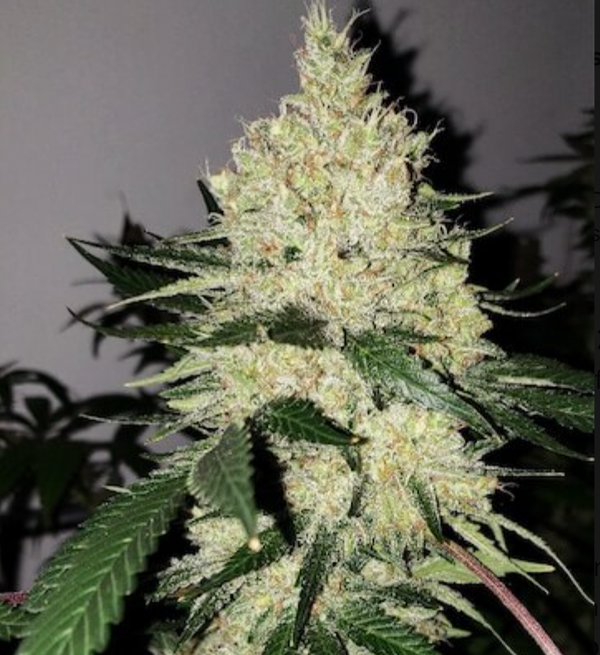
This is where the magic happens. Unlike photoperiod plants that need a change in the light cycle to start budding, autoflowers run on their own internal clock. They will automatically begin to flower after just a few weeks of vegetative growth. You’ll know it’s starting when you see tiny white hairs, called pistils, forming at the nodes where the branches meet the stem. The entire process, from seed to harvest, is incredibly quick, often taking just 7 to 10 weeks. This rapid turnaround means you can sometimes fit multiple harvests into a single outdoor season, especially if you’re growing one of the latest new releases.
Feed Your Plants at Every Stage
When it comes to nutrients, the golden rule for autoflowers is "less is more." Because of their ruderalis genetics and quick lifecycle, they are sensitive to overfeeding. A good practice is to start with half the recommended dose on any nutrient product label and see how your plant responds. During the short vegetative stage, your plant will appreciate a bit more nitrogen (N) for leafy growth. Once you see flowers forming, switch to a bloom formula with higher levels of phosphorus (P) and potassium (K) to support bud development. Always water with plain, pH-balanced water between feedings to prevent nutrient buildup in the soil.
Water Your Plants the Right Way
Overwatering is one of the easiest mistakes to make, but it’s also easy to avoid. Autoflowers hate having "wet feet," which can lead to root rot and stunted growth. The best way to know when to water is to simply check the soil. Stick your finger about an inch deep; if it feels dry, it’s time to water. When your plant is a small seedling, give it just a small amount of water in a circle around the stem. As the plant gets bigger and thirstier, you can increase the amount of water you provide. Your outdoor marijuana seeds will have different needs based on your climate, pot size, and the weather, so let the plant tell you what it needs.
Optimize Sun Exposure
Autoflowers may not need a specific light schedule to flower, but they still need a lot of light to thrive. For an outdoor grow, your goal should be to place your plants in a spot that gets at least 12 hours of direct sunlight per day. Because autoflowers tend to be shorter and bushier, they are perfect for a sunny patio, balcony, or a discreet corner of your yard. If your plants are in pots, try to rotate them every couple of days. This ensures that all sides of the plant get equal sun exposure, which encourages even growth and prevents one side from getting all the good stuff while the other is left in the shade.
Troubleshoot Common Growing Problems
Even with the best planning, you might run into a few bumps along the road. Growing outdoors means dealing with nature in all its glory—pests, diseases, and unpredictable weather included. The key is to catch problems early and act fast. Since autoflowers are on a tight schedule, quick and effective troubleshooting makes all the difference. Don’t worry, most common issues are easy to manage once you know what to look for. Here’s how you can keep your plants healthy and thriving.
Manage Pests Naturally
The best way to handle pests is to stop them from showing up in the first place. Check on your plants daily, looking closely at the undersides of leaves and around the stems for any unwelcome visitors like spider mites or aphids. Giving your plants plenty of space improves airflow and makes it harder for pests to spread. If you do spot some bugs, turn to natural pest control methods first. Introducing beneficial insects like ladybugs can work wonders, as can planting companion herbs like basil or mint nearby to deter common garden pests. These simple, organic approaches keep your cannabis clean and free from harsh chemicals.
Prevent Common Diseases
Healthy plants are your best defense against common diseases like powdery mildew and bud rot. Good air circulation is critical, so avoid crowding your plants. If you’re growing in pots, make sure they are spaced out. For in-ground plants, proper pruning of lower leaves can help air move freely through the canopy. Be careful not to overwater, as soggy soil is a breeding ground for root rot and other fungal problems. Starting with strong genetics also gives you a major advantage. Strains specifically bred for resilience, like many high-quality outdoor marijuana seeds, are naturally better equipped to fight off common ailments, giving you a much smoother growing experience.
Spot and Fix Nutrient Issues
Autoflowers are efficient and generally require fewer nutrients than their photoperiod cousins. A common mistake is overfeeding, which leads to nutrient burn—you’ll see yellow or brown, crispy leaf tips. Always start with half the recommended dose of any fertilizer and see how your plants respond before increasing the amount. Pay attention to the color of the leaves. Yellowing leaves can signal a nitrogen deficiency, while other discolorations might point to different issues. Learning to read your plants is a skill that develops with practice. Keeping a simple journal of when you feed and water can help you pinpoint what’s working and what isn’t.
Your Quick Troubleshooting Guide
Because autoflowers move from seed to harvest so quickly, they have very little time to recover from stress or damage. If you make a mistake, like accidentally snapping a branch or over-pruning, the plant doesn't have weeks to heal like a photoperiod plant would. This means you have to be gentle. Any significant stress can stunt its growth and reduce your final yield. This isn’t meant to scare you, but to encourage a mindful approach. Handle your plants with care, especially when training or moving them. Starting with robust autoflower seeds provides a bit of a buffer, as vigorous genetics can sometimes bounce back from minor mishaps more effectively.
Set Up Plant Supports
While you want to be gentle, some physical guidance can help your plants produce more. Low-Stress Training (LST) is perfect for autoflowers. Instead of high-stress techniques like topping, which involves cutting the main stalk, LST focuses on carefully bending and tying down branches. This gentle training exposes more of the plant to direct sunlight, encouraging more bud sites to develop without causing major stress. As your plants enter the flowering stage, the buds can get heavy. You may need to add bamboo stakes or a small trellis to support the branches and prevent them from snapping under their own weight. This simple step ensures your heavy colas make it to harvest day intact.
Maximize Your Harvest
You’ve nurtured your plants from tiny sprouts to full, budding beauties. Now comes the most rewarding part: the harvest. But don't rush it! The final steps of harvesting, drying, curing, and storing are just as important as the growing process itself. This is where you lock in the potency, aroma, and flavor of your buds. A little patience and attention to detail here will make all the difference in the quality of your final product. Think of it as the final sprint in a marathon—finishing strong ensures all your hard work pays off.
From knowing the perfect moment to chop down your plants to curing your buds for a smooth, flavorful experience, we’ll walk through everything you need to do. Following these steps carefully will help you preserve the delicate cannabinoids and terpenes you've worked so hard to cultivate. Let's get you ready to enjoy the fruits of your labor.
Train Your Plants for Bigger Yields
While many growers train their plants to increase light exposure and yields, this is one area where you need to be careful with autoflowers. Because of their short, predetermined lifespan, they have very little time to recover from stress. High-stress training techniques like topping or heavy bending are generally not recommended, as a slow recovery can permanently stunt their growth and reduce your final harvest.
For beginners, the best approach is to let your autoflower seeds grow naturally. Their genetics are already optimized for a quick and efficient life cycle. If you’re an experienced grower and want to experiment, consider very gentle low-stress training (LST) early in the vegetative stage, but proceed with caution. For most outdoor growers, focusing on providing great soil, water, and sun is the surest path to a great autoflower harvest.
Give Your Plants Enough Space
Giving your plants room to breathe is one of the easiest ways to ensure a healthy grow. When you plant your seeds or transplant your seedlings, make sure there's plenty of space between them. Good spacing allows for better airflow around the lower branches and bud sites, which is your best defense against common problems like mold and powdery mildew, especially in a humid outdoor climate.
Proper spacing also ensures each plant gets unobstructed access to sunlight, allowing it to grow to its full potential. Crowded plants have to compete for light, which can lead to smaller, less-developed buds. Make it a habit to check your plants often for any signs of pests or sickness. Having enough space makes it much easier to inspect each plant thoroughly and manage any issues before they spread.
Know Exactly When to Harvest
Timing your harvest is everything. Harvest too early, and your buds won't be potent; harvest too late, and the effects can become more sedative than desired. Forget about the calendar and focus on the plant itself. The most reliable way to know when it's time is by inspecting the trichomes—the tiny, crystal-like glands on the buds. You'll need a jeweler's loupe or a small digital microscope to see them clearly.
You're looking for the moment when most of the trichomes have turned from clear to a milky or cloudy white. This is the point of peak THC production. A good rule of thumb is to harvest when about 80% of the trichomes are milky white. If you see some amber trichomes, that's okay—this indicates some of the THC has begun to convert to CBN, which can add a relaxing, body-focused effect to your THCA seeds harvest.
Dry Your Buds Properly
Once you’ve harvested, the drying process begins. This step is crucial for preserving the aroma and flavor of your buds while preventing mold. Start by trimming off the large fan leaves, then cut the plant at its base or trim individual branches. Hang the branches upside down in a dark, cool, and well-ventilated space, like a closet or a grow tent. Make sure the branches aren't touching to allow for even drying.
The ideal environment for drying is a temperature of 60–65°F with a humidity level below 50%. You can use a small fan to keep air circulating, but don't point it directly at your buds, as this can cause them to dry too quickly. The process typically takes about 10 to 14 days. You’ll know they’re ready when the smaller stems snap instead of bending.
Cure for a Smoother Experience
Drying is done, but your buds aren't quite ready yet. Curing is the final, critical step that develops their full flavor profile and ensures a smooth smoke. After the buds feel dry on the outside, trim them from the branches and place them into airtight glass jars, filling them about three-quarters full. For the first week, open the jars for 5–10 minutes a couple of times a day. This process, known as "burping," releases moisture and brings in fresh air.
After the first week, you can reduce burping to once every few days for another week or two. The entire curing process can take anywhere from two weeks to two months, but even a short cure will make a huge difference. This slow and steady process is what separates decent cannabis from a truly premium harvest from your shop all seeds purchase.
Store Your Harvest for Lasting Quality
To keep your perfectly dried and cured buds fresh for months, proper storage is key. The biggest enemies of your harvest are light, heat, and oxygen, as they degrade cannabinoids and terpenes over time. Store your buds in airtight glass jars in a cool, dark place like a cabinet or closet. Avoid using plastic bags or containers, as they can affect the taste and cause the trichomes to break off.
For long-term storage, consider adding a two-way humidity pack to your jars. These inexpensive packs will maintain the relative humidity at an ideal level (usually 58% or 62%), preserving the texture, aroma, and potency of your harvest. With the right storage, the buds from your feminized seeds will stay fresh and potent, ready for you to enjoy whenever you want.
Related Articles
- Best Autoflower Seeds: A Buyer's Guide for 2025
- Autoflower Seeds for Beginners: Grow Fast & Easy
- A Grower's Guide to Feminized Cannabis Seeds
- How to Grow Cannabis at Home: A Simple Guide
- How to Grow a Weed Plant: 10 Simple Steps
Frequently Asked Questions
What's the biggest mistake to avoid when growing autoflowers outdoors? The most common pitfall is trying to do too much. Because autoflowers have such a short and fast life, they are very sensitive to stress and don't have time to recover from mistakes. The biggest errors usually come from overwatering or overfeeding. Always let the soil dry out an inch deep before watering again, and when you start using nutrients, begin with half the recommended dose. A gentle, hands-off approach is often the most successful one.
Can I really get more than one harvest in a single outdoor season? Yes, this is one of the best perks of growing autoflowers. Their quick lifecycle, often just 8 to 12 weeks from seed to harvest, makes it entirely possible. To achieve this, you can stagger your planting schedule. Start your first batch of seeds as soon as the weather is consistently warm and frost-free. About four to five weeks later, you can plant a second batch. This way, you’ll be harvesting your first crop while the second one is well on its way.
Is it okay to prune or train my autoflower plant? You need to be very careful here. High-stress training techniques like topping, which involves cutting the main stalk to create more colas, are not recommended for autoflowers. The plant simply doesn't have enough time in its vegetative stage to heal from that kind of stress, and it can permanently stunt its growth. If you want to improve light exposure, stick to very gentle Low-Stress Training (LST) by carefully bending and tying down branches early in the plant's life. For most growers, letting the plant grow naturally is the safest path to a great harvest.
How do I know if my buds are ready to harvest without a special microscope? While checking the trichomes with a jeweler's loupe is the most accurate method, you can get a good idea by looking at the pistils—the little hairs on the buds. Early in flowering, these pistils are white and stick straight out. As the plant matures, they will begin to darken, turning to an orange or amber-brown color, and curl inward. When about 70-80% of the pistils have changed color, you are generally in the right window for harvesting.
Do I need to buy special "autoflower" nutrients? No, you don't need to hunt down nutrients specifically marketed for autoflowers. Standard cannabis nutrients work perfectly well. The important thing isn't the specific product, but the amount you use. Autoflowers are typically lighter feeders than their photoperiod relatives. A good rule of thumb is to use a quality soil mix and then supplement with a standard bloom formula at half-strength once you see flowers begin to form, adjusting only if the plant shows signs of needing more.