Have you ever watched a seedling sprout, only to see it stall out and stop growing for a week? That frustrating pause is often caused by transplant shock, a period of stress a plant experiences after being moved. For autoflowers, which live on a strict internal timer, that lost week is a critical setback they may never recover from. You can completely avoid this common problem from the start. The solution is to plant autoflower seeds directly in their final pot. This method provides a stable home from day one, allowing the vital taproot to grow deep and strong without disturbance.
Key Takeaways
- Skip Transplanting to Avoid Shock: Plant your autoflower seed directly into its final pot. This single step prevents transplant shock, a major stressor that can stunt the growth of these fast-finishing plants and limit your final harvest.
- Control the Environment for Germination: Create a perfect nursery for your seed by maintaining a consistent soil temperature between 70–80°F and using a simple humidity dome. This warm, moist environment is the key to encouraging a quick and healthy sprout.
- Practice Patience with Water and Nutrients: The most common seedling mistakes are overwatering and feeding too soon. Use a spray bottle to keep the soil damp but not soaked, and let the potting mix provide all the food your plant needs for the first couple of weeks.
What Are Autoflower Seeds?
If you're looking for a straightforward path to a successful harvest, let me introduce you to autoflower seeds. Think of them as the cannabis plant's clever cousin. They're a special type of cannabis created by mixing Ruderalis genetics with Indica and Sativa strains. What makes them so special? Unlike traditional photoperiod plants that need a specific light schedule to start producing buds, autoflowers live by their own internal clock. They automatically switch from growing leaves and stems to flowering after just a few weeks, regardless of how much light they get.
This unique trait makes growing much simpler. You don't have to worry about changing your light timers or waiting for the seasons to shift. From the moment you plant the seed, the countdown to harvest has already begun. This predictable, speedy timeline is why so many growers, from first-timers to seasoned experts, choose to work with autoflower seeds. They offer a faster, more direct route from seed to harvest, letting you enjoy the results of your work without the complex light management required by other varieties.
What Sets Autoflowers Apart?
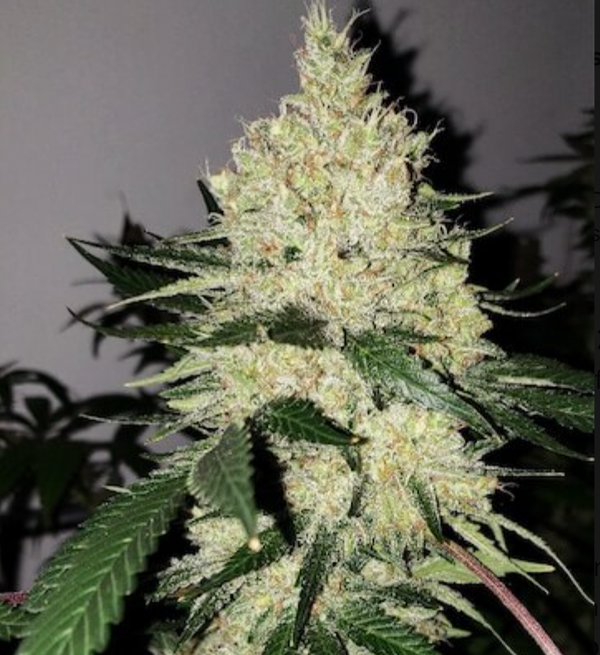
The defining feature of autoflowers is their speed. These plants operate on an accelerated timeline, often going from seedling to a harvest-ready plant in as little as 8 to 10 weeks. This rapid growth is a huge advantage, but it also comes with a trade-off: autoflowers are very sensitive to stress. Because their lifespan is so short and programmed from the start, they don't have the luxury of time to recover from setbacks. Things like overwatering, nutrient issues, or damage from transplanting can permanently stunt their growth and reduce your final yield. Understanding this sensitivity is the key to helping them reach their full potential.
Rapid, Light-Independent Flowering
One of the most freeing aspects of growing autoflowers is that they operate on their own schedule, completely independent of the light cycle. Unlike photoperiod plants that require a strict change in light hours to trigger their flowering stage, autoflowers have an internal clock inherited from their Ruderalis ancestry. After just a few weeks of vegetative growth, they will automatically begin to produce buds, no matter if they're getting 12 or 18 hours of light per day. This removes a significant layer of complexity from the cultivation process, making it much more manageable for new growers and offering flexibility for experienced ones running perpetual harvests.
Fast Growth from Seed to Harvest
If patience isn't your strongest virtue, you'll appreciate the incredible speed of autoflowers. The entire journey from a tiny seedling to a plant ready for harvest can take as little as 8 to 10 weeks. This accelerated timeline means you can achieve multiple harvests within a single outdoor growing season or run more cycles per year in an indoor setup. This rapid turnaround is a game-changer, allowing you to experiment with different strains and enjoy the fruits of your labor much sooner than you would with traditional photoperiod varieties, which can often take several months to mature.
Compact and Discreet Stature
Autoflowers are the perfect solution for growers working with limited space. They typically maintain a compact and bushy structure, usually growing to a manageable height of two to three feet. This smaller size makes them ideal for cultivation in small grow tents, on apartment balconies, or tucked away in a discreet corner of your garden. Their modest stature not only makes them easier to manage but also helps keep your cultivation private. If you're looking for high-quality plants that won't take over your space, these indoor-friendly seeds are an excellent choice.
Natural Hardiness and Resilience
Thanks to their Ruderalis heritage, which originates from harsh climates, autoflowers are naturally tough. They possess an inherent resilience that makes them more forgiving of common beginner mistakes. These plants can often handle minor temperature fluctuations and are generally more resistant to pests and diseases than their photoperiod counterparts. While they are sensitive to major stressors like transplanting, their overall hardiness provides a welcome buffer for those still learning the nuances of cultivation. This built-in durability helps ensure you get to the finish line with a healthy plant and a successful harvest.
Diverse Effects and Feminized Genetics
Long gone are the days when autoflowers were considered less potent. Modern breeding has produced an incredible variety of autoflowering strains that rival the potency and flavor of photoperiod cannabis, with options ranging from high-THCA to CBD-rich cultivars. Better yet, nearly all modern autoflower seeds are also feminized. This means you can be confident that almost every seed you plant will grow into a bud-producing female, eliminating the need to identify and remove male plants. This combination of diverse genetics and guaranteed female plants makes growing easier and far more productive.
Why Plant Directly in Soil?
Given how much autoflowers dislike stress, many growers skip the transplanting process altogether and plant their seeds directly into their final pot. This method completely avoids "transplant shock," the period of stress a plant experiences when it's moved to a new environment. For a plant with a short, fixed lifespan, even a few days of recovery can make a big difference. Planting directly in soil gives your autoflower a stable, undisturbed home from day one. It’s a simple technique that helps your plant establish a strong root system without interruption, setting it up for vigorous, healthy growth right from the start.
Is Direct Planting Right for You?
If you want to give your autoflowers the most stable, stress-free start possible, then planting directly in soil is an excellent choice. This method is incredibly beginner-friendly because it removes several steps—and potential points of failure—from the germination process. You don't have to worry about handling a delicate sprouted seed or damaging its fragile taproot when moving it. Many growers report incredibly high success rates with this technique. By planting your seed directly into its final container, you simplify the process and protect your plant from the biggest threat to its success: stress. It’s a straightforward way to get your grow started on the right foot.
Autoflower Growth Timeline and Expectations
One of the best things about growing autoflowers is their predictable and speedy lifecycle. While every plant and environment is a little different, you can generally follow a consistent timeline from the moment your seed sprouts to the day you harvest. Understanding these key stages helps you know what to look for and how to best support your plant as it grows. This isn't a race, but knowing the key milestones will make you a more confident and successful grower. Let's walk through what you can expect during each phase of your autoflower's short but productive life.
Germination Stage (2-7 Days)
This is where it all begins. The germination stage is when your seed first comes to life and sprouts its initial taproot. When you plant directly in soil, you're creating the perfect dark, protected environment for this to happen. Your main job is to provide the right conditions and then be patient. Keep the soil temperature between 70°F and 80°F and ensure it stays consistently moist, but not waterlogged. Within about two to seven days, you should see a tiny seedling emerge from the soil. This is the first sign of success and the official start of your plant's journey.
Seedling Stage (2-3 Weeks)
Once your seed has sprouted, it enters the seedling stage. For the next two to three weeks, your plant will focus on developing its first true leaves and establishing a strong root system. This is a delicate phase, and your plant is vulnerable to overwatering. Use a spray bottle to keep the soil damp and consider placing a plastic dome over the seedling to maintain high humidity. Your plant will get all the food it needs from the soil during this time, so hold off on adding any nutrients. Just provide gentle light and consistent moisture, and watch your little plant begin to take shape.
Expected Yields Per Plant
It's the question every grower asks: how much will I harvest? With autoflower seeds, you can generally expect a yield of about one to four ounces of dried flower per plant. This can vary quite a bit based on the specific strain, your growing conditions, and how much stress the plant experiences. For example, plants grown outdoors with plenty of direct sunlight often produce larger yields than those grown indoors. The key to maximizing your harvest is to provide a stable, stress-free environment from start to finish, allowing your plant to reach its full genetic potential without any setbacks.
A Quick Note on Legality
Before you start growing, it’s essential to understand the legal landscape. Thanks to the 2018 Farm Bill, cannabis seeds are considered legal at the federal level in the United States as long as they contain less than 0.3% THC, which classifies them as hemp products. This federal ruling is why you can purchase high-quality seeds from reputable sources online and have them shipped directly to you. However, and this is the important part, the legality of *germinating and cultivating* these seeds is a different story. State and local laws can vary dramatically, with some states permitting home cultivation for personal or medical use, while others have much stricter regulations or outright prohibitions.
It is entirely your responsibility to research and comply with the laws in your specific area. A quick search for your state's cannabis cultivation laws is the best first step you can take to get clear, accurate information. Being informed not only ensures you stay on the right side of the law but also allows you to enjoy your growing experience with complete peace of mind. Think of it as part of your garden prep, just as important as choosing your soil or pots. Always confirm your local regulations before you purchase any seeds or begin planting your garden.
How to Create the Perfect Soil Mix
Think of soil as the foundation of your entire grow. Getting it right from the start gives your plant the best possible chance to thrive. Autoflowers, in particular, have a short life cycle, so they don't have much time to recover from early mistakes. A well-prepared soil mix provides the perfect balance of nutrients, water retention, and aeration for strong root development. This isn't about finding a magic formula, but about creating a welcoming home for your seed to sprout and flourish. Let's walk through the simple steps to create the ideal soil environment for your plants.
What's the Best Soil for Autoflowers?
When you’re starting with autoflower seeds, you want to give them a gentle start. The best approach is to use a light, airy potting mix. Heavy, dense garden soil can compact easily, making it difficult for delicate new roots to push through. You should also steer clear of soils that are packed with nutrients, often called "hot" soils. While mature plants love these rich environments, the high concentration of nutrients can overwhelm and "burn" a fragile seedling. Look for a high-quality seedling or light potting mix specifically designed to be fluffy and low in initial nutrients. This gives your seedling a safe space to establish itself before it needs more food.
A Simple DIY Soil Recipe for Autoflowers
Creating your own soil mix might sound complicated, but it’s one of the easiest ways to guarantee your plants get the perfect start. You get complete control over what goes into your pot, ensuring a light, well-draining environment that young roots love. Here’s a simple, tried-and-true recipe that provides everything your autoflower needs without being too "hot" or nutrient-dense. Just mix these three ingredients together thoroughly: 3 parts coco coir for moisture retention and aeration, 2 parts perlite to ensure excellent drainage and prevent compaction, and 1 part high-quality compost for a gentle supply of initial nutrients. This blend creates the ideal fluffy texture, giving your premium genetics the perfect foundation to establish a strong root system from day one.
Mixing in Your Key Amendments
For truly happy roots, you can create your own simple but effective soil blend. A great soil mix allows roots to grow freely, drains excess water to prevent rot, and lets oxygen flow. A classic and reliable recipe is a combination of potting soil, perlite, and coco coir (or coco fiber). The soil provides a base structure and some initial nutrients. Perlite, those little white volcanic rocks, creates air pockets for excellent drainage and aeration. Coco coir is fantastic for retaining just the right amount of moisture without becoming waterlogged. A common ratio is about three parts soil, one part perlite, and one part coco coir, but feel free to adjust based on your specific environment.
Get Your Soil's pH Right
You can have the perfect soil texture and the best nutrients, but if your pH is off, your plant can't use them. The pH level of your soil determines which nutrients are available for your plant to absorb through its roots. For cannabis, the sweet spot for soil is a pH between 6.0 and 6.5. If the soil is too acidic or too alkaline, your plant can experience "nutrient lockout," meaning it's starving even if the food is present. You can easily check your soil's pH with a simple testing kit or meter. Making small adjustments before you plant is much easier than trying to fix a problem once your seedling is already growing.
Why Water pH Matters
Getting your soil pH right is a huge step, but it's only half the battle. The water you use plays an equally critical role because, with every watering, you're influencing the soil's environment. If your water's pH is consistently off, it will slowly pull your soil's pH out of that perfect range, leading you right back to the problems you tried to avoid. This is a primary cause of "nutrient lockout," a frustrating situation where your plant can't absorb the food that's right there in the soil. The pH level of your water directly affects your plants' ability to absorb nutrients, which impacts everything from their overall health to your final harvest size. To keep things stable, always check your water and adjust it to a pH between 6.0 and 6.5 before giving your plants a drink. This simple habit keeps the root zone happy and ensures your plant can actually eat the food you provide.
Getting Your Soil Ready for Planting
Once your soil mix is ready, the final step is to prepare the pot. Fill your chosen container with your soil mix, leaving about an inch of space at the top. Before you even think about planting the seed, give the soil a thorough watering. Let the water run all the way through until it drains freely from the bottom of the pot. This ensures the entire medium is evenly moist and helps the soil settle. After this initial soaking, don't water it again until you plant your seed. This pre-watering step creates a perfectly damp environment that encourages your seed to germinate without the risk of being washed away or overwatered later.
Setting Up the Ideal Grow Environment
Think of this stage as creating the perfect nursery for your new seed. While autoflower seeds are known for their resilience, giving them a stable and nurturing environment from day one sets them up for vigorous growth. Your goal is to mimic the ideal conditions of spring, telling your seed that it’s safe to sprout and reach for the sun. This means getting the temperature, humidity, and airflow just right before you even plant. A little prep work here goes a long way in preventing common seedling issues and helps your plant build a strong foundation for its entire, speedy life cycle. Getting these elements right from the start is one of the most effective ways to ensure a healthy, thriving plant.
Dial in the Temperature
Your seed needs warmth to kickstart the germination process. Aim for a consistent temperature between 70–80°F (21–27°C). This cozy warmth signals to the seed that it's time to wake up and get growing. If your room is a bit chilly, a seedling heat mat placed under the pot is a fantastic tool for providing steady, gentle heat right where it’s needed. Otherwise, find a consistently warm spot in your home, away from drafty windows or vents. Maintaining this temperature helps ensure a quick and successful sprouting process, getting your grow off to a strong start.
Keeping Humidity in the Sweet Spot
High humidity is crucial for a sprouting seed. Before it develops roots, a seed absorbs moisture from the air through its shell. To create a perfectly moist environment, you can make a simple humidity dome. Just cover your pot with a clear plastic cup, a cut-in-half soda bottle, or even plastic wrap with a few small holes poked in it for air exchange. This traps moisture and creates a mini-greenhouse effect that encourages the seed to sprout. Just be sure to remove the dome for a few minutes each day to allow fresh air in.
Humidity Levels by Growth Stage
While your seedling loves the high humidity of its dome (around 70-80%), it won't need that tropical environment forever. As your autoflower plant grows a stronger root system, it will start pulling more moisture from the soil and rely less on the air. During the vegetative stage, you can gradually decrease the humidity to a comfortable 40-60%. Once your plant begins to flower, it's wise to lower it again to about 40-50%. This drier air during the flowering phase is crucial for preventing mold and mildew from developing on your dense, beautiful buds. Think of it as gently weaning your plant off the high humidity of its nursery as it matures.
Choosing and Setting Up Your Lights
Here’s a key point: your seed doesn't need any light while it's germinating under the soil. It’s in complete darkness, focused on sending down its first root. However, the moment that little green sprout breaks through the surface, light becomes its most important resource. Have your grow lights set up and ready to go. As soon as you see the seedling emerge, you’ll want to turn them on. This immediate access to light is vital for photosynthesis and prevents the seedling from stretching and becoming weak as it searches for a light source, a common issue for many indoor cannabis seeds.
Pick the Perfect Pot
Autoflowers have a short life and a sensitive root system, which is why they really don’t like being transplanted. The stress of moving can stunt their growth, and with their accelerated timeline, they don’t have much time to recover. The best practice is to plant your seed directly into its final container. For most autoflower strains, a fabric or air pot between 2 and 4 gallons is perfect. This size gives the roots plenty of room to expand without the soil staying waterlogged for too long, which can lead to root rot and other problems.
Getting Airflow Just Right
Just like we need to breathe, your seed and its future roots need oxygen. Good airflow is essential for a healthy grow, right from the beginning. It helps the soil breathe and prevents the damp, stagnant conditions where mold and fungus can thrive. You don’t need a powerful fan blowing directly on your pot, as this can dry out the soil too quickly. Instead, a small, oscillating fan placed in the room will provide gentle, indirect air circulation. This will also help strengthen your seedling’s stem once it sprouts.
Tips for Growing Autoflowers Outdoors
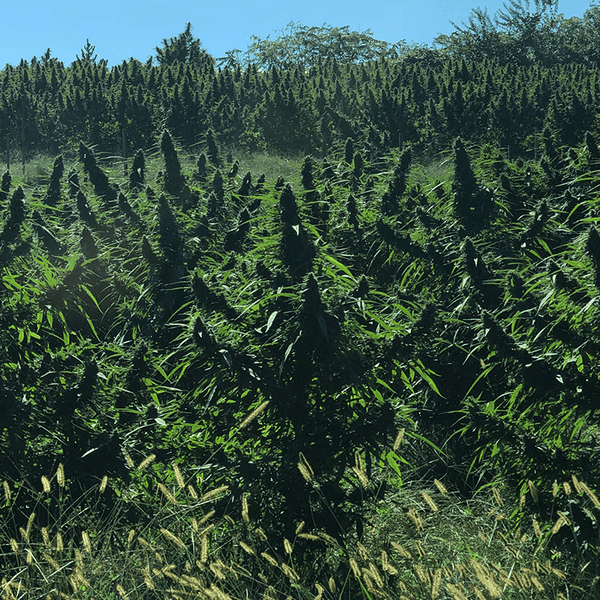
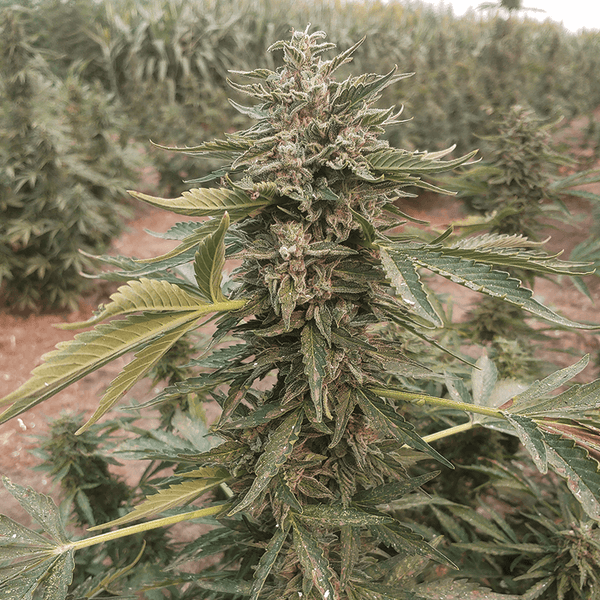
Taking your autoflower grow outside lets you harness the most powerful grow light of all: the sun. Growing outdoors can lead to bigger plants and more impressive yields, but it also means you have less control over the environment. Success comes down to smart planning and timing. Unlike an indoor setup where you manage every variable, outdoor growing requires you to work with nature. By understanding the rhythm of the seasons and preparing for potential challenges, you can create a thriving outdoor garden. Let's go over a few key strategies to help your outdoor marijuana seeds reach their full potential under the open sky.
When to Plant Your Seeds Outside
Timing is everything when you’re growing outdoors. Your goal is to make sure your plants experience the longest, sunniest days of the year during their crucial flowering stage. For most growers in northern climates (above 45° N.L.), the safest time to plant seeds outside is from mid-to-late May, once the last threat of frost has passed. If you live in a warmer, southern region, you can often get started a bit earlier. A great strategy for any climate is to give your plants a head start by germinating them indoors under a simple light in March or April. This lets you move a healthy, established seedling outside as soon as the weather is consistently warm, maximizing your growing season.
The Potential for Multiple Harvests
One of the biggest advantages of growing autoflower seeds outdoors is the potential for more than one harvest in a single season. Because these plants aren't dependent on changing light cycles to start flowering, they race from seed to harvest in about 60 to 90 days. This incredible speed means you can stagger your planting schedule. By starting a new batch of seeds every few weeks, you can create a continuous cycle of harvesting throughout the late spring, summer, and early fall. This is especially useful for growers in areas with short summers, as it allows you to fit in a full grow cycle where a photoperiod plant might not have enough time to finish.
Using Pots for Outdoor Grows
While planting directly in the ground is an option, using pots for your outdoor autoflower grow gives you a huge amount of flexibility and control. Growing in containers allows you to move your plants around to chase the sun throughout the day, ensuring they get as much light as possible. More importantly, it gives you a way to protect them from unexpected weather. If a surprise frost is in the forecast or a week of heavy rain is coming, you can simply bring your pots indoors or onto a covered porch until the weather passes. This control is invaluable for protecting your sensitive autoflowers from the kind of environmental stress that can stunt their growth and reduce your final yield.
How to Plant Your Autoflower Seed
With your soil mixed and your environment ready, it’s time for the main event: planting your seed. This is a delicate step, but don’t let that intimidate you. The goal is to give your seed a safe, stable, and welcoming home so it can confidently send down its first root. Follow these simple steps to get your seed settled in its final pot and set it up for a successful start.
Alternative Germination Methods
While planting directly in soil is my go-to recommendation for giving autoflowers a stress-free start, I know that many growers have their own tried-and-true methods they feel more confident with. If you prefer to watch your seeds sprout before they go into the soil, there are a few other popular techniques. These methods give you a clear view of the germination process, which can be reassuring. The key, especially with autoflowers, is to be incredibly gentle during the transplanting stage to avoid damaging the delicate taproot and causing the very stress you're trying to prevent.
The Paper Towel Method
This classic technique is popular for a reason: it’s simple and it works. You just need to moisten a paper towel so it's damp but not dripping wet, then place your seeds on one half before folding the other half over them. To create a dark, humid environment, you can slide the towel into a plastic baggie or place it between two plates. Keep it in a warm spot, ideally between 70-80°F. Check on it daily, and within a few days, you should see a tiny white taproot emerge. Once that root is about a quarter-inch long, it's time to very carefully transfer the seed, root-down, into its final pot.
Soaking Seeds in Water
Another straightforward and effective method is to soak your seeds. Just drop your autoflower seeds into a glass of lukewarm, room-temperature water and let them sit for about 12 to 24 hours. You'll likely see them sink to the bottom, which is a good sign they've taken on water. This process softens the hard outer shell and helps kickstart germination. After the soak, you can plant the seed directly into its final pot. Be careful not to leave the seed in water for too long, as it can drown from a lack of oxygen once the taproot emerges and needs to breathe.
Using Rockwool or Peat Pellets
For growers who want a middle ground between direct sowing and other methods, starter plugs like rockwool cubes or peat pellets are a fantastic option. First, soak the plug in pH-balanced water until it's fully saturated. Then, gently place your seed into the small hole at the top. Keep the plug in a warm, humid environment, like a small tray with a humidity dome over it. Once the seedling sprouts and its first roots begin to poke through the bottom of the plug, you can plant the entire thing directly into your final pot. This method significantly reduces transplant shock because the roots are never directly handled.
How Deep Should You Plant Your Seed?
How deep you plant your seed matters more than you might think. If it’s too shallow, the seedling can become unstable and dry out. If it’s too deep, it might not have enough energy to break through the surface. The sweet spot is about 1/4 to 1/2 inch deep.
Use your pinky finger or a pencil to poke a small hole in the center of your prepared soil. Gently place the seed inside, pointed-end up if you can, and lightly cover it with soil. Don’t pack the soil down; just make sure the seed is covered. This depth gives the taproot room to grow downward while protecting the delicate new sprout.
Your Seed's First Drink of Water
Your seed needs moisture to kickstart germination, but you want to avoid drowning it. Before you even place the seed in the soil, it’s a good idea to lightly moisten the medium. Use a spray bottle to gently mist the soil until it’s damp but not waterlogged. You’re aiming for the consistency of a wrung-out sponge.
After you’ve covered the seed, give it another light misting. This initial watering settles the soil around the seed and ensures it has the moisture it needs to sprout. Using a spray bottle prevents you from accidentally dislodging the seed with a heavy stream of water. From here, you’ll just need to keep the surface slightly damp until you see a sprout.
Creating a Humidity Dome for Germination
To give your seed the best chance of sprouting, you need to maintain high humidity. A humidity dome creates a mini-greenhouse effect, trapping moisture and warmth right where your seed needs it most. This consistent environment encourages the seed to pop.
You don’t need any fancy equipment for this. Simply place a clear plastic cup, a cut-off plastic bottle, or even some plastic wrap over the spot where you planted the seed. If you use plastic wrap, poke a few small holes in it for air exchange. This simple trick keeps the soil from drying out too quickly and provides the perfect humid climate for germination.
The Waiting Game: Watching for the Sprout
Now, it’s time to be patient. Your autoflower seeds should sprout within a few days to a week. Check on your pot daily, making sure the soil surface stays lightly moist.
As soon as you see the seedling emerge from the soil, you can remove the humidity dome. The plant no longer needs that extra moisture and will benefit from fresh air. At this point, place it under a gentle grow light or in a spot with plenty of indirect sunlight. Your new plant is officially on its way, and the real fun of watching it grow begins.
How to Care for Your Autoflower Seedling
Congratulations, your seed has sprouted! This is a delicate and critical stage in your plant's life. For the next couple of weeks, your seedling is focused on developing a strong root system and its first true leaves. Your job is to provide a stable, gentle environment that supports this early growth without causing stress. Think of yourself as a quiet guardian—observing carefully and intervening minimally.
Your First Week Checklist
Autoflower plants are on a fast track from seed to harvest, which means they are particularly sensitive to stress during their short life. Any setbacks in this first week can impact your final yield. Keep things simple and stable. Your main goals are to provide gentle light, maintain consistent moisture, and protect the fragile stem and roots. Avoid moving the pot around too much or making any drastic changes to its environment. Just let your seedling settle in and get established.
How and When to Water Your Seedling
Overwatering is one of the biggest mistakes new growers make. Your seedling’s roots are tiny and can easily drown if the soil is waterlogged. The goal is to keep the soil damp, not soaking wet. For the first few days, a simple spray bottle is your best tool. Gently mist the soil around the base of the seedling when the top layer starts to feel dry. Once the plant is a bit more established, you can start watering the soil thoroughly until a little drains from the bottom, then wait until the top inch of soil is completely dry before watering again.
When to Start Feeding Your Seedling
Hold off on the plant food for now. Most quality potting soils come pre-loaded with enough nutrients to get your seedling through its first one to two weeks. Adding extra nutrients at this stage can cause “nutrient burn,” which damages the delicate, developing roots and can stunt your plant’s growth. Wait until your seedling has developed at least two or three sets of true leaves before you even consider introducing a very light nutrient solution. Your plant will tell you when it’s hungry.
Understanding Autoflower Nutrient Needs
Because autoflowers grow so quickly, their nutrient requirements are different from traditional photoperiod plants. They simply don't have the time to recover from overfeeding or nutrient burn, which can permanently stunt their growth. The golden rule is always "less is more." When you do start feeding—after those first few sets of true leaves appear—begin with a very weak nutrient solution, about one-quarter to one-half of the recommended dose. This gentle introduction allows you to see how the plant responds without overwhelming its young root system. This careful approach is especially important when growing high-quality autoflower seeds, as it helps them reach their full genetic potential without the stress of nutrient-related issues.
What's the Best Light Schedule for Seedlings?
Once your seedling breaks through the soil, it’s ready for light. Remove the humidity dome and place your pot under a gentle grow light. Full-spectrum LEDs are a great choice for indoor cannabis seeds. Be careful not to place the light too close, as intense light can scorch the tender leaves. A good starting point is about 24-36 inches above the plant, but check your light manufacturer’s recommendations. Set your timer for an 18/6 or 20/4 light cycle (18-20 hours on, 4-6 hours off) to give your plant plenty of energy for vigorous growth.
Can You Train Autoflowers? A Gentle Approach
While it’s too early to start training in the first week, it’s good to know your options. Because autoflower seeds have a limited lifespan, high-stress training methods that involve cutting or breaking the plant are not recommended. Instead, consider Low-Stress Training (LST) once your plant has a few nodes. LST involves gently bending and tying down branches to create a more even canopy. This allows light to reach more bud sites, which can lead to a bigger harvest without stressing the plant.
Common Mistakes When Planting Autoflower Seeds
Even seasoned growers make mistakes, but a few simple precautions can set your autoflower up for a healthy life. Getting the planting stage right is all about creating a stable, gentle environment for your seed to sprout. Let's walk through some of the most common pitfalls and how you can easily sidestep them. By paying attention to water, temperature, and nutrients from day one, you give your plant the best possible start.
Are You Overwatering? How to Tell and What to Do
One of the quickest ways to stop a seed in its tracks is by giving it too much water. Your goal is to keep the soil moist, not soaking wet. Think of a wrung-out sponge—that’s the consistency you’re aiming for. Overwatering can suffocate the seed and lead to rot before it even has a chance to sprout. I recommend using a spray bottle to gently mist the soil when it feels dry to the touch. This gives you precise control and prevents you from accidentally flooding your pot. It’s always easier to add a little more water than it is to take it away.
Keeping Your Plant Safe from Temperature Stress
Cannabis seeds need warmth to kickstart the germination process. If the environment is too cold, your seed will remain dormant. Aim to keep the soil temperature consistently between 70–80°F (21–27°C). This cozy warmth signals to the seed that it’s safe to sprout. If your grow space is on the cooler side, a simple seedling heat mat placed under the pot can make a world of difference. It provides gentle, consistent heat right where it’s needed most. Find a warm spot in your home, away from drafts, to create the perfect incubator for your new plant.
What is Nutrient Burn and How to Avoid It?
It’s tempting to want to give your plant a head start with nutrients, but hold off for now. Most quality potting soils come pre-loaded with enough food to sustain a seedling through its first couple of weeks. Adding extra fertilizers at this delicate stage can cause nutrient burn, which can stress or even kill your young plant. The initial leaves, called cotyledons, will provide the seedling with all the energy it needs to get started. Let your plant use up the nutrients in the soil first before you introduce any additional feeding.
Why Protecting the Taproot is Crucial
When a seed germinates, it sends out a single, delicate root called the taproot. This is the plant’s lifeline, and it’s incredibly fragile. This is exactly why we recommend planting directly into the soil. Methods like germinating in a paper towel require you to handle and transplant the sprouted seed, which creates a huge risk of snapping or damaging that vital taproot. By planting your seed in its final home from the start, you eliminate that risk entirely. A healthy, undisturbed taproot will grow deep and strong, creating a solid foundation for a thriving plant.
Why Starting with Quality Seeds is a Must
You can do everything else right, but if you start with a bad seed, you’ll never get the results you want. A successful harvest begins with great genetics. Healthy, viable autoflower seeds are typically dark in color, firm to the touch, and might have a slightly waxy sheen. Avoid seeds that are pale, feel soft or squishy, or have cracks in their casing. These are signs that the seed is likely immature or damaged and may not germinate. Investing in high-quality seeds from a trusted source is the most important first step you can take.
Pro Tips for an Amazing Autoflower Harvest
Once you’ve mastered the basics of planting, a few extra steps can make a huge difference in the health and yield of your autoflowers. Think of this as fine-tuning your process to give your plants the best possible start. Focusing on the environment, minimizing stress, and choosing the right container will set you up for a successful harvest from day one. These small adjustments help your plants reach their full genetic potential, turning a good grow into a great one.
Fine-Tuning Your Grow Environment
Your seed’s first home needs to be just right to encourage it to sprout. Keep the soil temperature consistently between 70°F and 80°F. If it’s too cold, the seed might stay dormant; too hot, and you risk damaging it. Humidity is just as important. Aim for a high humidity level of 70-90% to keep the seed from drying out. You can easily achieve this by placing a clear plastic dome or cut-up bottle over the planting spot. This simple trick creates a mini-greenhouse, giving your seed the warm, moist conditions it needs to thrive, which is especially important for growing high-quality indoor cannabis seeds.
Simple Ways to Minimize Plant Stress
Autoflowers operate on a fixed timeline from seed to harvest, so they don’t have much time to recover from stress. This is exactly why planting directly in the final pot is such a great strategy—it eliminates the risk of transplant shock. Any setback, whether from pests, disease, or physical damage, can stunt their growth and reduce your final yield. Your main job during the seedling stage is to be a protector. Keep the environment stable and handle the plant as little as possible. Starting with robust genetics from quality autoflower seeds also gives your plant a natural advantage in staying healthy and resilient.
Rethinking Your Pot Strategy for Better Growth
Choosing the right pot is a critical decision you make before you even plant your seed. Since you won’t be transplanting, the pot you start with is the pot you finish with. For most autoflowers that are ready in about two months, a 1.8-gallon pot is perfect. If you’re growing a larger variety that takes closer to three months, a 3-gallon pot will give the roots enough room to expand. Before planting, fill your pot with your soil mix, leaving about a half-inch of space at the top. Water the soil thoroughly until you see it drain from the bottom, ensuring it’s evenly moist for your new seed.
How to Guide Your Plant from Seedling to Veg
The moment your seedling breaks through the soil is a major milestone. Now, it’s time to help it transition into a strong vegetative plant. As soon as you see the sprout, it needs light to start photosynthesis. If you used a humidity dome, you can remove it once the first set of true leaves (the jagged-edged ones) appears. This allows for better airflow and helps strengthen the stem. This early phase is all about gentle adjustments. You’re guiding your plant from a delicate sprout to a vigorous, leafy powerhouse, ready to take full advantage of the premium cannabis genetics you started with.
What to Do When Things Go Wrong
Even with the most careful planning, sometimes things just don’t go as expected. Don’t panic—every grower, from beginner to expert, runs into hiccups. The key is learning how to spot the signs of trouble early and knowing what to do to get your plant back on track. Think of it as learning your plant’s language. A droopy leaf or slow growth is its way of telling you it needs something. This guide will walk you through some of the most common issues you might face during the seedling stage.
Of course, the best way to prevent problems is to start with a solid foundation. Using fresh, high-quality autoflower seeds from a trusted source gives you a huge advantage. Strong genetics mean your plant is already programmed for vigorous growth and resilience. But when challenges do arise, a little know-how can make all the difference. Let’s look at how to troubleshoot the most frequent early-stage problems.
Your Seed Didn't Sprout?
It’s incredibly frustrating when you’ve done everything right and your seed still doesn’t pop. Before you give up, let’s run through a quick checklist. First, consider your seed’s age and quality. Older or poorly stored seeds can have lower germination rates. If you’re confident in your seed, try soaking it in a glass of water for about 12 hours to soften its shell. You can even add a few drops of hydrogen peroxide to help things along. Double-check that your soil temperature and moisture levels are correct—not too hot, not too cold, and consistently damp but not waterlogged. Finally, be patient. Some seeds are just a little slower and can take up to a week to sprout.
Advanced Tip: Helping Older Seeds Germinate
Have some older seeds you're not ready to give up on? They might just need a little extra help to get going. A seed's shell hardens over time, which can prevent water from getting in to trigger germination. To help it along, you can try a technique called scarification. Gently rub the seed between two pieces of fine-grit sandpaper, or carefully nick the shell's edge with a nail clipper. The goal is to create a small scuff, not crack it open. This tiny opening makes it much easier for the seed to absorb water. After this, plant it as you normally would, but pay close attention to creating the perfect nursery: keep the soil temperature between 70–80°F and use a humidity dome to trap moisture. Remember to be patient, as older seeds can sometimes take a bit longer to sprout. While this can revive stubborn seeds, your best bet for a successful grow is always starting with fresh, viable autoflower seeds.
What Causes Stunted Growth (And How to Fix It)
Is your seedling looking a little small for its age? Stunted growth is usually a sign that something in the environment is off. The most common culprit is overwatering. It’s easy to love your plants a little too much, but soggy soil suffocates the roots. Let the soil dry out a bit between waterings. Another cause can be introducing nutrients too early or in too high a concentration, which can cause nutrient burn. If you suspect this, flush the soil with plain, pH-balanced water. Lastly, autoflowers have sensitive roots and don’t like being transplanted. Root shock can easily stunt them, which is why we recommend planting them directly in their final pot.
How to Read Your Plant: Spotting Early Signs of Stress
Your plant will give you visual cues when it’s unhappy. Discolored leaves, drooping, or stretching are all signs of stress. If you see these, it’s time to play detective. Start with the basics. Is the soil too wet or too dry? Are your lights too close, causing light stress? Maybe you’ve been a bit heavy-handed with the nutrients. Often, a simple adjustment to your watering schedule or light distance is all it takes. If a seed sprouts but then seems to stop growing, check your environment’s stability. A sudden drop in temperature or humidity can stall a seedling. Keep the area warm and consider misting the soil surface to maintain moisture.
A Simple Recovery Plan for Stressed Plants
When a seedling is struggling, gentle care is crucial for its recovery. Your main job is to provide a stable, nurturing environment and then let the plant do its thing. Monitor the growing medium daily to ensure it stays consistently damp but never soaking wet. The tiny primary root, or taproot, is incredibly delicate at this stage. If you absolutely must move a seedling for any reason, handle it with extreme care. Never touch the root or the fragile stem. Instead, gently scoop it up with plenty of soil or handle it by the seed shell that may still be attached to the first leaves. A little patience and careful attention can help your plant recover and thrive.
Related Articles
- How to Start Autoflower Seeds: The Ultimate Guide
- How to Germinate Autoflower Seeds Successfully
- Feminized Autoflower Seeds: A Comprehensive Guide
- What are Autoflower Seeds?
- Best Autoflower Seed Banks for Premium Cannabis
Frequently Asked Questions
Why is transplanting such a big deal for autoflowers? Think of an autoflower's life as a sprint, not a marathon. From the moment it sprouts, it's on a fixed, internal clock to reach the finish line—harvest. Unlike other cannabis plants that can take their time, an autoflower doesn't have weeks to recover from the stress of being moved to a new pot. Any time it spends recovering from transplant shock is time it's not spending on growing bigger and developing buds, which can directly impact your final yield. Planting it in its final home from day one eliminates this risk entirely.
Can I just use a regular bag of potting soil from the garden center? You can, but you'll want to be selective. Many standard potting soils are very dense and packed with nutrients, which can be too much for a delicate seedling. Look for a mix specifically labeled for seedlings or a "light" potting mix. If you can't find one, you can easily improve a standard mix by adding about 20-30% perlite. This will make the soil much lighter and airier, giving your seedling's new roots the oxygen and space they need to grow strong.
My seedling sprouted, but it looks really tall and skinny. What's going on? This is a classic sign that your seedling is "stretching" for light. It means your light source is either too far away or not powerful enough, so the plant is putting all its energy into growing upward to find it. This results in a weak, fragile stem. To fix this, you'll need to lower your grow light so it's closer to the plant. Just be careful not to get it so close that it burns the tender leaves. Providing strong, direct light as soon as it sprouts encourages the plant to grow stout and strong instead of tall and flimsy.
You mentioned not to add nutrients at first. So, when should I start feeding my plant? It's best to wait until your seedling has developed its first few sets of "true" leaves. The first little round leaves that appear are called cotyledons, and they act as the seed's packed lunch. The true leaves are the iconic serrated ones that come after. Once your plant has two or three sets of these, it has likely used up the nutrients in the soil and is ready for its first light meal. When you do start, begin with a very diluted nutrient solution, about one-quarter of the recommended strength, to avoid overwhelming it.
How can I tell if I'm overwatering or underwatering my seedling? This is the most common challenge for new growers. The best way to check is by feel. Stick your finger about an inch into the soil. If it feels dry, it's time to water. If it feels damp, wait another day. Another great trick is to get a feel for the weight of the pot right after you've watered it and then again when it's dry. A light pot means it's time for a drink. A seedling's roots are tiny and need oxygen, so letting the soil dry out slightly between waterings is crucial to prevent them from drowning.