Let's move past the idea that autoflowers are just for beginners. While their speed and simplicity are great, modern genetics have turned them into something more: an exciting challenge for experienced growers. How do you push these compact powerhouses to their absolute genetic limits? This guide is for cultivators who have the fundamentals down and are ready for a truly massive harvest. We’ll explore the specific techniques and environmental tweaks that make all the difference, starting with the most crucial step: choosing the best yield autoflower seeds from the start.
Key Takeaways
- Start with High-Yield Genetics: A plant can only live up to its genetic potential. Set yourself up for success by choosing autoflower seeds specifically bred for heavy production and vigorous growth.
- A Stable Environment is Crucial: Autoflowers thrive on consistency. Prevent stress and maximize growth by providing a stable home with large pots, a steady 18/6 light cycle, and consistent temperature and humidity.
- Less Stress Equals More Success: With a short life cycle, autoflowers don't have time to recover from harsh treatment. Stick to gentle, low-stress training (LST) and start with a light nutrient schedule to avoid stunting your plant's progress.
What Are Autoflower Seeds?
If you're looking for a straightforward path to a hefty harvest, autoflower seeds are your new best friend. These plants are popular for a reason: they grow fast, are easy to manage, and can produce an impressive amount of bud in a short time. Unlike traditional cannabis plants that require specific light cycles to start flowering, autoflowers do their own thing, making them a fantastic choice for both new growers and seasoned experts looking for a quick turnaround. Let's get into what makes these seeds so special and how you can get the most out of them.
What Makes Autoflowers So Different?
The magic of autoflowers lies in their genetics. They contain ruderalis, a subspecies of cannabis that evolved in the harsh climates of Central Asia and Siberia. This genetic heritage means they don't rely on changes in light to start producing flowers. Instead, autoflower seeds operate on an internal clock, automatically switching from vegetative growth to the flowering stage after just a few weeks. This completely removes the need to manage light schedules, which is often one of the trickiest parts of growing photoperiod strains. For you, this means a simpler, more predictable growing process from start to finish. You can focus on giving your plants the best care without worrying about flipping light timers.
The Genetic Makeup of Autoflowers
The secret ingredient in every autoflower is a hardy cannabis subspecies called Cannabis Ruderalis. This tough plant evolved in the harsh, short-summer climates of places like Central Asia and Siberia, where it had to adapt to survive. Instead of waiting for a change in the light cycle to signal flowering, it developed an internal clock to flower based on age. This unique trait means your plant will automatically switch from vegetative growth to flowering in just a few weeks. But genetics do more than just dictate the flowering time; they set the entire potential for your harvest. Starting with quality autoflower seeds bred for vigor and production is the single most important factor in achieving a heavy yield, giving your plants the foundation they need to thrive.
Why You'll Love Growing Autoflowers
One of the biggest draws of autoflowers is their speed. Most are ready to harvest in just 8 to 10 weeks from seed, allowing you to fit multiple harvests into a single growing season. Their compact size also makes them ideal for growers with limited space, whether you're using a small tent for an indoor grow or a discreet corner of your balcony. Because they flower automatically, they are incredibly forgiving, making them a perfect entry point for beginners. You get to learn the ropes of cultivation without the added complexity of light cycle management, setting you up for a successful first harvest and building your confidence as a grower.
Pros and Cons of Autoflowers
Deciding if autoflowers are right for you means looking at the whole picture. On the plus side, their biggest advantage is speed. You can go from seed to harvest in as little as eight weeks, which is perfect if you want to squeeze in multiple harvests per year. Their compact stature makes them a dream for anyone working with a small tent or a discreet outdoor space. And because they handle their own light schedule, you can skip one of the more technical parts of cultivation. This simplicity, combined with their naturally hardy genetics, makes them a really rewarding choice.
Now for the trade-offs. That same speed means they have very little time to recover from stress. An early mistake like overwatering can stunt the plant and reduce your final yield, so a gentle hand is key. Because of their shorter life, they typically produce less bud than a massive photoperiod plant and you can't take clones. While older autoflowers had a reputation for lower potency, modern breeding has largely solved that issue, with many high-THCA strains now rivaling their photoperiod cousins in quality and effect.
How Do Autoflowers Produce Such Big Yields?
While autoflowers are user-friendly, getting those massive yields you're dreaming of isn't just about planting a seed and waiting. The final harvest size depends on several key factors: genetics, your growing environment, nutrients, and your own experience. The journey to a huge harvest starts with choosing the right strain. Look for genetics specifically bred for high production—some modern autoflowers can easily yield as much as their photoperiod counterparts. Starting with high-quality cannabis seeds from a reputable source gives your plants the genetic potential they need to truly thrive and produce dense, resinous buds.
Understanding Autoflower Yield Potential
Before you can maximize your harvest, it helps to know what you’re aiming for. Yield potential is a combination of your plant's genetics and the care you provide. While some growers report massive harvests, it's important to have realistic expectations and understand how yield is measured. The numbers can vary wildly based on your setup, experience, and the specific strain you choose. Let's break down what a typical autoflower harvest looks like, from the moment you chop down your plant to the final cured bud, so you can set achievable goals for your grow.
Wet vs. Dry Weight: What to Expect
After you harvest, your branches will be heavy with fresh, wet buds. It’s an exciting moment, but remember that most of that weight is water. Cannabis flowers are about 75-80% water when freshly cut, and all of that moisture needs to be removed during the drying and curing process. A simple rule of thumb is to expect your final dry weight to be about 20-25% of the initial wet weight. So, if you harvest 200 grams of wet buds, you can anticipate having around 40 to 50 grams of dried flower. This is a crucial calculation for managing expectations and accurately gauging the success of your harvest.
Average Yields for Autoflowers
So, what’s a good number to shoot for? On average, an indoor autoflower can produce anywhere from 50 to 250 grams (about 2 to 8 ounces) per plant. Of course, this is a wide range. Your final yield will depend heavily on factors like light intensity, pot size, nutrients, and training techniques. Some high-performance "super autos" can push beyond this, with experienced growers pulling in 300 grams or more under optimal conditions. The most important factor, however, is starting with the right genetics. Choosing high-quality autoflower seeds from a breeder known for vigorous, high-yielding strains sets the foundation for a truly impressive harvest.
How Autoflowers Compare to Photoperiod Plants
When it comes to pure volume, traditional photoperiod plants often have a higher yield ceiling than autoflowers. Because you control their vegetative period, you can let them grow much larger before flipping them to flower, resulting in more bud sites and a heavier harvest. An experienced grower might get 4-6 ounces from an autoflower but 8-12 ounces from a photoperiod plant in the same space. However, it's a trade-off. Autoflowers give you incredible speed and simplicity, allowing for multiple harvests in the time it takes to grow one photoperiod crop. For many growers, the convenience and rapid turnaround of an autoflower outweigh the potential for a slightly larger yield from their feminized seed counterparts.
The Typical Autoflower Growth Timeline
One of the best things about autoflowers is their predictable, lightning-fast lifecycle. While genetics and your specific environment can cause slight variations, most follow a similar 10-week journey from seed to harvest. Understanding what your plant is doing during each phase is the key to providing the right care at exactly the right time, which is crucial given their short lifespan. This timeline breaks down the entire process, from the first sprout to the final snip, so you know exactly what to expect and how to support your plant for the best possible results. Let's walk through each stage of your autoflower's rapid development.
Weeks 1-2: Germination and Seedling Stage
This is where it all begins. During the first two weeks, your plant's main focus is on germination and establishing a healthy root system. This stage is incredibly important because it lays the groundwork for the plant's future health and overall yield. Your tiny seedling is delicate, so it’s crucial to provide a stable environment with gentle light and consistent moisture without overwatering. Think of this as building a strong foundation; any stress or setbacks now can have a lasting impact on a plant with such a short life. By the end of week two, you should see a small but sturdy seedling with its first few sets of true leaves, ready to explode with growth.
Weeks 3-6: Vegetative Growth
Get ready for some explosive growth. From weeks three to six, your plant shifts into the vegetative stage. All its energy goes into getting bigger, developing more leaves, and building a robust structure that will eventually support heavy buds. This is when you'll really see the quality of your genetics shine. A strong plant will develop thick stems and lush foliage, maximizing its ability to absorb light and nutrients. This period is your best window for any low-stress training (LST) you plan to do. Gently bending and tying down branches can open up the canopy, ensuring all parts of the plant get enough light for even growth.
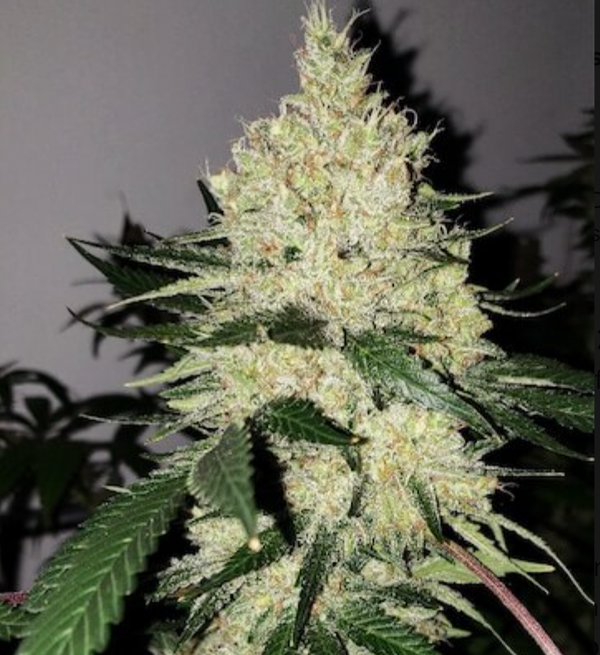
Weeks 7-9: Flowering Stage
This is the moment you’ve been waiting for. Around week seven, your autoflower will automatically transition into the flowering stage, regardless of the light cycle. You'll start to see small white pistils forming at the nodes, which will soon develop into full-fledged buds. The plant's energy now shifts from growing taller to producing flowers. During these weeks, it's essential to provide optimal conditions and the right nutrients to support bud development. The plant will continue to stretch a bit at the beginning of this stage, but soon all its resources will be dedicated to packing on weight and resin. This is where you'll see the development of the dense, frosty buds that make growing high-THCA strains so rewarding.
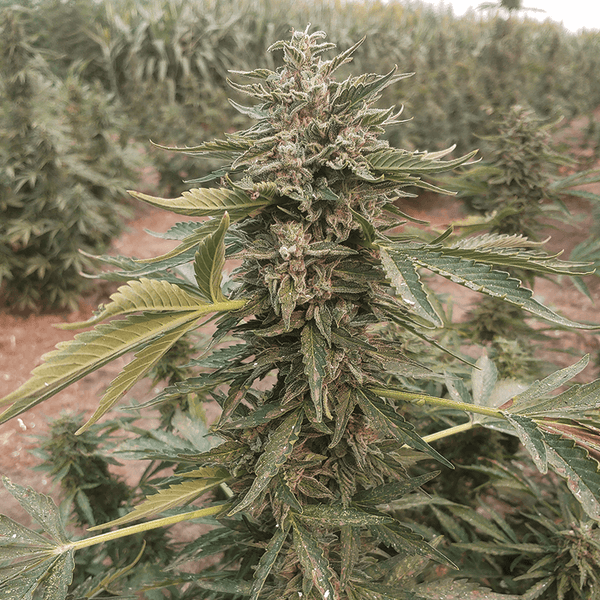
Week 10: Ripening and Harvest
By week ten, you're on the home stretch. Your buds are likely looking plump and smelling amazing, but patience is key. This final stage is all about ripening. The plant is no longer focused on growth but on maturing its flowers to maximize their quality and potency. The best way to know when it's time to harvest is to look at the trichomes—the tiny, crystal-like glands on the buds—with a magnifier. When most have turned from clear to a milky white, with a few amber ones mixed in, your plant has reached its peak. This is your signal to chop it down and start the drying and curing process.
How to Choose High-Yield Autoflower Seeds
Picking the right seeds is the single most important decision you'll make for a massive harvest. Think of it as laying the foundation for your entire grow—a plant can only reach the potential that’s written in its DNA. While your growing skills play a huge role, starting with genetics bred for size and density gives you a serious head start. Not all autoflowers are created equal, and some have been specifically developed by breeders to pack on weight quickly and efficiently.
When you browse for seeds, you're looking for more than just a cool name or a high THC percentage. You're looking for a genetic blueprint for success. This means paying close attention to the breeder's notes, understanding what key traits to look for, and matching a strain's characteristics to your specific goals and grow setup. Let’s walk through exactly how to vet a strain and find the perfect high-yielding autoflower for your garden.
Spotting the Best Autoflower Genetics
A plant’s genetics dictate its upper limit for yield. The type of cannabis strain you choose has a massive impact on how much it can ultimately produce. Look for strains described with terms like "vigorous," "sturdy," and "heavy-branching." These are clues that the plant has a strong structure capable of supporting dense, heavy colas. Reputable breeders spend generations stabilizing these traits, ensuring that the seeds you buy will consistently express these high-yielding characteristics. Exploring a collection of well-bred autoflower seeds is the best place to start your search for a genetic powerhouse.
Can You Spot a High-Yielder?
Breeders make it easy to identify top producers by providing estimated yield numbers. A great benchmark to look for is a strain that can produce between 500–600 grams per square meter (g/m²). You'll usually find this information right in the strain description. These high-yield autoflower seeds are specifically bred to produce much larger amounts of cannabis buds compared to standard varieties. Beyond the breeder's stats, do a little homework. Check out online forums and grow diaries to see what other cultivators are saying. Real-world results can confirm a strain's potential and give you valuable insight into its performance.
Finding Your Perfect Autoflower Strain
While a huge harvest is the goal, it's not the only factor. The best strain for you also needs to fit your personal preferences. Do you prefer the effects of THCA seeds, or are you looking for the therapeutic benefits of CBD? Think about the flavor and aroma profiles you enjoy. Some high-yielders might have an earthy, piney taste, while others burst with fruity, citrus notes. Consider the plant's size and structure, too. If you have limited vertical space, a shorter, bushier plant might be a better fit than a tall, lanky one. Your perfect strain is one that balances a massive yield with the effects and flavors you love.
Why a Strain's Family Tree Matters
A strain's lineage offers a glimpse into its potential. If an autoflower was bred from a legendary high-yielding photoperiod parent, there's a good chance it inherited those productive traits. A stable, consistent family tree from a trusted breeder means you're less likely to encounter unwelcome surprises. That said, remember that genetics are only half the equation. As many experienced growers will tell you, your cultivation method is just as important as the strain itself for getting big yields. The best cannabis seeds in the world still need the right environment, nutrients, and care to reach their full, impressive potential.
Setting Up Your Grow for a Massive Yield
Once you’ve chosen your high-yield seeds, the next step is creating an environment where they can truly thrive. Think of it as building the perfect home for your plants. Autoflowers are resilient, but they still have needs. Giving them the right foundation—from the soil they grow in to the light they soak up—is the most reliable way to get those heavy, resinous buds you’re after.
Setting up your grow space doesn’t have to be complicated or expensive. It’s about understanding the fundamentals and creating a stable, consistent environment. A little attention to detail at the beginning of your grow pays off big time at harvest. We’ll walk through the four pillars of a successful setup: pots and soil, lighting, climate control, and feeding. Get these right, and you’ll be well on your way to growing some of the best cannabis of your life.
Get Your Pot and Soil Right
Your plant’s root system is its engine, and it needs room to grow. Choose pots that hold at least 4-5 gallons (or 15-20 liters). This size gives the roots plenty of space to expand, which directly supports a bigger plant and, ultimately, a more impressive yield. When it comes to the growing medium, autoflowers love a light, airy soil mix. Look for something that drains well and contains organic material. This prevents the roots from becoming waterlogged and gives them easy access to oxygen, which is crucial for healthy growth. A strong foundation is the first step to getting the most from your autoflower seeds.
Choosing the Best Pots for Aeration
The container you choose is more than just a home for your plant; it's a critical part of its support system. For autoflowers, bigger is definitely better. Aim for fabric pots or air pots that are at least 4-5 gallons. These types of containers are fantastic because they allow air to reach the root zone, which prevents the roots from circling and becoming root-bound. Instead, the roots are naturally "air-pruned," encouraging a dense, fibrous root mass that can absorb nutrients more efficiently. This strong foundation is what supports vigorous top-side growth, leading to the heavy yields you're aiming for with your indoor cannabis seeds.
Amending Your Soil for Healthier Roots
Once you have the right pot, you need to fill it with the right medium. Autoflowers thrive in a light, airy soil that doesn't become compacted or waterlogged. A dense, heavy soil can suffocate the roots and stunt your plant's growth right from the start. To create the perfect mix, amend a high-quality potting soil with about 20-30% perlite or coco coir. Perlite improves drainage and aeration, while coco coir helps retain moisture without becoming soggy. Adding organic matter like worm castings can also provide a gentle source of nutrients, giving your feminized seeds a healthy start before you even introduce liquid fertilizers.
How Much Light Do Autoflowers Need?
Light is food for your plants, and more light generally means more buds. If you’re growing indoors, a consistent light schedule of 18 hours on and 6 hours off is the sweet spot for autoflowers throughout their entire life cycle. This extended "daylight" gives them plenty of energy to pack on weight during their short flowering period. Invest in high-quality LED or HID grow lights to ensure your plants get the intense, full-spectrum light they need for dense flower development. Providing the right light is one of the most effective ways to support your indoor cannabis seeds and help them reach their full genetic potential.
The Ideal Light Cycle (and What to Avoid)
While photoperiod plants need a change in light to start flowering, autoflowers march to the beat of their own drum. That's why the 18/6 light cycle (18 hours on, 6 hours off) is the gold standard from seedling to harvest. This schedule gives your plants a long, consistent 'day' to absorb energy and fuel their rapid development. One common mistake growers make is switching to a 12/12 cycle during the flowering stage, thinking it will help the buds mature. For autoflowers, this actually does the opposite and will significantly reduce your final yield. They don't need a light cue to flower, so cutting their light exposure only starves them of the energy they need to produce dense, heavy buds. Stick with 18/6 for the entire life of your autoflower seeds for the best results.
Why LED Lights are a Smart Choice
When it comes to lighting, LED technology is a game-changer, especially for autoflowers. The main advantage is that they produce far less heat than older HID lights. This is a huge plus because autoflowers have a short life and can be sensitive to heat stress, which can stunt their growth. A cooler running light allows you to provide high-intensity illumination without cooking your plants. As a general rule, aim to provide at least 75 watts of light per plant to ensure they have enough power for vigorous growth and dense flower production. Modern LEDs also offer a full spectrum of light that mimics the sun, giving your plants everything they need to thrive. Investing in a quality LED setup is one of the smartest moves you can make for a successful harvest from your cannabis seeds.
Dial In Your Temperature and Humidity
Cannabis plants are happiest in a stable climate. Aim to keep your grow space between 65-85°F (18-29°C). Humidity is just as important, but your plant’s needs will change as it matures. Younger, vegetative plants prefer higher humidity, around 50-60%, to encourage lush growth. Once they start flowering, you’ll want to lower the humidity to 40-50%. This simple adjustment helps prevent mold and mildew from forming on your developing buds. Using a simple thermometer and hygrometer will help you monitor your environment and make small adjustments to keep your plants in their ideal climate zone.
What Should You Feed Your Autoflowers?
One of the most common mistakes new growers make is overfeeding their autoflowers. These plants are efficient and typically require fewer nutrients than their photoperiod cousins. When you start feeding, begin with a light dose—about 25-50% of the amount recommended on the nutrient bottle. You can always give them more later if they look hungry. Use a balanced nutrient mix formulated specifically for cannabis to ensure they get the right blend of macro and micronutrients. This careful approach to feeding helps you avoid nutrient burn and keeps your plants healthy and productive, especially if you're growing innovative genetics like triploid cannabis.
Focusing on Bloom Nutrients
As your autoflower transitions into its flowering stage, its dietary needs change. This is the time to switch from growth-focused nutrients to a bloom formula. Bloom nutrients are specifically designed with higher levels of phosphorus and potassium, the key ingredients your plant needs to produce large, dense, and resinous flowers. This is the most critical phase for building yield, so getting the feeding right is essential. Continue with the "less is more" philosophy; start with a low dose and only increase it if the plant shows signs of needing more. Overfeeding now can stress the plant and reduce your final harvest. A careful approach ensures your feminized seeds have the best chance to develop into the heavy-yielding plants you're aiming for.
Level Up Your Grow with These Techniques
Once you’ve got your setup dialed in, you can start thinking about techniques that give your plants an extra edge. While autoflower seeds are known for being straightforward, a few simple training and care strategies can make a huge difference in your final harvest. Think of it less as forcing the plant to do something and more as guiding its natural growth to get the most out of every branch.
The key with autoflowers is to be gentle. Their life cycle is short and sweet, which means they don't have a lot of time to recover from stress. High-stress training methods that work for photoperiod plants can actually stunt an autoflower's growth and reduce your yield. Instead, we'll focus on low-stress techniques that work with the plant's rapid development. These methods are all about improving light exposure and airflow to the lower branches, encouraging the entire plant to produce dense, heavy buds instead of just one main cola. With a little bit of attention, you can create a full, even canopy that turns your entire plant into a top-tier producer.
A Gentle Guide to Low-Stress Training (LST)
Low-Stress Training, or LST, is your best friend when growing autoflowers. The goal is to break the plant's natural tendency to grow one dominant central stalk (a trait called apical dominance) and instead encourage a wider, bushier structure. This allows light to penetrate deeper into the canopy, reaching bud sites that would otherwise be left in the shade.
To do this, you’ll gently bend the main stem down and tie it horizontally. As the side branches grow upwards toward the light, they become main colas themselves. This simple act of redirecting growth creates a more even canopy where every bud gets its share of light and air. The result is a significant increase in your overall yield without putting the plant through any major stress.
How to Maximize Your Grow Space
One of the most critical—and easiest—ways to ensure a big harvest is to give your plant the right home from day one. For autoflowers, this means planting your germinated seed directly into its final pot. Moving an autoflower from a small pot to a larger one can cause transplant shock, which slows down growth. Since their vegetative stage is so short, they don't have time to recover, and that lost time translates directly to a smaller yield.
Choose a pot that’s between 10-15 liters (about 3-4 gallons). This gives the root system plenty of room to expand without restriction. A strong, healthy root system is the foundation for a large, productive plant. By starting your cannabis seeds in their forever home, you set them up for uninterrupted, vigorous growth from sprout to harvest.
Supporting Heavy Buds with Stakes or Netting
As your plants enter the late flowering stage, you might run into a wonderful problem: the buds are getting so big and dense that their weight starts to bend the branches. This is a sign you’re doing a great job, but it’s also a critical moment to step in and provide support. Without it, branches can snap, which stresses the plant and can reduce your final harvest. The solution is simple and effective. You can use bamboo stakes or small trellises to prop up individual heavy colas, or install a net over your canopy to support the entire plant structure. This small step protects your investment and ensures your beautiful buds make it to harvest day intact.
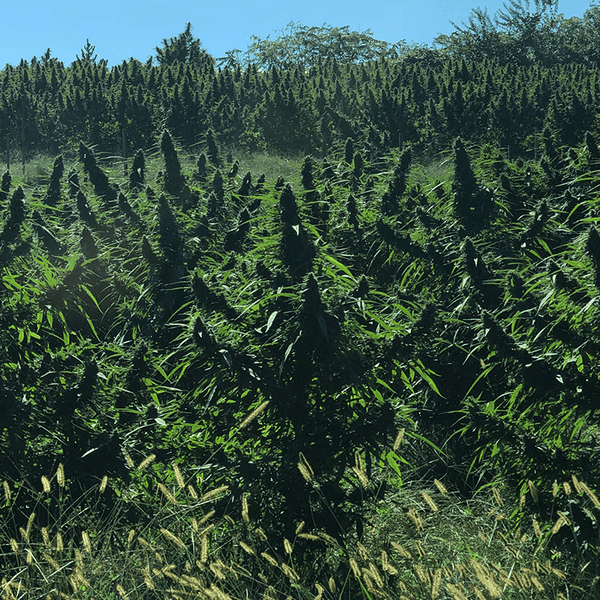
A Tip for Outdoor Growers: Start Seedlings Indoors
If you're planning an outdoor grow, give your plants the best possible start by germinating them indoors. Young seedlings are incredibly delicate and vulnerable to unpredictable weather, pests, and temperature swings. By keeping them inside for the first week or two under a gentle light, you provide a stable, controlled environment where they can establish a strong root system and healthy initial foliage without any stress. This head start makes them far more resilient and prepared for the transition outside. When you eventually move your outdoor marijuana seeds into the great outdoors, they’ll be vigorous and ready to thrive, leading to a much healthier plant and a bigger final yield.
When Is the Best Time to Train Your Plants?
Timing is everything, especially with autoflowers. You want to begin LST when the plant is young and flexible but developed enough to handle it. The sweet spot is usually when your plant has developed between three and five nodes, or sets of leaves. At this stage, the main stem is still pliable and can be bent easily without snapping.
Start by gently bending the main stalk over and securing it with a soft plant tie. Continue to adjust the ties and train new branches as the plant grows, always aiming for a flat, even canopy. Once you see the first signs of flowering—little white pistils emerging—it’s time to stop training. During the flowering stage, you want the plant to focus all its energy on producing buds, not recovering from stress.
Water Your Plants Like a Pro
It’s easy to kill your plants with kindness, and overwatering is one of the most common mistakes growers make. Cannabis plants thrive when their roots have access to both water and oxygen. When the soil is constantly saturated, the roots can't breathe, which can lead to root rot and other problems.
The best rule of thumb is to water only when the top inch or two of the soil feels dry to the touch. Another great method is to get a feel for the weight of the pot when it’s fully watered versus when it’s dry. Water thoroughly until you see a little runoff, then wait until the pot feels light again before you water next. This practice encourages the roots to grow deeper in search of moisture, building a stronger foundation for a bigger plant.
Watering Wisdom: pH and Quality Matter
Beyond just how much you water, the quality of your water is a game-changer. Think of pH as the gatekeeper for nutrients. If the water's pH is off, your plant can't absorb the food you're giving it, even if it's in a nutrient-rich solution. For soil grows, you want to keep your water's pH level between 6.0 and 7.0. Your tap water might also contain chlorine or other impurities that can affect your plants. If you want total control, using filtered or reverse osmosis (RO) water gives you a pure, clean base to start from. Getting this right ensures your plants can make the most of their nutrients, which is essential for developing those dense, heavy buds you're working toward. It's a simple step that supports the powerful genetics in your autoflower seeds.
Avoid These Common Yield-Killing Mistakes
Growing impressive autoflowers is as much about avoiding mistakes as it is about using the right techniques. Even with the best genetics, a few simple errors can significantly reduce your final harvest. These plants grow on a tight schedule, so there’s little room to recover from stress. By sidestepping these common pitfalls, you give your plants the clear runway they need to reach their full potential. Let’s walk through the most frequent mistakes growers make and how you can easily avoid them to get the massive buds you're after.
The Dangers of Overfeeding (and How to Avoid It)
It’s tempting to think that more food equals bigger buds, but it’s one of the quickest ways to hurt your harvest. Over-feeding your plants is a classic mistake that leads to nutrient burn, which appears as yellow or brown, crispy leaf tips. Autoflowers are generally more compact than photoperiod plants and often require fewer nutrients. A good rule of thumb is to start with half or even a quarter of the recommended dose on your nutrient bottle and watch how your plant responds. It’s always easier to add more nutrients later than it is to fix a plant that’s been overfed. Starting with robust autoflower seeds gives you a great foundation, but gentle feeding is key.
Common Plant Training Mistakes to Sidestep
While training methods can help your buds get more light and air, the wrong approach can do more harm than good. Because autoflowers have a limited lifespan, they don’t have much time to recover from high-stress training (HST) like topping. For most autoflower strains, it’s best to stick with low-stress training (LST). This involves gently bending and tying down branches to create a more even canopy, allowing light to reach lower bud sites without cutting the plant. If you’re a beginner, focus on LST to guide your plant’s shape. This simple technique can improve your yield without risking the stress that could stunt its growth.
The Problem with Topping Autoflowers
Topping involves cutting the main stalk of the plant to encourage it to grow two main colas instead of one. While this is a fantastic technique for photoperiod plants, it can be a disaster for autoflowers. The issue comes down to time. When you top a plant, it needs a recovery period to heal and redirect its energy. With photoperiods, you can simply extend the vegetative stage to give them all the time they need to bounce back. But the internal clock of your autoflower seeds is already ticking from the moment they sprout. They will switch to flowering automatically, ready or not. This often leads to stunted growth, as the plant spends precious energy on healing instead of getting bigger, resulting in a much smaller plant and a disappointing yield.
Why a Stable Environment is Non-Negotiable
Cannabis plants thrive on consistency. Wild swings in temperature, humidity, or light schedules can cause stress that slows down growth and limits bud production. Your goal is to create a stable environment where your plants can flourish without interruption. Good light, temperature, humidity, and airflow are all key pieces of the puzzle. Use timers for your lights and fans to maintain a strict schedule, and use a simple thermometer and hygrometer to monitor conditions in your grow space. This is especially important when growing sensitive indoor cannabis seeds, as you have complete control over their world. A stable environment means a happy, productive plant.
Is Your Timing Off? Common Scheduling Mistakes
Understanding your specific strain’s timeline is crucial for a successful harvest. Autoflowers usually flower for about 6 to 10 weeks, but this can vary. Sativa-dominant autos might take a bit longer, while Indica-leaning ones can finish faster. Harvesting too early means you’ll miss out on both weight and potency, while waiting too long can cause cannabinoids to degrade. The best way to know when to harvest is to read the breeder’s notes for your strain and, more importantly, to inspect the trichomes with a magnifier. When they turn from clear to milky white with a few amber ones mixed in, your plant is at its peak. You can check the specs for each strain to get a clear idea of its expected lifecycle.
How to Maximize Your Harvest
Once you’ve chosen the perfect seeds and set up your space, the real fun begins. Maximizing your harvest isn’t about a single secret trick; it’s about consistently giving your plants what they need to thrive. This final stretch of the grow cycle is where your attention to detail really pays off, turning a good harvest into a great one. Think of it as creating the ideal five-star resort for your plants—when they’re happy and comfortable, they’ll reward you with an impressive yield. From dialing in the humidity to knowing the precise moment to chop, every small adjustment contributes to the final weight and quality of your buds.
This is a hands-on process that requires observation and response. Your plants will communicate their needs through the color of their leaves, the speed of their growth, and the development of their flowers. Learning to read these signs is the hallmark of an experienced grower. It means checking on them daily, not just to water, but to inspect for pests, assess their structure, and ensure the environment is stable. By staying engaged and proactive, you can catch small issues before they become big problems and make the subtle tweaks that encourage your plants to reach their full genetic potential. Let’s walk through the key areas to focus on as you approach the finish line.
Fine-Tune Your Grow Environment for Big Results
Your grow space is your plant's entire world, so making it perfect is one of the most impactful things you can do. The key is stability. Autoflowers love consistency in their light, temperature, and humidity. For indoor growers, a good rule of thumb is to provide at least 75 watts of light per plant. Keep the temperature between 65–85°F and the humidity around 50–60% during the vegetative stage. Once flowering begins, you’ll want to drop the humidity to 40–50% to help prevent mold and encourage resin production. Good airflow is also essential, so use fans to keep the air moving gently. This helps strengthen stems and keeps the climate consistent throughout the canopy.
How to Perfect Your Nutrient Schedule
It’s easy to assume that more food equals bigger plants, but autoflowers actually prefer a lighter touch. Because of their short life cycle, they are more sensitive to nutrient burn than their photoperiod cousins. A great starting point is to use about a quarter to half the recommended dose of nutrients you see on the bottle. Watch your plants closely—their leaves will tell you everything you need to know. If they are a healthy green, you’re on the right track. If they start showing yellowing tips, you might be overdoing it. Starting with high-quality autoflower seeds gives you a plant with strong genetics that can better handle its nutrient regimen.
Know Exactly When to Harvest
Patience is a virtue, especially when it comes to harvesting. Chopping your plants down too early or too late can affect both the final weight and the potency of your buds. The best way to know when it’s time is to look at the trichomes—the tiny, crystal-like glands on the flowers—with a jeweler's loupe. When most trichomes have turned from clear to a milky or cloudy white, you’ve reached peak THC levels. If you wait until some turn amber, you’ll get a more relaxing, body-focused effect. For a truly maximized yield, try a staggered harvest. The top buds often mature faster, so you can harvest them first and give the lower buds another week to ripen fully.
Using a Staggered Harvest for Better Buds
A staggered harvest is a simple but effective technique to get the most out of every single plant. Because the top colas are closer to the light source, they almost always mature faster than the lower buds. Instead of harvesting the entire plant at once, you can chop the ripe top sections first. This simple act does two amazing things: it lets you harvest those buds at their absolute peak, and it opens up the canopy, allowing direct light to reach the smaller, lower buds. Give them another week or two, and you’ll be amazed at how much they can swell and ripen. This method ensures that every part of your plant reaches its full potential, increasing your total yield and giving you a more consistent, high-quality product from top to bottom. It's an ideal strategy for getting the most from high-quality autoflower seeds.
Simple Tricks to Monitor Plant Health
A healthy plant is a productive plant, and it all starts from the ground up. A strong, vibrant root system is the engine that drives vigorous growth and big yields. Using fabric pots or air pots can help with root aeration and prevent your plants from becoming root-bound. Pay attention to your watering habits; you want the soil to be moist but not waterlogged. Ultimately, your final harvest is the result of many factors working together: the genetics you start with, the environment you create, and the care you provide. When you shop for seeds, you're choosing the genetic blueprint for your entire grow, so starting with a strong foundation is the first step to a successful harvest.
Ready to Go Pro? Advanced Yield Strategies
Once you’ve mastered the fundamentals, you can start exploring more advanced strategies to really push your yields to their full potential. These aren't complicated secrets, but rather a series of refinements that separate good growers from great ones. It’s all about paying closer attention to your plants and creating the perfect environment for them to thrive. By layering these techniques onto your existing routine, you can consistently produce impressive, high-quality harvests.
Think of this as fine-tuning your process. You’ll learn to anticipate your plants' needs, respond to subtle cues, and make strategic adjustments that lead to bigger, denser buds. It requires a bit more effort, but the payoff is well worth it. From establishing a daily check-in to experimenting with training methods, these pro-level tips will help you get the most out of every single seed.
Your 10-Minute Daily Grow Room Checklist
Consistency is your best friend in the grow room. A quick, daily check-in helps you spot potential issues before they become major problems. This isn't just about watering; it's about observing. Look for changes in leaf color, check for pests, and monitor the soil's moisture. You should also pay close attention to your climate. Young, vegetative plants prefer higher humidity, while flowering plants need drier air to prevent mold from forming on your precious buds. Using fans for air circulation and a simple hygrometer to track humidity will help you maintain the ideal conditions for your indoor cannabis seeds at every stage.
Why You Should Keep a Grow Journal
Keeping a grow journal might sound like homework, but it’s one of the most powerful tools for improving your skills. You don’t need anything fancy—a simple notebook or a spreadsheet works perfectly. Log key details like when you watered, what nutrients you used and at what strength, and any training techniques you applied. Note how your plants respond to these actions. This record-keeping is invaluable. It allows you to look back, identify what worked well, and understand what caused any issues. Over time, this journal becomes a personalized guide that helps you replicate your biggest successes and learn from every mistake, leading to better harvests with each cycle.
Pro Techniques for an Even Bigger Harvest
Ready to take your canopy management to the next level? Training methods like Sea of Green (SOG) and Screen of Green (SCROG) are designed to maximize light exposure to all parts of the plant. SOG involves growing many small plants close together, while SCROG uses a screen to train fewer plants to grow horizontally, creating a flat, even canopy where every bud site gets direct light. For growers who have their environment perfectly dialed in, supplementing with CO₂ can also encourage faster, more vigorous growth. However, this is a truly advanced step that should only be considered once you’ve mastered all other variables.
Planning Your Next Grow for Continuous Success
Advanced techniques can’t fix a poor foundation. The single most important factor for a massive harvest is starting with the right genetics. Choose autoflower seeds that are specifically bred for high yields. Another simple but crucial element is pot size. Give your plants plenty of room to grow by using large containers. Bigger pots allow the root system to expand, which enables the plant to absorb more water and nutrients. A robust root system is the engine that powers a large, healthy plant, directly translating to bigger buds and a more impressive final yield.
Related Articles
- Autoflowers Seeds: Your Complete Grower's Guide
- Autoflower Seeds for Beginners: Grow Fast & Easy
- Auto Strain 101: A Complete Grower's Guide
- Auto Seeds 101: Your Ultimate Grower's Guide
- What Is an Autoflowering Seed? A Beginner's Guide
Frequently Asked Questions
How long does it really take to grow autoflowers from seed to harvest? Most autoflowers are impressively fast, finishing their entire cycle in about 8 to 10 weeks. This can vary a little depending on the specific strain's genetics, but you can generally count on a quick turnaround. This speed is what allows growers to fit multiple harvests into a single season, making them a fantastic and efficient choice.
Can I "top" my autoflower plants to get more buds? It's best to avoid high-stress techniques like topping with autoflowers. Because these plants operate on a very tight schedule, they don't have the time to recover from the stress of being cut. This can actually stunt their growth and lead to a smaller harvest. Instead, stick with gentle, low-stress training (LST) to bend and guide the branches for better light exposure without causing any shock to the plant.
Are autoflower yields really as big as photoperiod plant yields? While photoperiod plants used to hold the title for the biggest yields, modern autoflower genetics have closed that gap significantly. Breeders have developed incredibly productive autoflower strains that can easily compete with their photoperiod cousins. When you start with a high-yield strain and provide great care, you can absolutely achieve a massive, dense harvest in a much shorter time.
Does the size of the pot actually make a big difference for autoflowers? Yes, it makes a huge difference. The size of your pot determines the size of your plant's root system, and a bigger root system supports a bigger plant. Since you should plant your autoflower seed directly into its final container to avoid transplant shock, choosing the right pot from the start is critical. Aim for at least a 4-5 gallon pot to give your plant the foundation it needs for vigorous growth and a heavy yield.
When should I start giving my autoflowers nutrients? You should wait until your plant has developed its first three to four sets of true leaves before introducing any nutrients. Most quality potting soils contain enough food to sustain a seedling for its first couple of weeks. When you do begin feeding, start with a very light dose—about a quarter of the recommended strength—and see how your plant responds. It's always better to start slow and increase as needed.